Western Showmanship for the Beginner

The World of Western Showmanship
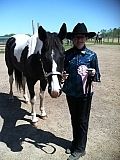
My horse Flash is very excited to show you all about Western Showmanship. In a showmanship class, you are showing off your horse. You are showing the judge that you've spent a lot of time and effort working with your horse and getting him ready. You are showing the world that you have the best horse there is and you are honored to be showing him. You are so proud of your horse and you both stand out from all the others because you have spent lots of time making yourself look great too! You are unforgettable!
Keep that attitude and you will do great! A judge can tell when you've put the time and effort into your horse and yourself. First impressions are important in western showmanship so be ready to go as soon as the judge gives you the go ahead nod. Always remember to smile big!
Most importantly, remember that Showmanship isn't just about doing a pattern. It's about doing a pattern better than anyone else!
Image credit:
Learn the Pattern
Now that you have completed all the preparations on your horse, it's important to watch for the pattern to be posted. Depending on the show you're at, they should make an announcement when they are posted or they may already be set up when you get there. Either way, it's important to learn the pattern as quickly as possible.
Since you took the time to have you and your horse looking great early in the morning, all you have left to do is practice the pattern until your class is called. Have someone hold onto your horse while you walk through the pattern. Sometimes it's easier to do it that way so you aren't distracted by a fidgety horse. You can take the time to make sure that you're on the right side of the cones and you know which direction and how much to pivot. It also helps to be facing the same direction when you practice as you will be in the arena. That way, things won't be all turned around once you get in there!
Once you're confident that you know the pattern inside and out, try it with your horse. Again, make sure that you are on the same side of the cones as the pattern shows. If not, you could end up putting yourself in some pretty tricky situations - facing the wrong direction after a pivot, not having enough room to do a pivot, or running into a wall. Yes, it happens!
And remember - SMILE!!!
Walking Through the Pattern
Walking through the pattern doesn't have to be perfect. It's just a way to make sure that you know all the right directions to go and which side of the cones you should be on.
The Pattern Walkthrough
This might seem like an unnecessary step, which it is and can be skipped if you don't have time, but it is one thing that can help you feel prepared. The more prepared you are, the more relaxed you will be and the more natural your pattern will flow.
Do you walk through the pattern without your horse first?
Starting with a Walk or Trot
You always want to be standing and ready on the side of the horse opposite to where the judge is. In our example, you would be waiting and ready at Cone A on the left side of the horse, looking towards the judge with your toes towards your horse. Once he gives you the nod that you can start, you switch back over to the right side and start the pattern. A lot of beginner patterns start out with walking from Cone A to Cone B like this one but there can be many variations - start at a trot, start by backing and pivoting, etc.
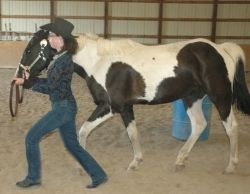
You want to make sure that you've practiced a lot and your horse knows to walk when you do. When you walk your horse, you want him positioned so that you are walking with his throat latch next to you. You don't want to be dragging him or him pulling on you. It should be a smooth transition with minimal effort on your part. Your horse should be able to see the slightest movement in your body and know that it's time to start moving. The only way he'll know this is practice, practice, practice!
In this pattern, you would walk to Cone B and then pick up a trot. The tricky part is knowing where the trot begins. In this example, you would start trotting your horse once his nose is lined up with Cone B. A little tiny jiggle on the chain should be enough to get him or her to wake up and know it's time to trot. Trot to the judge and stop at least an arm's length or a little more in front of the judge. You shouldn't make the judge feel crowded but you don't want to make him walk too far either.
And remember - PRACTICE PRACTICE PRACTICE!!!!
Setting Up For Inspection and Know Your Quarters
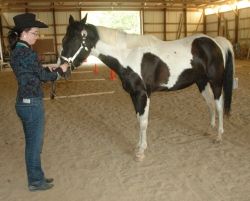
You've trotted up to the judge and stopped. Now what? Well now you get your horse to square up. Squaring up means getting your horses front feet next to each other, back feet together, and all four feet directly under the horse. I know that there's a correct way of teaching your horse to do this, I've read about it before, but I don't know all the technicalities of it and I'm not going to pretend like I do. Starting out in 4-H, we were just taught to pull, push, and jiggle the chain and get the horse to move it's feet and eventually they just get it. Since I've read that there's a correct way of doing it, I can tell you a little bit about what I learned and maybe that combined with the push, pull, and jiggle technique, you'll be able to figure something out.
Here goes. You want to have an anchor foot. It will usually be the back foot that the horse will pivot on. Every time you practice, you should stop and face the horse, toes pointed at the horse, and then push, pull and jiggle until the other 3 feet are all squared up with the anchor foot. Ideally, this should be accomplished within 10 seconds, but you'll get a higher score if it's done within 4 seconds. Practice helps with this. We've been told that every single time you stop your horse, you should turn around and square him up, that way he'll always do it.
Once you've got your horse squared up in front of the judge, you should look at the judge. Most people have a smile on their face when they do that. The judge will then acknowledge you and he will begin to walk around your horse. You want to imagine your horse with 2 lines through him. One from head to tail and the other across his withers. You should never be in the same quarter as the judge. As he moves around your horse, you need to move also. Your horse should be between you and the judge, making sure that you can see the judge at all times.
We're going to start out on your horse's right side, looking at the judge, toes facing your horse. The judge will start moving from your horse's head towards the tail on the left side. As he passes the withers, you will step over in front of your horse, toes still facing your horse, eyes on the judge. By the time he passes the tail, you should have stepped back to the right side, toes facing your horse, eyes on the judge. As he passes the withers, you should be stepping in front of your horse again to the left side. Wait there until he nods that you are dismissed. You will then step back over to the right side and continue on with your pattern.
The PIVOT

As I've said before, I'm not a trainer, I'm a 4-H mom. We do learn a lot just by watching and occasionally we work on some of the things ourselves. I've been working with Flash to get him to pivot. Here's what I was taught. This basically takes lots of practice, like everything else in showmanship. The practice really matters. Your horse should be squared up and you should be facing him. You will turn slightly to the left and put your hand up near your horse's face. NEVER touch your horse though! You should be standing in front of his nose, hand up near his face, and then walk to the left, slightly turning as you go. From this position, you will be able to see his right hind foot. Start out only turning 90 degrees. If he moves his foot, turn around and walk away. If the foot sticks, pat him and tell him what a good horse he is. Keep doing this over and over, he will get it eventually. It will take a little time for him to figure out how to balance on that hind leg so keep doing 90 degree turns until he is really consistently doing it. Don't try to move on to anything bigger too fast. If he's done it right 100 times, make him do it another 100 times before attempting to go 180 degrees.
Which Leg Do You Pivot Off Of?
Some people say the correct way to pivot is off the back left leg and some say the back right leg.
Which leg do you think is the correct one?
Putting the Parts All Together
This is Flash's first year doing western showmanship so there's still a lot of work that needs to be done! He needs lots more practice! Try to pick out all the mistakes in his pattern. There's lots of them so it should be easy!
You Either Love It or You Don't!
It seems to me that showmanship is one of those things where you either love it or you hate it and there's not many people in between. Which one are you?
Do you enjoy doing showmanship?
Showmanship Halters
Showmanship halters are usually made of leather and can be plain or garnished with silver plates. You should shine them all up before a show. Along with the halter, you need to have a show lead with a chain. One thing we learned this year is that in some shows, like the local ones that we do, a show halter is not a requirement and you can show in any halter or lead that you want and the judge can't hold that against you. If you're doing local shows like we are, and you don't have the money for a nice halter and lead, take the time to find out if they are a requirement or if you can use what you have. Don't let money get in the way of showing!
Showmanship isn't about doing a pattern. It's about doing a pattern better than anyone else!
Western Showmanship Outfits
You will need to be wearing the appropriate western show clothes when you are performing your showmanship pattern. Starting from the bottom up, boots are required. Next you should have slacks or nice jeans if you are just starting out. Do not tuck your pants into your boots! You should be wearing a belt. You must be wearing a long sleeved shirt. You can also wear a jacket if you prefer. Some people wear a long sleeve shirt with a vest over it. There is some variations in the shirts but your arms must be covered. Lastly, you should be wearing a hat or a helmet. Hair should be tightly put up without strands sticking out all over the place. You can use bobby pins and hair spray to keep the hair down.
Here's a few more patterns. - Try to evaluate them and figure out what went wrong.
These patterns are being done by young horses with young kids so they are all learning. It's also easy to tell someone how to do showmanship but it's harder when you're doing it yourself. The horse doesn't always do what you want it to and it can get frustrating. Showing as often as you can, even if you don't think you will win, will only help you get better.
Learning How to Do Showmanship
The best way to teach your horse how to do showmanship is with lots of practice and patience. If you're having problems teaching your horse how to do showmanship, you can check out these great DVD's with lots of how-to instructions.


If you have any great little tips that will help a beginner showmanship participant, please share them here. Thanks!!

")


