Photography Manual: A Guide in Taking Bracketed Photographs - How to use Automatic Bracketing or Manually Bracket Photos

Bracketing Images

What is Bracketing?
Bracketing is taking a series of the same image with different exposure values. Typically, when you bracket your shots you take a shot that is properly exposed, along with one that is underexposed and another that is overexposed.
Why Bracket your Photos?
You may ask your self if your taking a properly exposed photograph why bracket. Well that's be cause properly exposed can mean a lot of things. What your camera calculates as a properly exposed image is not always what you want. By properly bracketing your shots you can ensure that you will get the correct exposure.
Bracketing your photos also allows you to Create HDR photographs. HDR photographs take your bracketed photographs and merge them together to create one image with a High Dynamic Range, meaning you have more contrast from the under exposed to the over exposed image.
Setting your Camera to Automatically Bracket
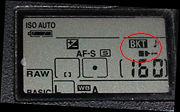
If your camera supports Bracketing you will have a Button or Menu Option to turn on Bracketing. It may be abbreviated as BKT for Bracketing or AEB for Automatic Exposure Bracketing. If you know your camera is capable of automatic bracketing but can't find the setting check that your camera is in a mode that supports bracketing (Manual, Program, Aperture Priority or Shutter Priority).
Once you turn bracketing on you will need to setup how much the camera will under and over expose the shots. This is called the EV Steps. You will typically be able to select a variance of anywhere from 1/3 of a step up to 2 full steps.
Normally your camera will bracket sets of 3 shots. However, some cameras will allow you to create larger brackets with even more shots.
Now that you have setup the bracketing your camera will now adjust the exposure of each shot you take. If you hold down the shutter your camera should take the full bracket set of images for you.
Manually Bracketing
If your camera does not automatically bracket you can manually bracket your photographs. You may also use these manual bracketing techniques over or under expose farther than your cameras automatic bracketing settings will allow.
There are two ways you can manually bracket your photographs.
Manually Bracket using Exposure Compensation
If you have a digital SLR it probably has a setting for Exposure Compensation. You can adjust the exposure compensation to underexpose or overexpose your shot.
To manually bracket using Exposure Compensation, just take one shot with exposure compensation set to zero, then one with negative compensation to create an underexposed shot, and another with positive compensation for an overexposed shot.
Manually Bracket using Manual Mode
If your camera does not have an Exposure Compensation Setting, you can still Manually bracket your photographs using the Manual Mode. Just take a properly exposed and adjust your Shutter Speed up one stop and then down a stop.
It is important to note that when bracketing photographs you typically want to adjust the shutter speed and not that aperture so that you maintain a consistent depth of field in each shot. This is very import if you are bracketing your shots so that you can combine them into an HDR image.


