ArtsAutosBooksBusinessEducationEntertainmentFamilyFashionFoodGamesGenderHealthHolidaysHomeHubPagesPersonal FinancePetsPoliticsReligionSportsTechnologyTravel

A Rose Craft: How to Make a Shoe Box Into Paper Wrapped Gift Box

Updated on October 30, 2013

With a little bit of paper and some imagination, you can turn any shoe box into a gift worthy of admiration. Move over Martha!

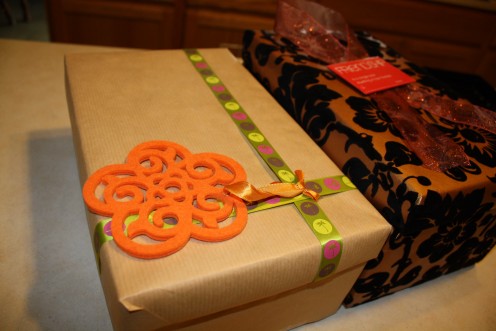
A pretty box for any occasion

Needed:

A shoe box

2 inch clear tape

Craft paper, fabric, or wrapping paper

Measuring tape

Scissors

Step one: gather materials, remove any tags sticking up/out of the box

Step two: measure the lid and box by measuring both length (to include vertical sides) and width (to include vertical sides) add 2 inches to your measurements

Step three: using your measurements (to include the extra 2 inches both width and length) mark out your wrapping paper and cut to size

Keep in mind as you are working on the lid, pull the wrapping tight and crease the edges. If not, you might find it hard to take the lid on and off of your finished box !

Step four: Start with your lid. Set your lid in the middle of the paper. Use a bit of tape to tape the paper to the lid to keep it from sliding around. Then bring the edge of the paper up and mark the corners. Then draw a line from the edge of the paper to the mark and cut the line.

Step five: start at the short sides of the lid, fold in the paper and tape using 2 inch strips of tape.

Step six: After the short sides of the lid are done, fold in the long sides.

Step seven: the box! Set your box in the middle of the paper. Use a bit of tape to tape the paper to the box to keep it from sliding around. Then bring the edge of the paper up and mark the corners. Then draw a line from the edge of the paper to the mark and cut the line.

Step eight: start at the long sides of the box, fold in the paper and tape using 2 inch strips of tape.

Step nine: After the long sides of the lid are done, fold in the short sides

Step ten: Accessorize! Find ribbon and such to complement the colors of your box.

Step by Step directions for wrapping your gift box

Click thumbnail to view full-size
Step one: gather materials, remove any tags sticking up/out of the boxStep two: measure the lid and box by measuring both length (to include vertical sides) and width (to include vertical sides)Step two: add 2 inches to your measurementsStep three: using your measurements (to include the extra 2 inches both width and length) mark out your wrapping paper and cut to sizeStep four: Start with your lid. Set your lid in the middle of the paper. Use a bit of tape to tape the paper to the lid to keep it from sliding around. Then bring the edge of the paper up and mark the corners. Then draw a line from the edge of the paStep five: start at the short sides of the lid, fold in the paper and tape using 2 inch strips of tape. Step five: start at the short sides of the lid, fold in the paper and tape using 2 inch strips of tape. Step five: start at the short sides of the lid, fold in the paper and tape using 2 inch strips of tape. Step six: After the short sides of the lid are done, fold in the long sides like so.The finished lid! Keep in mind as you are working on the lid, pull the wrapping tight and crease the edges. If not, you might find it hard to take the lid on and off of your finished boxThe inside of the finished lidStep seven: the box! Set your box in the middle of the paper. Use a bit of tape to tape the paper to the lid to keep it from sliding around. Then bring the edge of the paper up and mark the corners. Then draw a line from the edge of the paper to the Step seven: the box! Set your box in the middle of the paper. Use a bit of tape to tape the paper to the lid to keep it from sliding around. Then bring the edge of the paper up and mark the corners. Then draw a line from the edge of the paper to the Step eight: start at the long sides of the box, fold in the paper and tape using 2 inch strips of tape. Step eight: start at the long sides of the box, fold in the paper and tape using 2 inch strips of tape. Step nine: After the long sides of the lid are done, fold in the short sides like so.Step nine: After the long sides of the lid are done, fold in the short sides like so.Step ten: Accessorize! Find ribbon and such to complement the colors of your box.Step ten: Accessorize! Find ribbon and such to complement the colors of your box.
Step one: gather materials, remove any tags sticking up/out of the box
Step two: measure the lid and box by measuring both length (to include vertical sides) and width (to include vertical sides)
Step two: add 2 inches to your measurements
Step three: using your measurements (to include the extra 2 inches both width and length) mark out your wrapping paper and cut to size
Step four: Start with your lid. Set your lid in the middle of the paper. Use a bit of tape to tape the paper to the lid to keep it from sliding around. Then bring the edge of the paper up and mark the corners. Then draw a line from the edge of the pa
Step five: start at the short sides of the lid, fold in the paper and tape using 2 inch strips of tape.
Step six: After the short sides of the lid are done, fold in the long sides like so.
The finished lid! Keep in mind as you are working on the lid, pull the wrapping tight and crease the edges. If not, you might find it hard to take the lid on and off of your finished box
The inside of the finished lid
Step seven: the box! Set your box in the middle of the paper. Use a bit of tape to tape the paper to the lid to keep it from sliding around. Then bring the edge of the paper up and mark the corners. Then draw a line from the edge of the paper to the
Step eight: start at the long sides of the box, fold in the paper and tape using 2 inch strips of tape.
Step nine: After the long sides of the lid are done, fold in the short sides like so.
Step ten: Accessorize! Find ribbon and such to complement the colors of your box.
Here is the finished product and another box that I did to give you an idea of things you can do with ribbons and accessories.
working

This website uses cookies

As a user in the EEA, your approval is needed on a few things. To provide a better website experience, hubpages.com uses cookies (and other similar technologies) and may collect, process, and share personal data. Please choose which areas of our service you consent to our doing so.

For more information on managing or withdrawing consents and how we handle data, visit our Privacy Policy at: https://corp.maven.io/privacy-policy

Show Details
Necessary
HubPages Device IDThis is used to identify particular browsers or devices when the access the service, and is used for security reasons.
LoginThis is necessary to sign in to the HubPages Service.
Google RecaptchaThis is used to prevent bots and spam. (Privacy Policy)
AkismetThis is used to detect comment spam. (Privacy Policy)
HubPages Google AnalyticsThis is used to provide data on traffic to our website, all personally identifyable data is anonymized. (Privacy Policy)
HubPages Traffic PixelThis is used to collect data on traffic to articles and other pages on our site. Unless you are signed in to a HubPages account, all personally identifiable information is anonymized.
Amazon Web ServicesThis is a cloud services platform that we used to host our service. (Privacy Policy)
CloudflareThis is a cloud CDN service that we use to efficiently deliver files required for our service to operate such as javascript, cascading style sheets, images, and videos. (Privacy Policy)
Google Hosted LibrariesJavascript software libraries such as jQuery are loaded at endpoints on the googleapis.com or gstatic.com domains, for performance and efficiency reasons. (Privacy Policy)
Features
Google Custom SearchThis is feature allows you to search the site. (Privacy Policy)
Google MapsSome articles have Google Maps embedded in them. (Privacy Policy)
Google ChartsThis is used to display charts and graphs on articles and the author center. (Privacy Policy)
Google AdSense Host APIThis service allows you to sign up for or associate a Google AdSense account with HubPages, so that you can earn money from ads on your articles. No data is shared unless you engage with this feature. (Privacy Policy)
Google YouTubeSome articles have YouTube videos embedded in them. (Privacy Policy)
VimeoSome articles have Vimeo videos embedded in them. (Privacy Policy)
PaypalThis is used for a registered author who enrolls in the HubPages Earnings program and requests to be paid via PayPal. No data is shared with Paypal unless you engage with this feature. (Privacy Policy)
Facebook LoginYou can use this to streamline signing up for, or signing in to your Hubpages account. No data is shared with Facebook unless you engage with this feature. (Privacy Policy)
MavenThis supports the Maven widget and search functionality. (Privacy Policy)
Marketing
Google AdSenseThis is an ad network. (Privacy Policy)
Google DoubleClickGoogle provides ad serving technology and runs an ad network. (Privacy Policy)
Index ExchangeThis is an ad network. (Privacy Policy)
SovrnThis is an ad network. (Privacy Policy)
Facebook AdsThis is an ad network. (Privacy Policy)
Amazon Unified Ad MarketplaceThis is an ad network. (Privacy Policy)
AppNexusThis is an ad network. (Privacy Policy)
OpenxThis is an ad network. (Privacy Policy)
Rubicon ProjectThis is an ad network. (Privacy Policy)
TripleLiftThis is an ad network. (Privacy Policy)
Say MediaWe partner with Say Media to deliver ad campaigns on our sites. (Privacy Policy)
Remarketing PixelsWe may use remarketing pixels from advertising networks such as Google AdWords, Bing Ads, and Facebook in order to advertise the HubPages Service to people that have visited our sites.
Conversion Tracking PixelsWe may use conversion tracking pixels from advertising networks such as Google AdWords, Bing Ads, and Facebook in order to identify when an advertisement has successfully resulted in the desired action, such as signing up for the HubPages Service or publishing an article on the HubPages Service.
Statistics
Author Google AnalyticsThis is used to provide traffic data and reports to the authors of articles on the HubPages Service. (Privacy Policy)
ComscoreComScore is a media measurement and analytics company providing marketing data and analytics to enterprises, media and advertising agencies, and publishers. Non-consent will result in ComScore only processing obfuscated personal data. (Privacy Policy)
Amazon Tracking PixelSome articles display amazon products as part of the Amazon Affiliate program, this pixel provides traffic statistics for those products (Privacy Policy)
ClickscoThis is a data management platform studying reader behavior (Privacy Policy)