Create Delicious Candy Text with Gradients and Textures in Photoshop

From this tutorial you will not only learn how to create super cool and yummy looking candy text effect, but also how to prepare dark textured background which could be used for your graphic design works.
Why I decided to create this Text effect and tutorial? I myself have seen many candy text tuts created by using different techniques. What I don't like about them is, that the candy letters look a bit flat and even. I wanted to make candy text with vivid texture and relief, and more sugary look. That's why I came up with the idea of this Candy Text Effect. Hope you will like the final result.
The Candy Text Effect itself is created with three Text layers (Cooper Std default Font) and lots of Blending Options applied.
As for the Background, the grunge textured effect is achieved with default filters and Soft Round Brush.
You can create this Text Effect in any Adobe Photoshop version.
Please click on any of the screenshots to open it in high resolution and to get a better visibility.
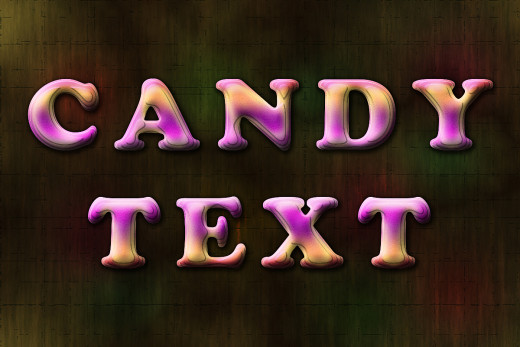
This is how your final result should look:

![Adobe Photoshop Elements 2018 [Old Version]](https://m.media-amazon.com/images/I/51AQ4wl7eOL._SL160_.jpg)
STEP 1
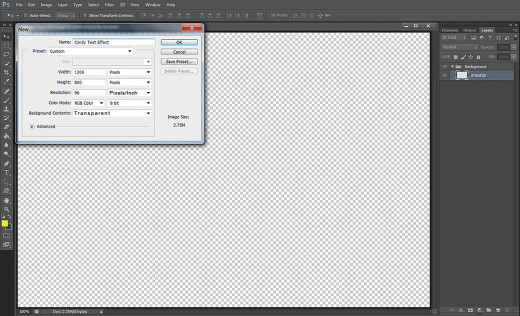
Start your work with opening your Adobe Photoshop and choosing File, New. In New dialog box insert Candy Text Effect for Name then set Width to 1200px and Height to 800px.
I don't intend to print this Text, so my Resolution is set to 96 Pixels/Inch and RGB Color is selected for Color Mode.
Those of you who would prefer to print the final result should insert 300 Pixels/Inch for Resolution and set the Color Mode to CMYK.
As you can see, I have chosen Transparent for Background Contents as it automatically will create an editable Layer 1 in my Layers panel.
Double click on Layer 1 name and insert #7b5f38 to rename it. This is the color we are going to fill the first Background layer with. While #7b5f38 layer is selected, press Ctrl+G (Layer, Group Layers) to place it in a Group and rename this new Group 1 to Background. Later we are going to add many layers to this Group.
Create Dark Textured Background with Filters and Soft Round Brush
In Steps 2-16 you will learn how to create awesome dark Background which you could use not only for the purpose of this tut but also for your own projects.
In the process of work we are going to apply the following filters: Fibers, Craquelure, Clouds and Difference Clouds. After the filters have been applied, you should change the Blend Mode and Opacity of their layers to add unique Texture to our Background. We'll be also using Soft Round Brush of different colors to add interesting color shades.
STEP 2
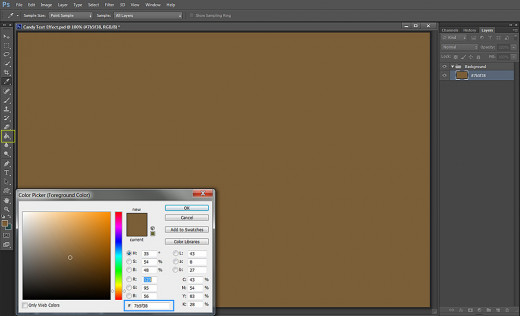
Navigate to the Tools Bar and click on the Foreground color swatch to change it. When Color Picker box appears on your screen, insert #7b5f38 for color and press OK button. Grab Paint Bucket Tool and drag once on your canvas to fill #7b5f38 layer with the chosen color. You can colorize the layer also by going to Edit, Fill, Foreground Color.
STEP 3
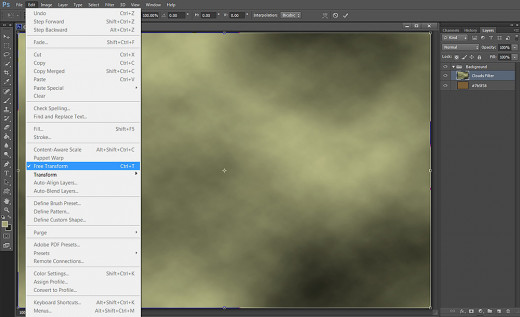
Now set the Foreground color to #b1b380 and Background color to#3e3f2d. Create a New layer on top of Background Group and call it Clouds Filter.
Navigate again to the Tools bar and grab Rectangular Marquee Tool. Draw a small selection as you see on the screenshot below and apply Filter, Render, Clouds to fill the selection. Press Ctrl+D (Select, Deselect) when you are ready.

STEP 4
With the Clouds Filter layer highlighted, navigate to the Menu bar and select Edit, Free Transform. Drag the upper and right hand side nodes so that the clouds to cover your canvas. Press Enter to apply the Transformation.
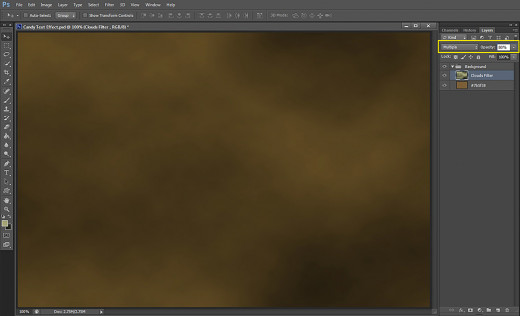
STEP 5
Change Blend Mode of Clouds Filter layer to Multiply and reduce its Opacity to 80%.
Hold on, we have a lot more work to do until we finish our cool dark Background.
STEP 6
Create a New Layer on top of Background Group and name it Fibers Filter.
Set Foreground color to #dc9e78 and Background color to #000000 (black).
Firstly fill this new Fiber Filters layer with the chosen Foreground color.
Then go to Filter, Render, Fibers, insert 16 for Variance and 4 for Strength. Press OK button to apply the Fibers Filter.
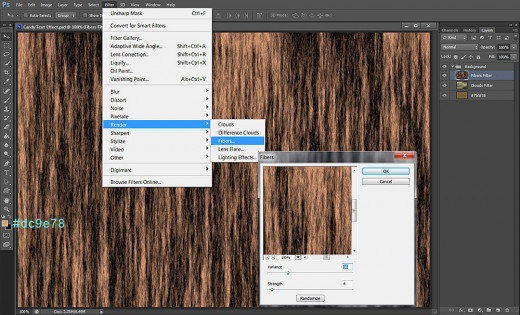
STEP 7
Change the Blend Mode of Fibers Filter layer to Soft Light and reduce its Opacity to 30%.
STEP 8
Create a New Layer on top of Layers panel. Leave its name to Layer 1 for now. We are going to rename it later.
Set Foreground color to awesome pastel shade- #dc9e79 and colorize with it your Layer 1. Then go to Filter, Filter Gallery in order to add a nice textured filter in the next step.

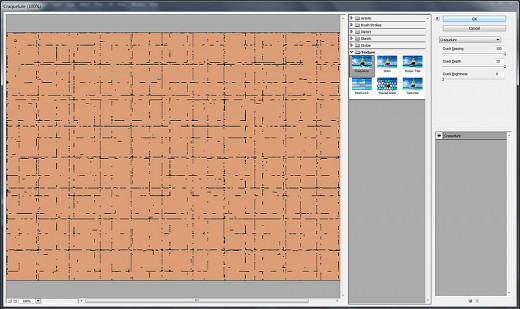
STEP 9
When Filter Gallery window appears on your screen, select Texture group of filters and click on the Craquelure swatch. Insert 100 for Crack Spacing, 10 for Crack Depth and 0 for Crack Brightness. Press OK button to apply the Filter.
STEP 10
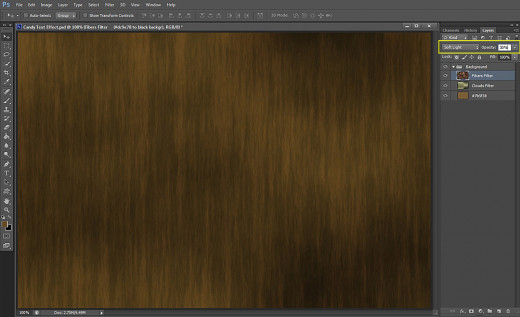
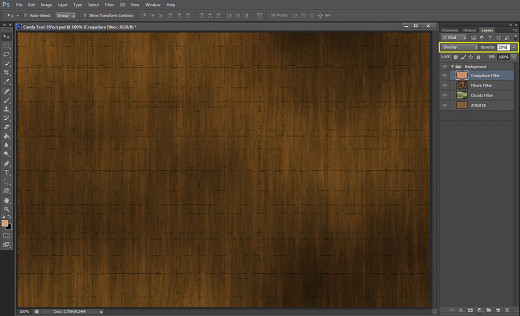
Now rename Layer 1 to Craquelure Filter then change its Blend Mode to Overlay and lower Opacity to 25%.
STEP 11
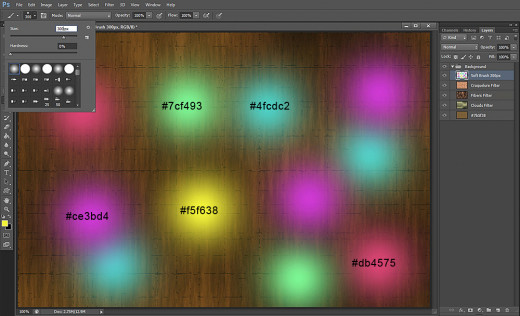
Create a New Layer on top of Background Group and call it Soft Brush 300px after the Brush we are going to use.
Grab Brush Tool from the Tools bar and from the Brush Preset Picker select Soft Round Brush then change its Size to 300px. Make a few dabs on your canvas using these colors: #f5f638, #7cf493, #4fcdc2, #ce3bd4, #db4575.
STEP 12
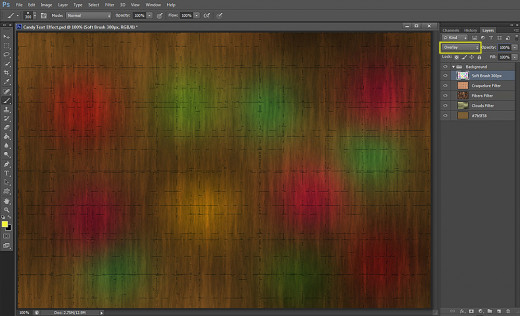
Change Blend Mode of the Soft Brush layer to Overlay and you'll get this result:
STEP 13
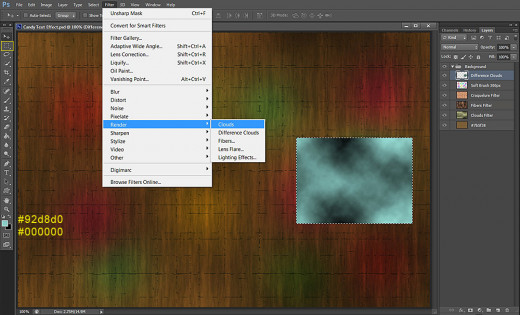
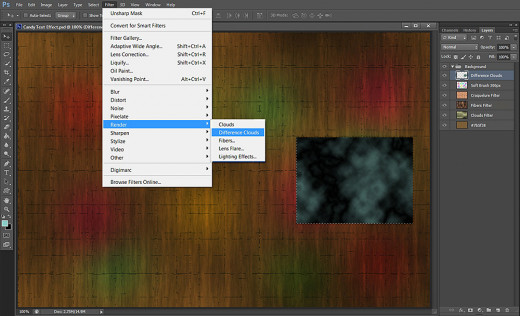
Create a New Layer on top of Background Group and call it Difference Clouds.
Set Foreground color to sweet blue #92d8d0 and Background to #000000 (black).
Use Rectangular Marquee Tool to draw a small rectangular selection and go to Filter, Render, Clouds.
STEP 14
Now go again to Filter, Render but this time check Difference Clouds. Press Ctrl+F a few times to repeat the Filter. When you are ready press Ctrl+D to get rid of the selection.
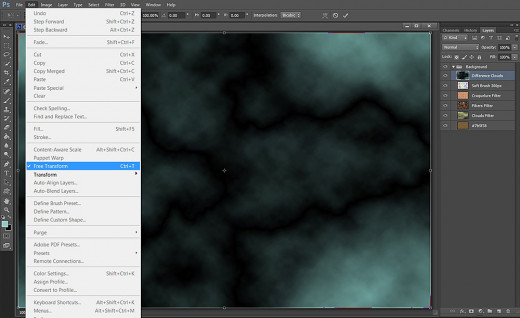
STEP 15
With Difference Clouds layer highlighted, go to Edit, Free Transform and drag the nodes so that the clouds rectangle to cover your canvas. Press Enter to tell your Photoshop to accept the Transformation.
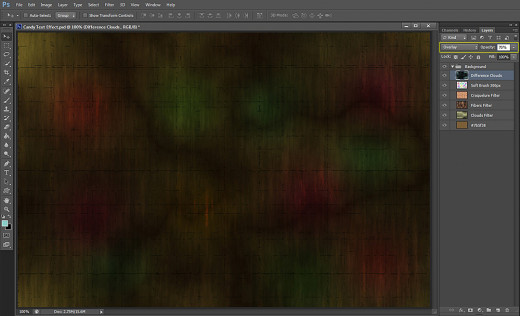
STEP 16
Change the Blend Mode of Difference Clouds layer to Overlay and lower its Opacity to 70%.
Take a deep breath. We already created a cool Background which could be used not only for our Candy Text but also for many other text effects and graphic design works.
Create Sweet and Yummy Text Effect with Layer Styles and Pink with Flecks Texture
In the coming ten steps you will have firstly to type the Text using the default Cooper Std Font. After that you have to duplicate twice the original Text layer and then apply the necessary Blending Options on each duplicate to make your Text look sweet and colorful. The unique relief is achieved with the help of the default Pink with Flecks Texture which will be used in Step 23.
STEP 17
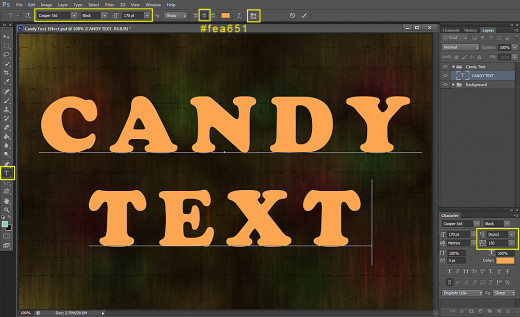
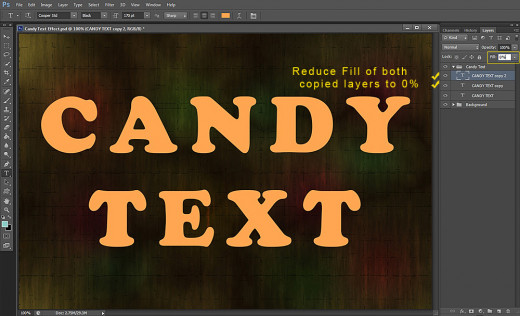
In this step we are going to type our Text. Grab Horizontal Type tool from the Tools bar or simply press T key to activate the instrument. From the Font Family drop down menu choose Cooper Std default Font and Set its Font Size to 170pt. Select also Center Text for positioning of your Text. Set #fea651 for Text Color then type Candy Text in Capital Letters as you see on the screenshot below.
When your text is ready, select it then click on Toggle the Character and Paragraph Panels icon in your Options bar and Set the Tracking for the Selected Characters to 150. Leave the leading to Auto by default.
STEP 18
With the Candy Text layer highlighted, press Ctrl+J twice (Layer, Duplicate Layer) in order to make two copies of the Text.
Reduce Fill Opacity of both Candy Text copy and Candy Text copy 2 layer to 0%.
STEP 19
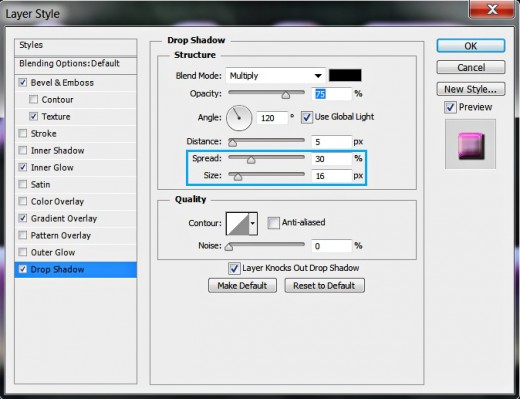
Now we are going to apply Blending Options firstly at the original Candy Text layer. Select it, right click on it and select Blending Options (Layer, Layer Style, Blending Options). Check Drop Shadow Layer Style and change its settings as follows:
Blend Mode: Multiply
Color of Shadow: #000000 (black by default)
Opacity: 75%
Angle: 120 degrees
Use Global Light: ticked
Distance: 5px
Spread: 30%
Size: 16px
Contour: Linear
Anti-aliased: unchecked
Noise: 0%.
Layer Knocks Out Drop Shadow: checked.
Keep Layer Style dialog box opened as we are going to add four more Blending Options in the next step.
STEP 20
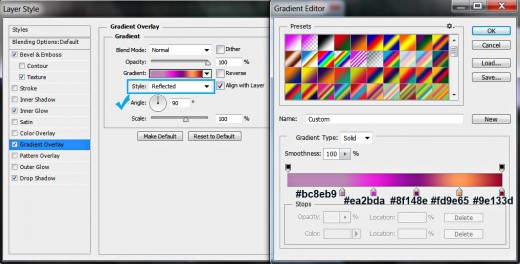
In this step we are going to fill our Candy Text with sweet soft colors. Check Gradient Overlay Layer Style and insert the following settings:
Blend Mode: Normal
Dither: unchecked
Opacity: 100%
Click to Edit the Gradient like this:
First Color Stop (Location 25%): #bc8eb9
Second Color Stop (Location 40%): #ea2bda
Third Color Stop (Location 60%): #8f148e
Fourth Color Stop (Location 80%): #fd9e65
Fifth Color Stop (Location 100%): #9e133d
Reverse: unchecked
Style: Reflected type of gradient
Align with Layer: checked
Angle: 90 degrees
Scale: 100%.
STEP 21
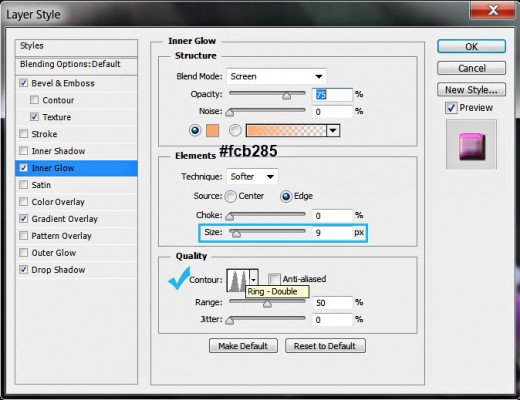
Now tick Inner Glow Layer Style and change its settings like this:
Blend Mode: Screen
Opacity: 75%
Noise: 0%
Color of Glow: #fcb285
Technique: Softer
Source: Edge
Choke: 0%
Size: 9px
Contour: Ring-Double
Anti-aliased: unchecked
Range: 50%.
Jitter: 0%.
STEP 22
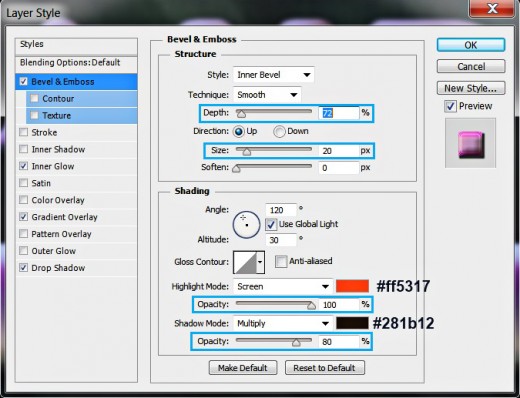
We are going to add 3D Effect now by means of Bevel and Emboss. Insert these settings:
Style: Inner Bevel
Technique: Smooth
Depth: 72%
Direction: Up
Size: 20px
Soften: 0px
Angle: 120 degrees
Use Global Light: checked
Altitude: 30 degrees
Gloss Contour: Linear
Anti-aliased: not checked
Highlight Mode: Screen
Color for Highlight: #ff5317
Opacity: 100%
Shadow Mode: Multiply
Color of Shadow: #281b12
Opacity: 80%.
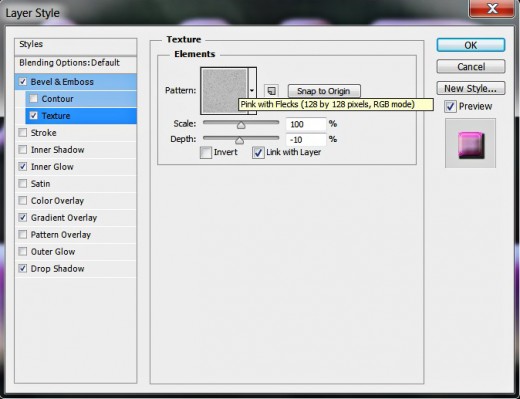
STEP 23
Let us give our text a slight relief. Check Texture Layer Style which is below Bevel and Emboss and apply these settings:
Pattern: Pink with Flecks (128 by 128 pixels, RGB mode)
Scale: 100%
Depth: -10%
Invert: not checked
Link with Layer: checked.
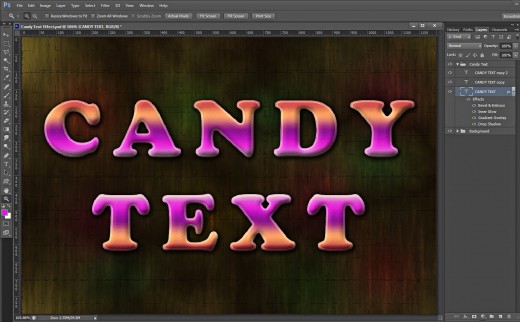
Press OK botton to apply the Blending Options and to close Layer Style dialog box. We are ready with the work on Candy Text layer.
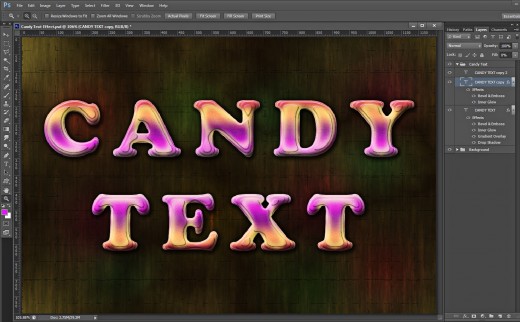
You should get this outcome after applying Shadow, Gradient, Glow and 3D Effect on the original Text layer:
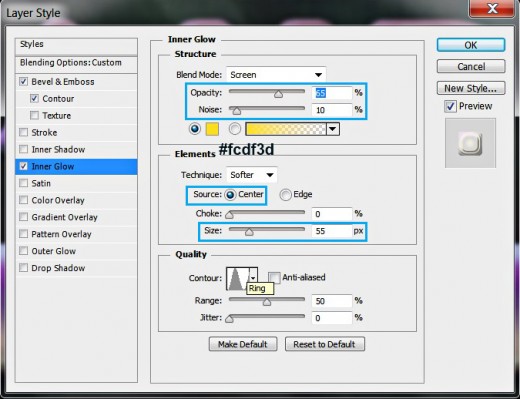
STEP 24
Now select Candy Text copy layer. Activate Layer Style dialog box again and firstly check Inner Glow. Change its settings as follows:
Blend Mode: Screen
Opacity: 65%
Noise: 10%
Color of Glow: #fcdf3d
Technique: Softer
Source: Center
Choke: 0%
Size: 55px
Contour: Ring
Anti-aliased: unchecked
Range: 50%.
Jitter: 0%.
Keep Layer Style dialog box opened as we have to add Bevel and Emboss and Contour.
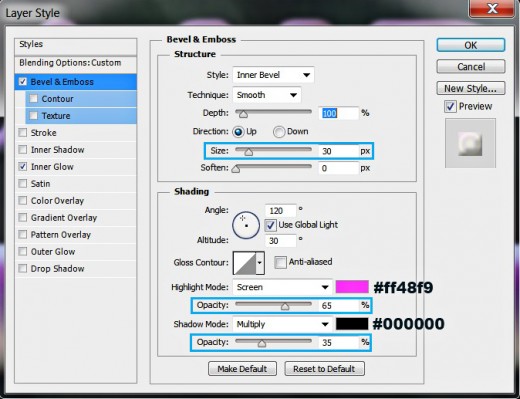
STEP 25
Now tick Bevel and Emboss Layer Style to add a slight 3D effect. Apply these settings:
Style: Inner Bevel
Technique: Smooth
Depth: 100%
Direction: Up
Size: 30px
Soften: 0px
Angle: 120 degrees
Use Global Light: checked
Altitude: 30 degrees
Gloss Contour: Linear
Anti-aliased: not checked
Highlight Mode: Screen
Color for Highlight: #ff48f9
Opacity: 65%
Shadow Mode: Multiply
Color of Shadow: #000000
Opacity: 35%.
STEP 26
Check Contour Layer Style in order to make the 3D effect more prominent and apply this type of contour:
Contour: Steps
Anti-aliased: not checked
Range: 77%.
Press OK button to close Layer Style box.
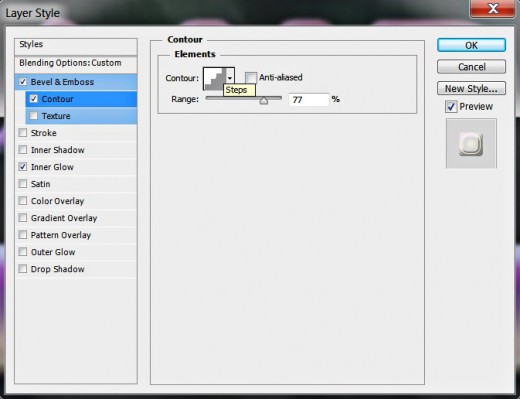
This should be the result on your canvas after applying Inner Glow, Bevel and Emboss and Contour to the first duplicated Text layer:
STEP 27
Now select Candy Text copy 2 layer (the one on top of Text Group) and apply on it Bevel and Emboss Layer Style with these settings:
Style: Inner Bevel
Technique: Smooth
Depth: 100%
Direction: Up
Size: 35px
Soften: 0px
Angle: 120 degrees
Use Global Light: checked
Altitude: 30 degrees
Gloss Contour: Linear
Anti-aliased: not checked
Highlight Mode: Hard Light
Color for Highlight: #ffbafd
Opacity: 100%
Shadow Mode: Multiply
Color of Shadow: #000000
Opacity: 45%.
Press OK button to apply the effect and to close Layer Style dialog box.

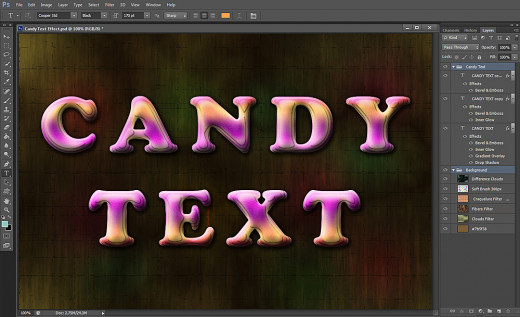
STEP 28
If you have followed all my steps in detail you should have these two groups of layers in your Layers pane:
-
Background Group which contains six layers: #7b5f38, Clouds Filter, Fibers Filter, Craquelure Filter, Soft Brush 300px and Difference Clouds layer;
-
Candy Text Group which consists of three layers: Candy Text, Candy Text copy and Candy Text copy 2 layer.
STEP 29
This is the final image saved in .jpg format. Hope it was not difficult to accomplish all the steps of this tutorial. I did my best to explain everything in detail.
Thank you very much for reading. God bless! :)