Create Glossy 3D Text with Strokes and Layer Styles

In this Photoshop tutorial I am going to show you how to create glamorous 3D Text with default Adobe Gothic Std Font, multiple strokes, Black Weave Texture which is exclusive for the program and other Blending Options.
The 3D effect is achieved by means of Bevel and Emboss so you can create the effect with any version of Adobe Photoshop. I haven't used special 3D instruments.
The newest Photoshop versions offer creating of multiple strokes on only one layer but it won’t help you in this tutorial as we have to rasterize any separate Stroke and apply new Blending Options on it.
The tutorial is very detailed so it is suitable for Beginners.
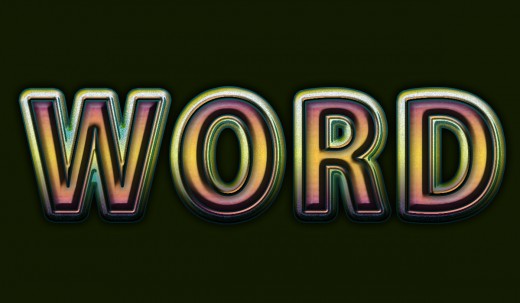
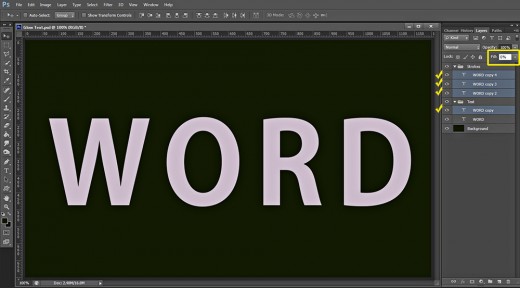
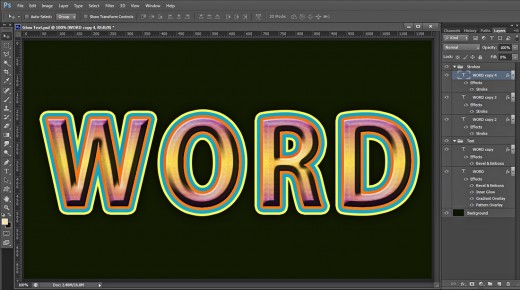
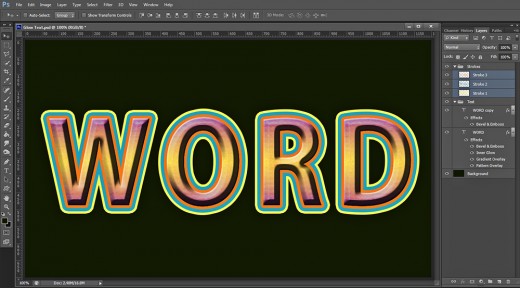
On the following screenshot you can see the final result:


Create a New Photoshop Document and Colorize the Background Layer
While implementing the first two steps, you are going to create a new .psd file which Resolution and Color Mode depend on whether you intend to print the final result.
After you have prepared your document, you have to fill your first transparent layer with dark green color, using Paint Bucket tool.
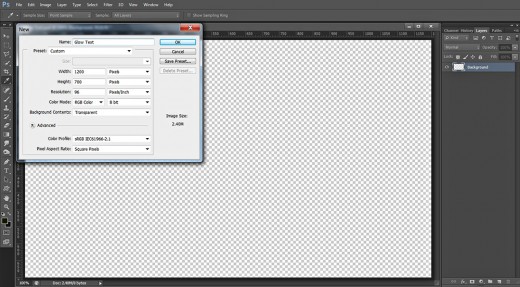
STEP 1
Start your work with creating a new .psd file (File, New). Name your Photoshop document Glow Text or use another title you prefer. Set the Width of the document to 1200px and Height to 700px. Insert 72 or 96 Pixels/Inch for Resolution. Choose also RGB for Color Mode and Transparent for Background Contents. If you need to print this Text Effect, set its Resolution to 300 Pixels/Inch and select CMYK for Color Mode. Press OK button and you'll see transparent Layer 1 in your Layers panel. Rename this Layer 1 to Background (double click on the layer name and write the new name in the white space).
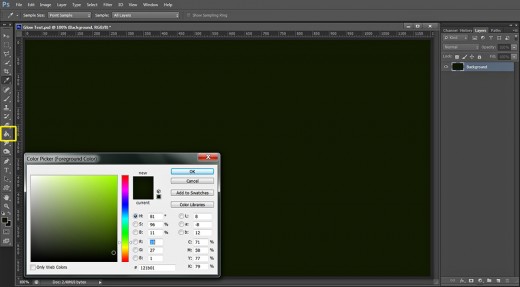
STEP 2
Go to the Tools bar and change the Foreground Color to #121b01 then grab Paint Bucket Tool from the Tools bar (or go to Edit, Fill, Foreground Color) to colorize your Background layer.
Type the Text Using Thick Default Font and Create Four Duplicates
In the coming two steps your task is to type the Text with Adobe Gothic Font which is default for Photoshop. Certainly, you can use another Font but you will probably need to adjust the settings of the Blending Options you should apply as their look depends on the size and shape of the object.
After the Text is ready, you have to create four duplicates of its layer. You should apply four layer styles to the original Text layer then you have to add 3D Effect to the first duplicate and three Stroke layer styles of different size to the rest of the duplicates which you have to place in a new group called Stroke.
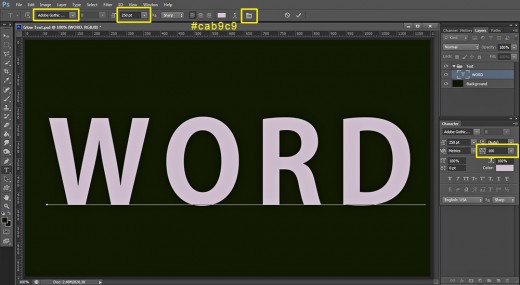
STEP 3
In this step we'll start to create our Text Effect. Firstly go to the Tools bar, select Horizontal Type Tool (or simply press T), choose the default Adobe Gothic Std Font from Font Family drop down menu and set the Font Size to 250pt. Choose also #cab9c9 for Text Color then type Word in Capital Letters.
As we are going to apply thick strokes to our Text, we need a bigger Tracking so after you have typed the Text, highlight it and click on Toggle the Character and Paragraph Panels icon in the Options bar then Set the Tracking for the Selected characters to 100.
With the Word Text layer selected, press Ctrl+G (Layer, Group Layers) to place it in a Group and name the newly created Group Text.
STEP 4
We need to make a few copies of our Text layer in this step, so while Word Text layer is selected, press Ctrl+J four times (Layer, Duplicate Layer). Reduce Fill Opacity of Word copy, Word copy 2, Word copy 3 and Word copy 4 layer to 0%.
Apply Pattern, Colors, Glow and 3D Effect on the Original Text and its First Duplicate
In Steps 5-9 your work will be only in Text group. Firstly you have to select the original Text layer, then add Black Weave Texture (exclusive for Photoshop), yellow to violet Gradient, orange Glow plus default Bevel and Emboss.
After the work on the original Text is ready, you should select the copied Text layer above it and apply navy blue to black Bevel and Emboss.
STEP 5
Now we are going to place the Text layers in separate groups. Firstly select (holding Shift key) both Word and Word copy layer and press Ctrl+G (Layer, Group Layers) to put them in one Group. Call this Group Text. Secondly, highlight Word copy 2, Word copy 3 and Word copy 4 layer, press Ctrl+G to group them and name this new Group Strokes.
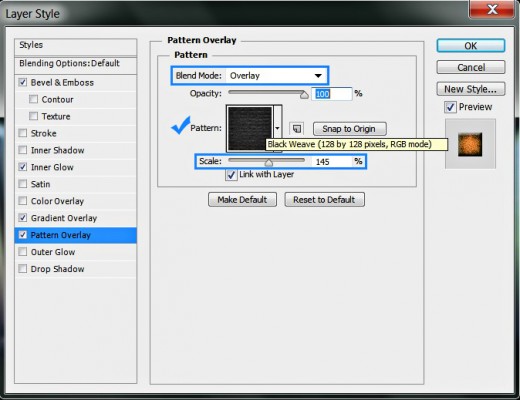
Right click on the original Word Text layer and select Blending Options (Layer, Layer Style, Blending Options). Tick Pattern Overlay in the opened Layer Style dialog box and change its settings like this:
Blend Mode: Overlay
Opacity: 100%
Pattern: Black Weave (128 by 128 pixels, RGB mode)
Scale: 145%
Link with Layer: checked.
Still don't close Layer Style box as three more Blending Options are to be applied on Word Text layer.
STEP 6
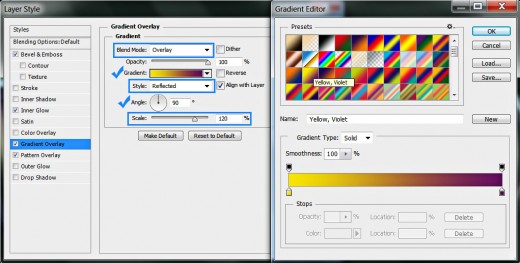
Now tick Gradient Overlay Layer Style and insert the following settings:
Blend Mode: Overlay
Dither: unchecked
Opacity: 100%
Select Yellow, Violet Gradient
from the Gradient picker.
Reverse: unchecked
Style: Reflected type of gradient
Align with Layer: checked
Angle: 90 degrees
Scale: 120%.
STEP 7
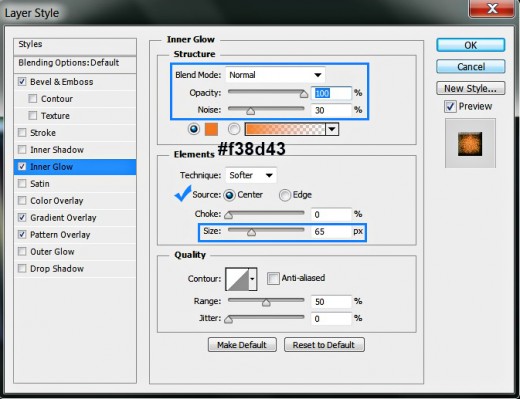
The third Layer Style to be added is Inner Glow. Insert these settings:
Blend Mode: Normal
Opacity: 100%
Noise: 30%
Color of Glow: #f38d43
Technique: Softer
Source: Center
Choke: 0%
Size: 65px
Contour: Linear
Anti-aliased: unchecked
Range: 50%.
Jitter: 0%.
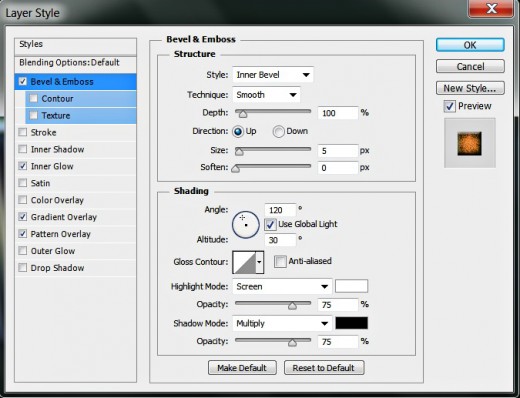
STEP 8
Now only check Bevel and Emboss Layer Style without changing anything. Leave all settings as by default.
Press OK button to close Layer Style dialog box.
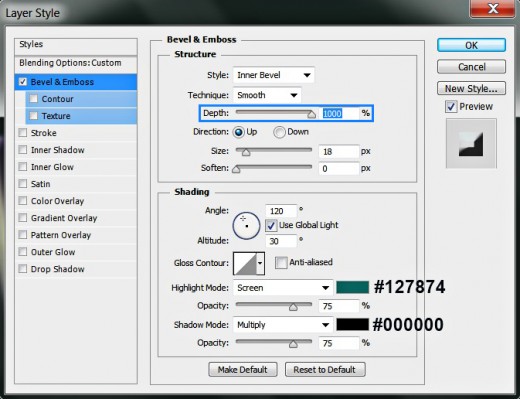
STEP 9
This time select Word copy layer and apply this Bevel and Emboss:
Style: Inner Bevel
Technique: Smooth
Depth: 1000%
Direction: Up
Size: 18px
Soften: 0px
Angle: 120 degrees
Use Global Light: checked
Altitude: 30 degrees
Gloss Contour: Linear
Anti-aliased: not checked
Highlight Mode: Screen
Color for Highlight: #127874
Opacity: 75%
Shadow Mode: Multiply
Color of Shadow: #000000
Opacity: 100%.
Press OK button to apply the 3D effect and to close Layer Style box.
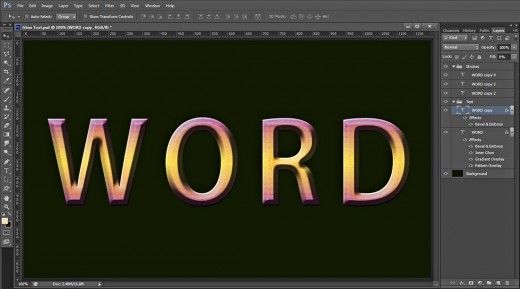
This should be your result after applying Blending Options on both layers in Text group:
Apply Three different Stroke Blending Options to the Text Layers in Strokes Group and Rasterize them
In Steps 10-15 you have to add Stroke of different size and color to the three duplicated Text layers in Strokes Group. After that you should Rasterize them in order to be able to add new Blending Options on the respective Stroke. You should also reduce the Fill Opacity of the top two Text duplicates to 0% as you don’t need their colors. You are going to colorize them anew with the help of the layer styles.
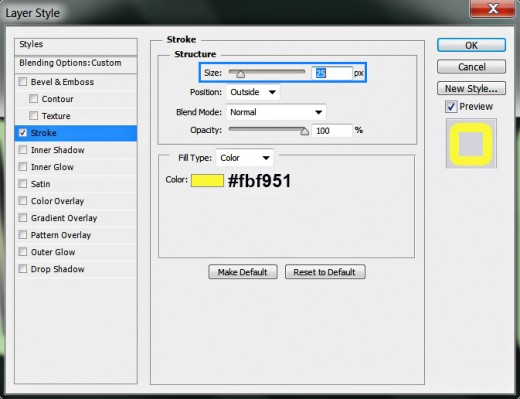
STEP 10
In this step we'll start adding the strokes.
Firstly select Word copy 2 layer and apply this Stroke Layer Style:
Size: 25px
Position: Outside
Blend Mode: Normal
Opacity: 100%
Fill Type: Color
Color of Stroke: #fbf951.
Press OK button when you are ready.
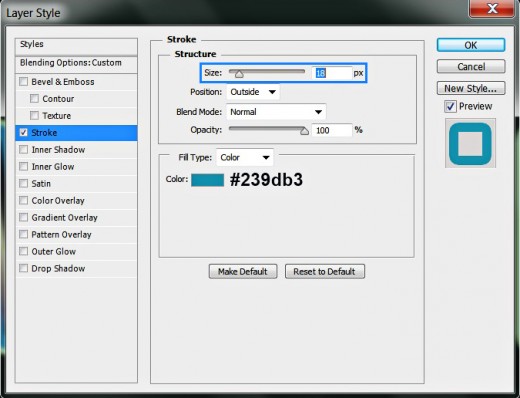
STEP 11
Now select Word copy 3 layer and add this Stroke:
Size: 18px
Position: Outside
Blend Mode: Normal
Opacity: 100%
Fill Type: Color
Color of Stroke: #239db3.
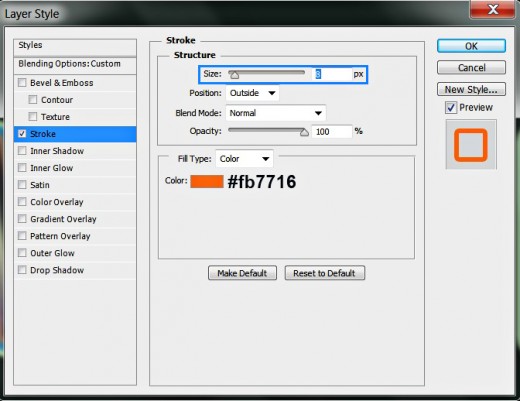
STEP 12
This is the Stroke Layer Style you should add to Word copy 4 layer:
Size: 8px
Position: Outside
Blend Mode: Normal
Opacity: 100%
Fill Type: Color
Color of Stroke: #fb7716.
This should be your outcome after applying the three different strokes on the Text layers in Stroke group.
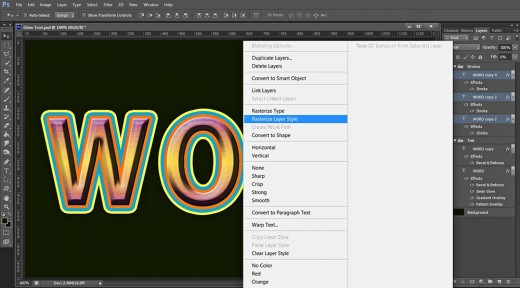
STEP 13
Now holding down Shift key click on Word copy 2, Word copy 3 and Word copy 4 layer to highlight them. Right click and select Resterize Layer Style.
STEP 14
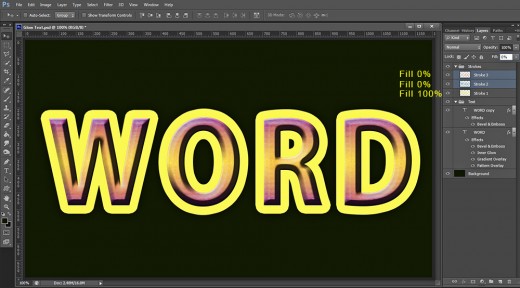
After you have rasterized the layer styles, change the names of the layers. Rename Word copy 2 layer to Stroke 1, Word copy 3 layer to Stroke 2 and Word copy 4 layer to Stroke 3. See the screenshot below for a reference:
STEP 15
Reduce Fill Opacity of Stroke 2 and Stroke 3 layer to 0%. You see that both strokes disappeared but no bother. You'll see them again after applying Blending Options.
Add Blending Options to the Three Layers in Stroke Group
From Step 16 to the end of the tutorial your work in Strokes group will continue with applying layer styles firstly on Stroke 1 layer. You have to add Shadow, Black to White Gradient, navy blue shaded Glow and Stroke plus 3D Effect with changed Contour.
Then you should select Stroke 2 layer and apply Bevel and Emboss and Contour Blending Options on it.
To Stroke 3 layer you have to add Bevel and Emboss only.
STEP 16
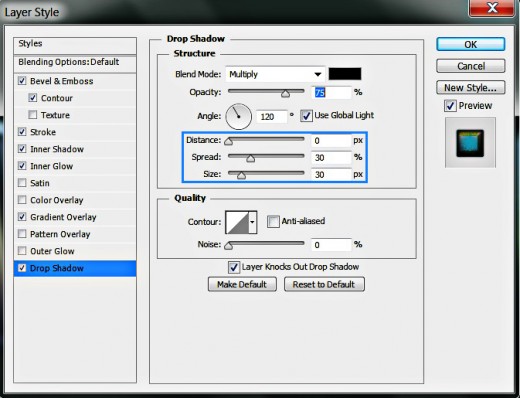
In this step select Stroke 1 layer, double click on its layer's thumbnail to open Layer Style box and apply this Drop Shadow Layer Style:
Blend Mode: Multiply
Color of Shadow: #000000 (black)
Opacity: 75%
Angle: 120 degrees
Use Global Light: checked
Distance: 0px
Spread: 30%
Size: 30px
Contour: Linear
Anti-aliased: unchecked
Noise: 0%
Layer Knocks Out Drop Shadow: checked.
Keep Layer Style box active as we have to add another six Blending Options in the coming steps.
STEP 17
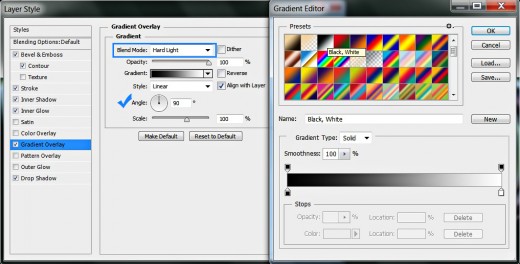
Now firstly press D key to set Foreground/Background color to Black/White. Then check Gradient Overlay Layer Styles and change the settings as follows:
Blend Mode: Hard Light
Dither: unchecked
Opacity: 100%
Select Black to White (default) Gradient
from the Gradient picker.
Reverse: unchecked
Style: Linear type of gradient
Align with Layer: checked
Angle: 90 degrees
Scale: 100%.
STEP 18
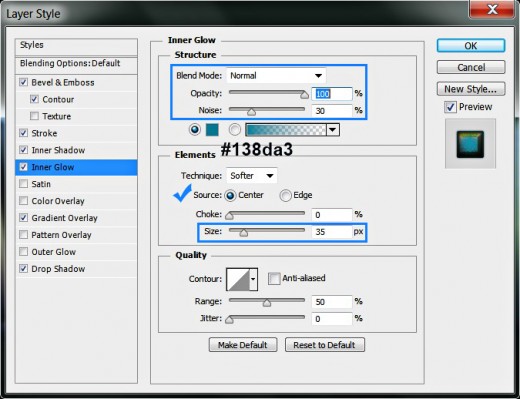
Check Inner Glow Layer Style and change its settings as follows:
Blend Mode: Normal
Opacity: 100%
Noise: 30%
Color of Glow: #138da3
Technique: Softer
Source: Center
Choke: 0%
Size: 35px
Contour: Linear
Anti-aliased: unchecked
Range: 50%.
Jitter: 0%.
STEP 19
It's time to tick Inner Shadow Layer Style. Change its settings like this:
Blend Mode: Multiply
Color of Shadow: #1a1602
Opacity: 85%
Angle: 120 degrees
Use Global Light: checked
Distance: 0px
Choke: 20%
Size: 10px
Contour: Linear
Anti-aliased: unchecked
Noise: 0%

STEP 20
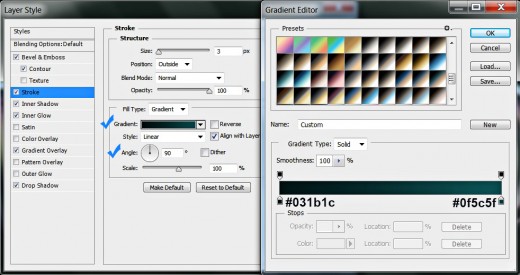
Now let us apply Gradient type of Stroke:
Size: 3px
Position: Outside
Blend Mode: Normal
Opacity: 100%
Fill Type: Gradient
First Color Stop (Location 0%): #031b1c
Second Color Stop (Location 100%): #0f5c5f
Reverse: unchecked
Style: Linear type of gradient
Align with Layer: checked
Angle: 90 degrees
Dither: not checked
Scale: 100%.
STEP 21
In this step you should tick Bevel and Emboss to add 3D effects and insert these settings:
Style: Inner Bevel
Technique: Smooth
Depth: 1000%
Direction: Up
Size: 8px
Soften: 0px
Angle: 120 degrees
Use Global Light: checked
Altitude: 30 degrees
Gloss Contour: Linear
Anti-aliased: not checked
Highlight Mode: Multiply
Color for Highlight: #d8d112
Opacity: 100%
Shadow Mode: Multiply
Color of Shadow: #504a08
Opacity: 60%.

STEP 22
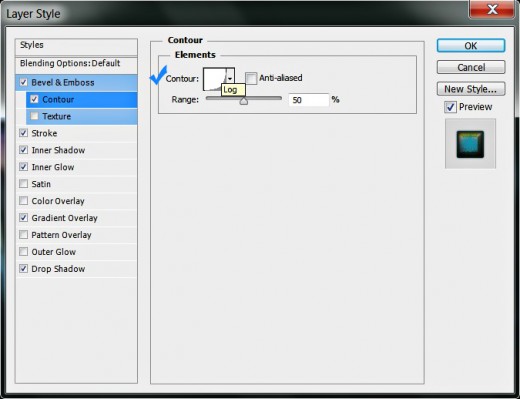
The last Layer Style to be applied on Stroke 1 layer is Contour. Change its settings like this:
Contour: Log
Anti-aliased: not checked
Range: 50%.
Press OK button to add the Blending Options and to close Layer Style dialog box.
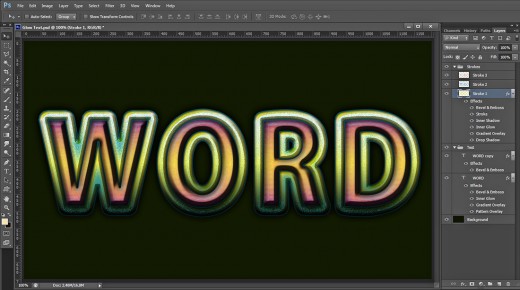
You should get this result on your canvas after the hard work done on Stroke 1 layer:
STEP 23
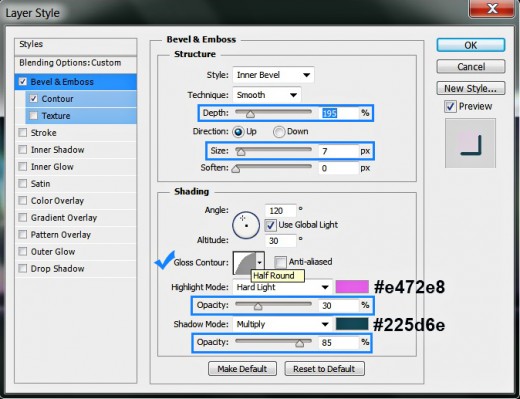
Select Stroke 2 layer and apply Bevel and Emboss Layer Style:
Style: Inner Bevel
Technique: Smooth
Depth: 195%
Direction: Up
Size: 7px
Soften: 0px
Angle: 120 degrees
Use Global Light: checked
Altitude: 30 degrees
Gloss Contour: Half Round
Anti-aliased: not checked
Highlight Mode: Hard Light
Color for Highlight: #e472e8
Opacity: 30%
Shadow Mode: Multiply
Color of Shadow: #225d6e
Opacity: 85%.
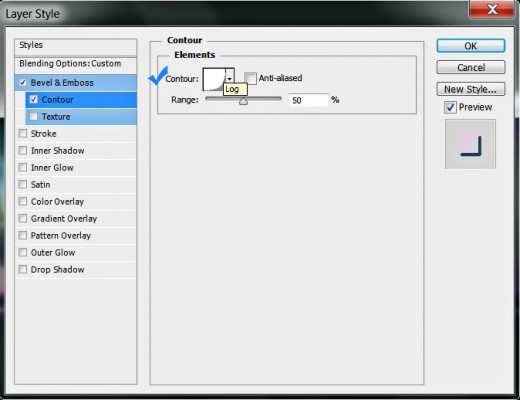
STEP 24
This time select Contour and insert the following settings:
Contour: Log
Anti-aliased: not checked
Range: 50%.
Press OK button to close Layer Style dialog box.
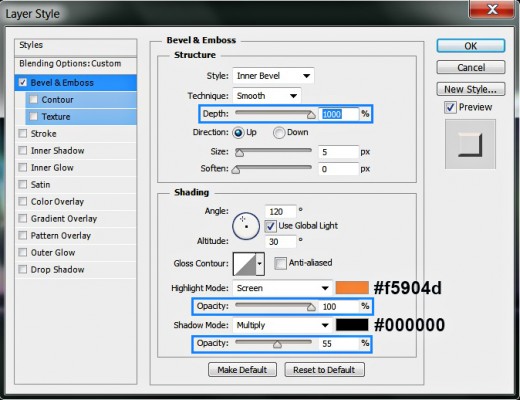
STEP 25
Now select Stroke 3 layer and apply this Bevel and Emboss:
Style: Inner Bevel
Technique: Smooth
Depth: 1000%
Direction: Up
Size: 5px
Soften: 0px
Angle: 120 degrees
Use Global Light: checked
Altitude: 30 degrees
Gloss Contour: Linear
Anti-aliased: not checked
Highlight Mode: Screen
Color for Highlight: #f5904d
Opacity: 100%
Shadow Mode: Multiply
Color of Shadow: #000000
Opacity: 55%.
Press OK button to apply the 3D effect and to close the dialog box.
STEP 26
No more playing with layer styles. :) We are ready with the Glowing Text Effect. Compare the result on your canvas and in your Layers panel with mine. You should have this groups and layers:
- One separate Background layer;
- Text Group which includes Word and Word copy layer and
- Strokes Group which contains three layers- Stroke 1, Stroke 2 and Stroke 3 layer.
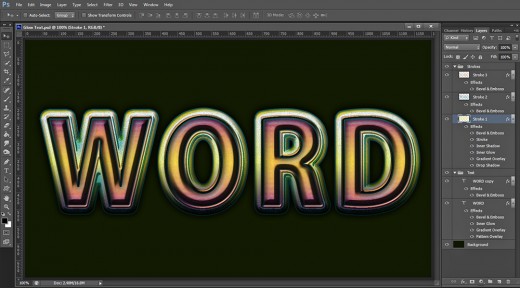
This is my outcome saved in .jpg format. If you like, you can apply Filter, Sharpen, Unsharp Mask to improve the final image.
Hope you liked thid short and easy tutorial and found it useful. Thanks a lot for reading. God bless! :)