Create Jolly Roger Poster Using Wingdings and Textures

In this tutorial I am going to show how to create super cool Jolly Roger Poster in Adobe Photoshop. It is not necessary to paint the famous skull and bones character. We are going to type its symbol using the default Wingdings. Of course, you can download ready to use Jolly Roger Custom Shape or Image from the net and Paste it in your .psd file instead typing the Wingdings symbol.
In the process of work we'll be using lots of Blending Options, Transformations, Layer Masks and Clipping Masks.
The tutorial is for intermediate Photoshop level users. You should know how to use Edit, Transform, Warp.
I haven't used features exclusive for the higher versions of the program, so you can create this awesome Poster in any Photoshop version.
All Textures you have to download while creating the Poster are my own photos and unrestricted stock. I'll be happy if you choose to use them for your own works too. :)
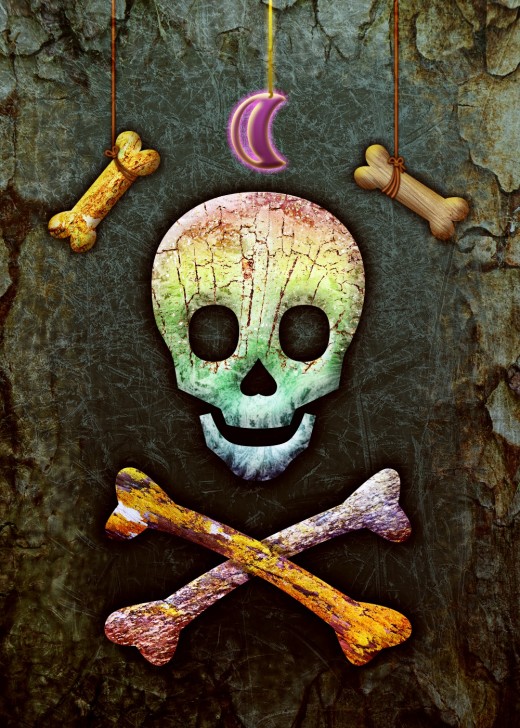
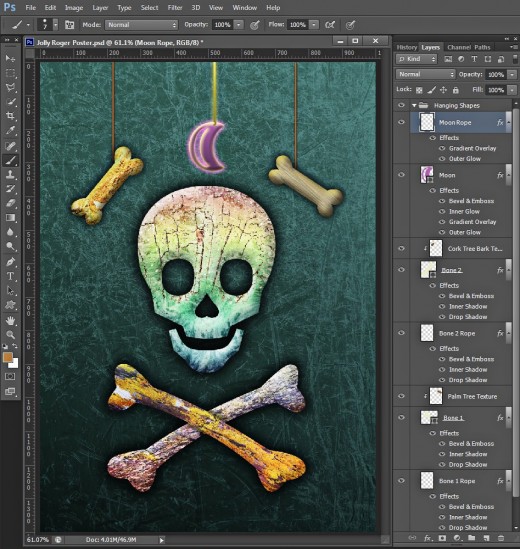
Well, this is the final result:
STEP 1
Before starting your work on the poster, create a separate Folder where you are going to keep all your files. Take into consideration that in addition to the .psd file and the file with the final result, you also have to download eight photos of textures.
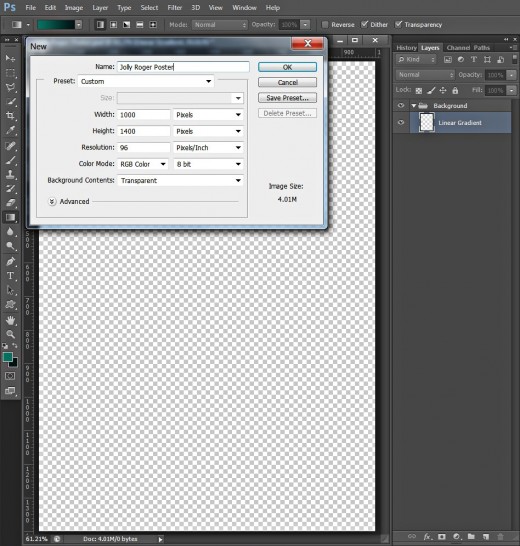
When you are ready with the Folder, open Adobe Photoshop and create a new .psd document- File, New. Name the file Jolly Roger Poster and set its Size to 1000 Pixels Width and 1400 Pixels Height. Insert 96 Pixels/Inch for Resolution, choose RGB Color for Color Mode and select Transparent from Background Contents drop down menu.
Those of you who plan to print their poster should use another settings for Resolution and Color Mode, so set Resolution to 300 Pixels/Inch and select CMYK Color for Color Mode.
Rename your transparent Layer 1 to Linear Gradient and press Ctrl+G (Layer, Group Layers) to place it in a group. Rename Group 1 that you'll get to Background.
Create the Background using Linear Gradient and Scratches Texture
In Steps 2-7 you have to prepare the textured dark Background for our Jolly Roger. Firstly you have to colorize your canvas with navy blue shaded Linear Gradient, then you'll have to download my Scratches Texture and Paste it into your .psd document. You also need to resize the Texture to make it the same Size as your canvas. As a final touch you are going to change the Texture Blend Mode and apply Black and White Adjustment layer. When you change the Blend Mode and Opacity of the Adjustment layer, you are going to sharpen the image and make the green-blue color of the Background less vivid.
STEP 2
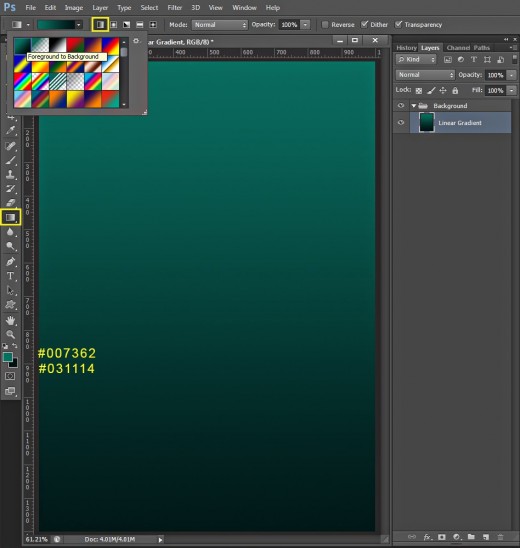
Keep Linear Gradient layer highlighted. Set Foreground Color to #007362 and Background Color to #031114. Press G key to take Gradient tool from the Tools bar and navigate to the Options bar to change the settings of the instrument. Select Foreground to Background Gradient from the Gradient Picker then click on Radial type of Gradient icon. Drag with the instrument from the upper to the bottom part of the canvas to colorize it.
STEP 3
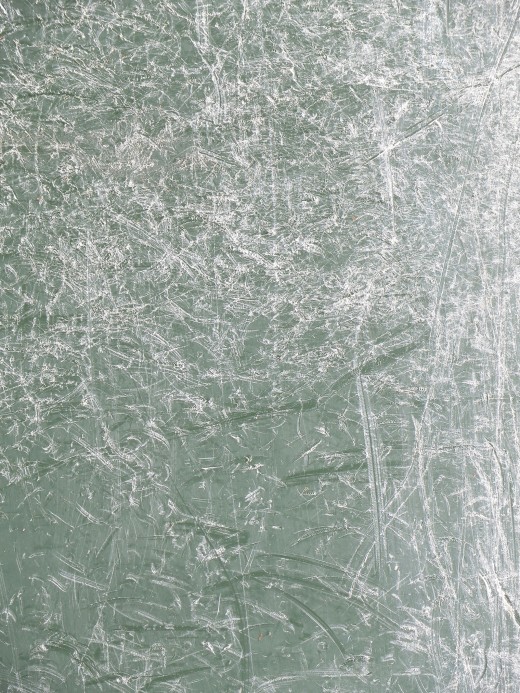
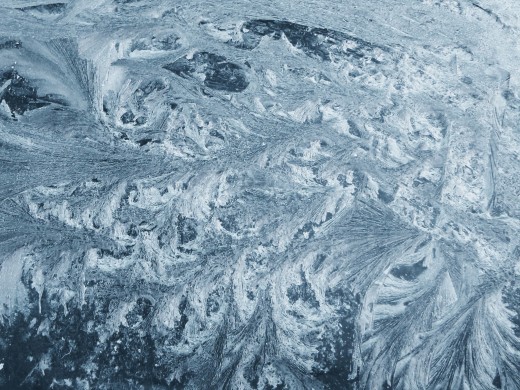
In this step you have to download the Scratches Texture photo shown below. Click on it to open it in high resolution in a new window, after that right click on it and choose Save Image As to place it in your folder.
STEP 4
Create a New Layer on top of Background group and call it Scratches Texture.
Open in Photoshop the Scratches Texture you previously downloaded, press Ctrl+A to Select its whole image, after that press Ctrl+C to Copy it. Return to your Jolly Roger Poster .psd file, make sure the Scratches Texture layer is highlighted and press Ctrl+V to Paste the Texture there.
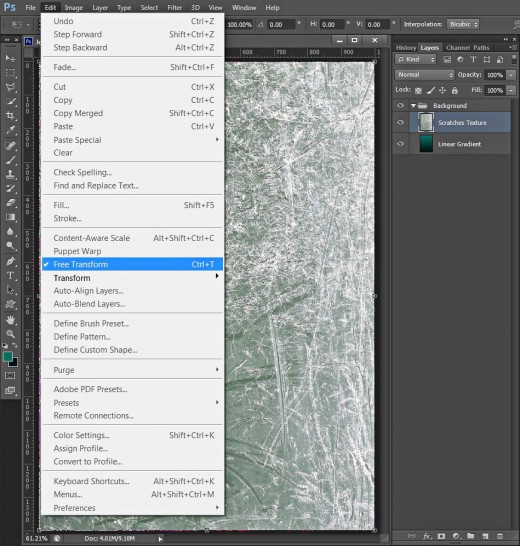
As the size of the Texture does not fit the size of your canvas, go to Edit, Free Transform and adjust the nodes so that the Texture covers the canvas. Press Enter to apply the Transformation.
STEP 5
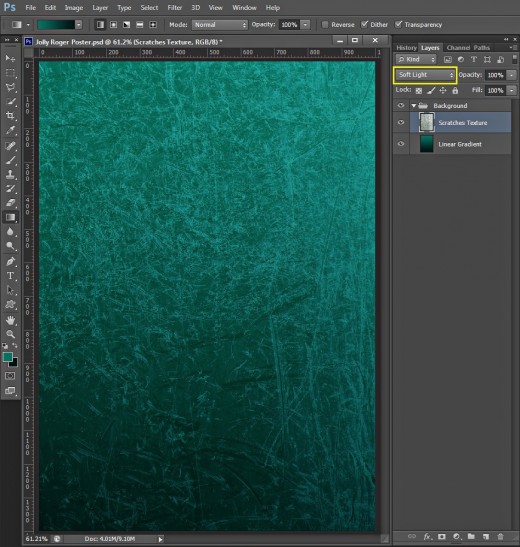
Change the Blend Mode of Scratches Texture layer to Soft Light.
STEP 6
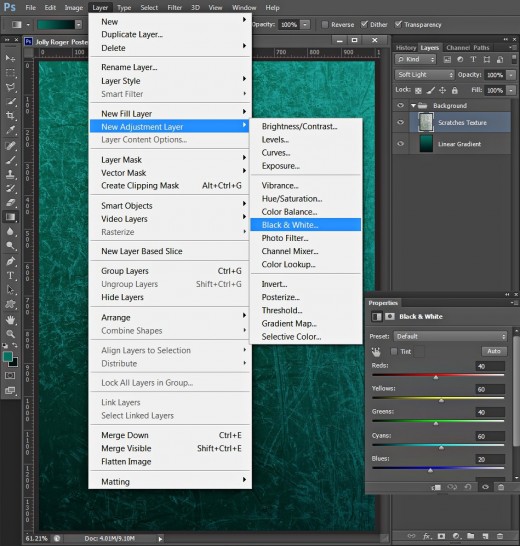
Keep Scratches Texture layer selected and navigate to the Menu bar. Choose Layer, New Adjustment Layer, Black & White and leave its settings as given by default.
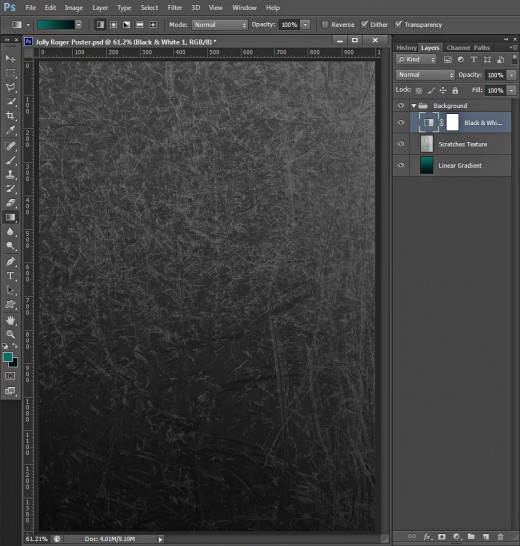
This will be the result on your canvas after adding the Adjustment Layer:
STEP 7
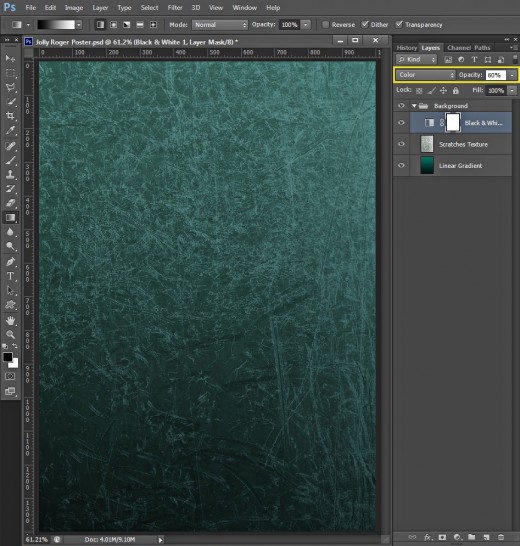
Change the Blend Mode of Black & White Adjustment Layer to Color and lower its Opacity to 60%.
Type the Jolly Roger Symbol, then Add Layer Styles
In Steps 8-12 you should select Horizontal Type tool and choose Wingdings, then you have to type the Jolly Roger symbol using capital N. You need also to add four Blending Options to its Text layer to give it colors and volume. All layer styles you have to apply on your Jolly Roger are Drop Shadow, Spectrum Gradient, which is default for all Photoshop versions, Inner Shadow and Bevel and Emboss.
STEP 8
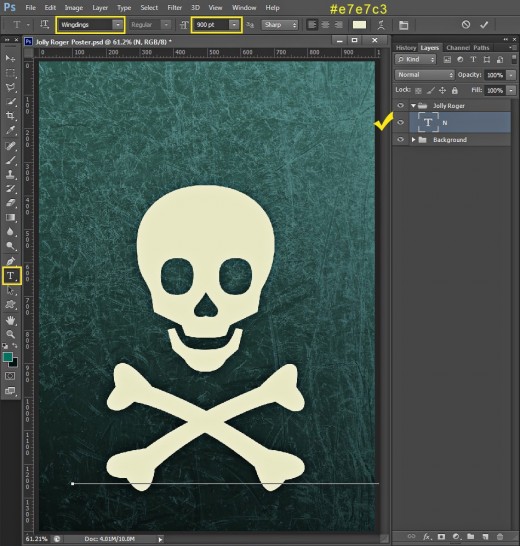
We have to type the main part of our tutorial now- the Jolly Roger Symbol which we are going to manipulate later. For the purpose select Horizontal Type tool and find Wingdings from Font Family drop down menu. Set the Font Size to 900pt and insert #e7e7c3 Color Code for Text Color.
After you have inserted the settings, press N key (Capital N!) and you'll get the cute Jolly Roger on your canvas. Use Move tool to place it as you see on the screenshot below.
Move N layer on top of Layers panel and put it in a group named Jolly Roger.
STEP 9
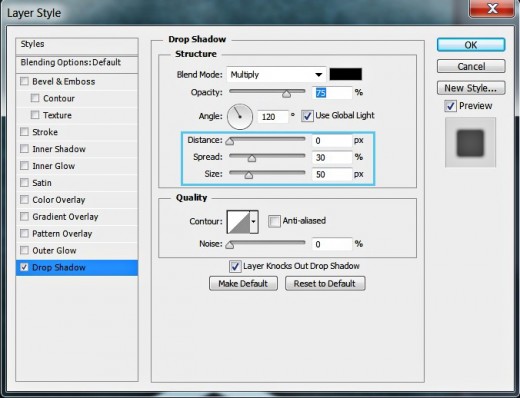
Right click on N Text layer and choose Blending Options (Layer, Layer Style, Blending Options) to activate Layer Style dialog box. Firstly tick Drop Shadow Layer Style. Move the Distance slider to 0px, then heighten the values of Spread to 30% and Size to 50px.
Don't close Layer Style dialog box because we have three more Blending Options to apply in the coming steps.
STEP 10
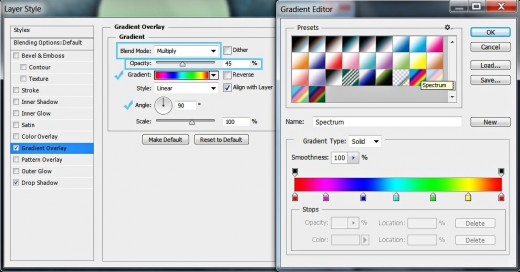
The second Layer Style we have to apply on our Jolly Roger is Gradient Overlay. Change its Blend Mode to Multiply, lower Opacity to 45% and set the Angle to 90 degrees then select Spectrum Gradient from the Gradient Picker.
STEP 11
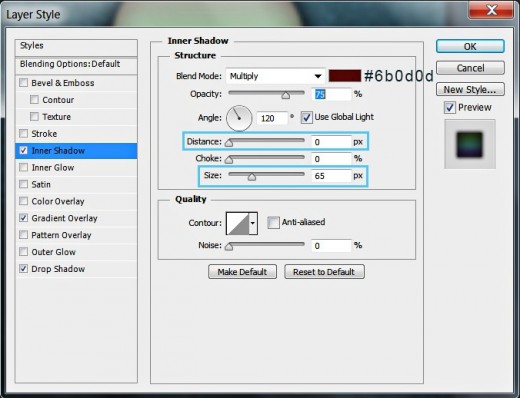
Now we are going to add dark shades to the skull & bones. Tick Inner Shadow Layer Style, Set color of Shadow to #6b0d0d, reduce Distance to 0px and Size to 65px.
STEP 12
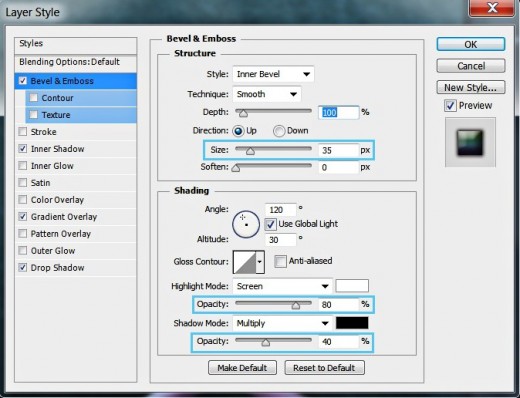
In this step we are going to make our Jolly Roger more prominent. For the purpose check Bevel and Emboss Layer Style, increase its Size to 35px, then slightly heighten the value of Color for Highlight Opacity to 80% and reduce Color of Shadow Opacity to 40%.
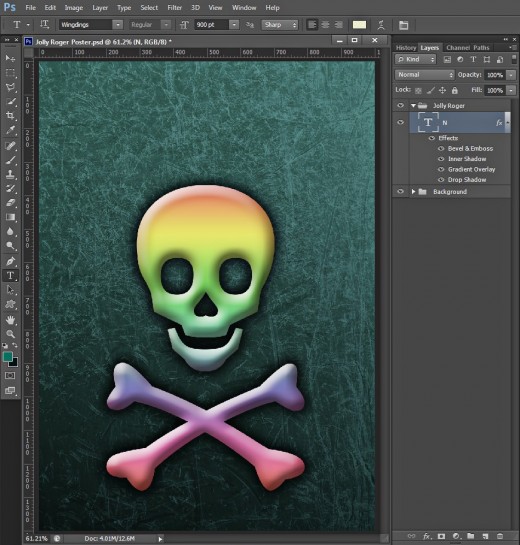
This should be the result on your canvas after applying all Blending Options on the typed symbol:
Add Highlights with Soft Round Brush, Apply Gaussian Blur Filter and Layer Styles
In Steps 13-16 you should grab Soft Round Brush of white color to draw highlights and thus to add more volume to your Jolly Roger. You also have to apply Gaussian Blur Filter to soften the edges of the highlights then you should add default Bevel and Emboss to make the contents of Highlights layer more prominent.
STEP 13
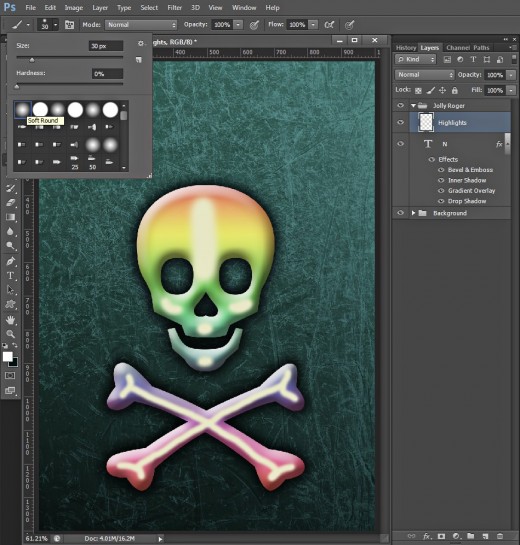
Create a New Layer on top of Jolly Roger group and call it Highlilghts.
Set Foreground Color to white and take Brush tool. Navigate to the Options bar and choose Soft Round Brush from the Brush Preset Picker. Paint highlights as you see on the screenshot below playing with the Brush Size- I used 30-100px.
STEP 14
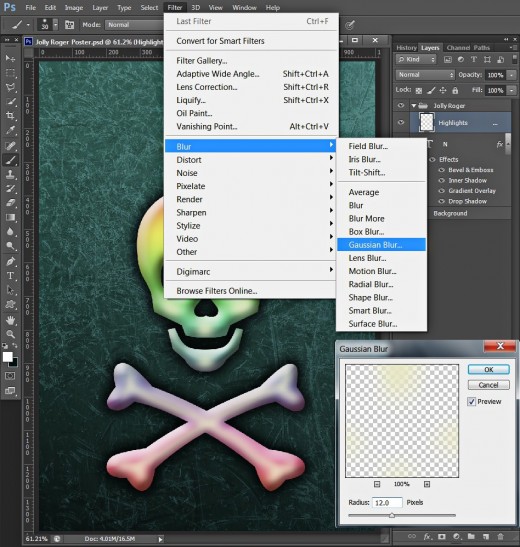
With Highlights layer selected, go to Filter, Blur, Gaussian Blur and insert 12 Pixels for Radius.
STEP 15
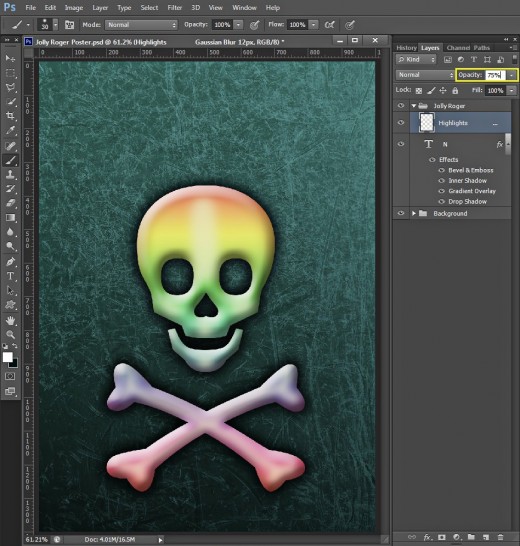
You should get a similar result after applying Gaussian Blur Filter. Lower Opacity of Highlights layer to 75%.
STEP 16
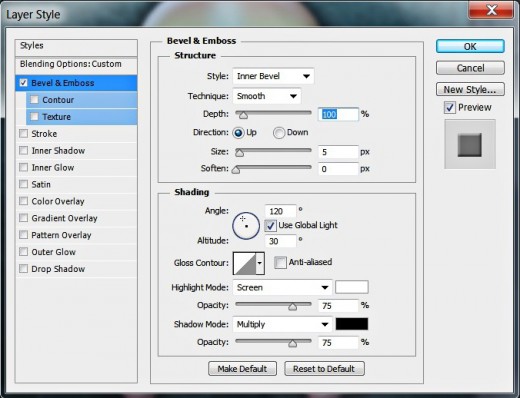
Double click on Highlights layer's thumbnail to call Layer Style dialog box, then check Bevel and Emboss without changing its default settings.
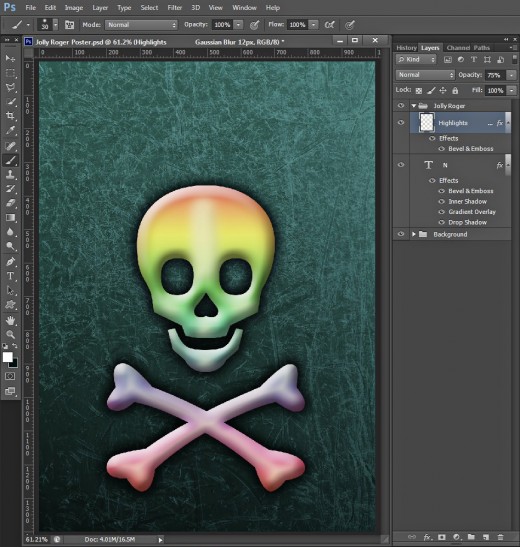
This should be the look of Jolly Roger so far:

Add Frost Texture to the Jolly Roger Symbol, Apply Warp Transformation and Layer Mask
From Step 17 to Step 20 you have to add Frost Texture to the Jolly Roger skull to create unique look. After you have pasted in a new layer and resized the Texture, you should apply Warp Transformation to Resize it more and better fix it to the skull. After that you have to apply Layer Mask so that the Texture covers only the Jolly Roger skull, then change the Blend Mode of the Texture to Soft Light and duplicate its layer.
STEP 17
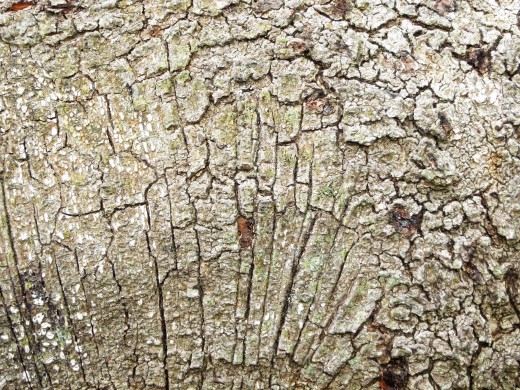
In this step your task is to download the Frost Texture shown below. See Step 3 for reference.
STEP 18
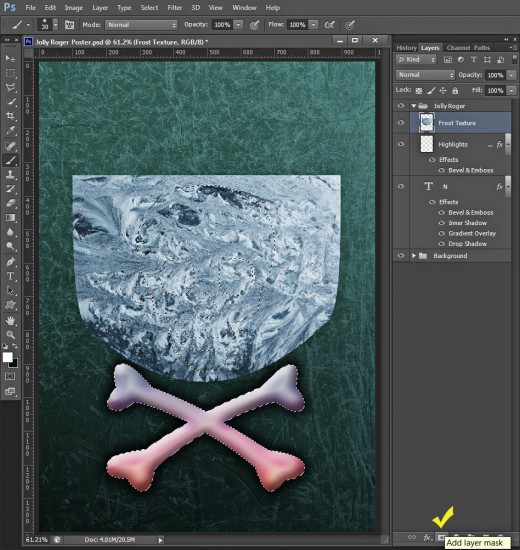
From this step on we'll start adding textures to our Jolly Roger symbol.
Create a New Layer called Frost Texture on top of Jolly Roger group. Paste there the Texture downloaded in the previous step (See Step 4) then apply Edit, Free Transform and Edit, Transform, Warp to resize and shape the Frost Texture so that it covers only the skull.

STEP 19
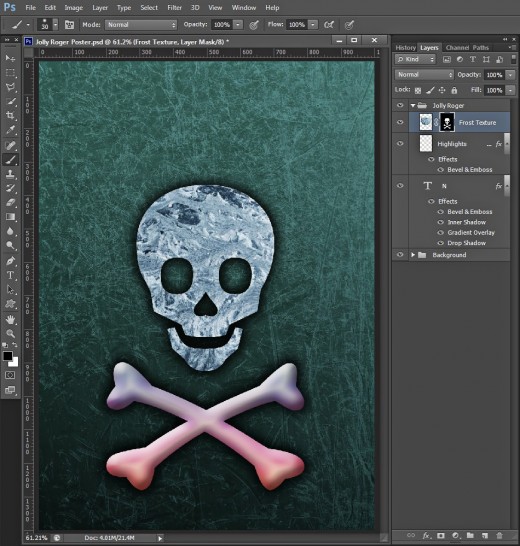
Keep Frost Texture layer highlighted, then hold down Ctrl key and click on N Text layer's thumbnail to Load Selection on Jolly Roger. After that click on Add Layer Mask icon at the bottom of Layers pane (Layer, Layer Mask, Reveal Selection).
Below is shown how the skull will look after adding the Frost Texture.
STEP 20
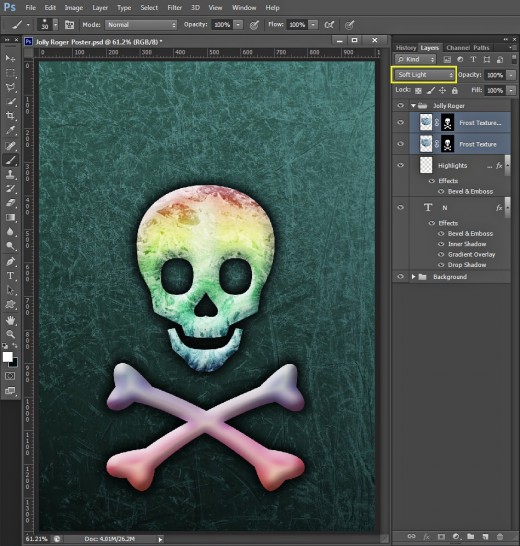
Change Blend Mode of Frost Texture layer to Soft Light then press Ctrl+J to duplicate it (Layer, Duplicate Layer). Leave the Blend Mode of Frost Texture copy layer to Soft Light too.
Add Tree Bark Texture to Make the Skull Looking Old and Cracked
In order to give old and cracked look to the skull, you have to add Tree Bark Texture covering the upper part of Jolly Roger and the portions around the eyes holes. You will do it in Steps 21-25. For the purpose you need to Paste the Tree Bark Texture in a New Layer on top of Jolly Roger Group then Resize it to cover the upper half of the skull. You also have to add Layer Mask so that only the portions of the Texture covering the skull to be visible. The next step is to erase the parts around the eyes holes with Spatter Brush and to change the Blend Mode of the Texture to Pin Light to achieve the cracked effect.
STEP 21
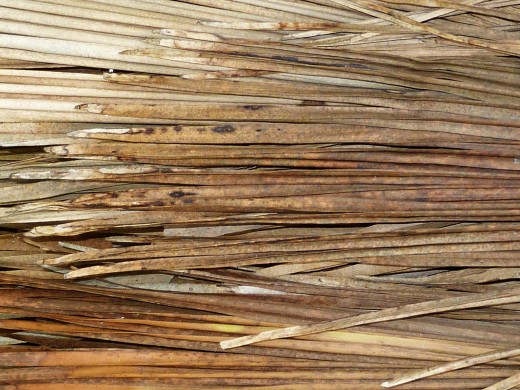
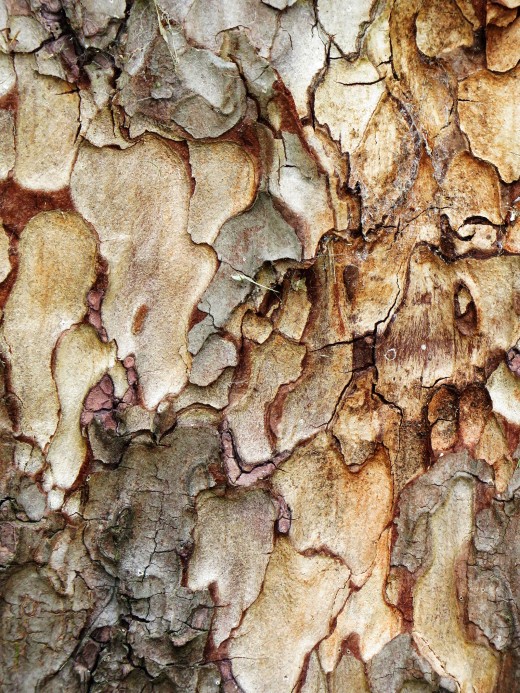
Now download this Tree Bark Texture:
STEP 22
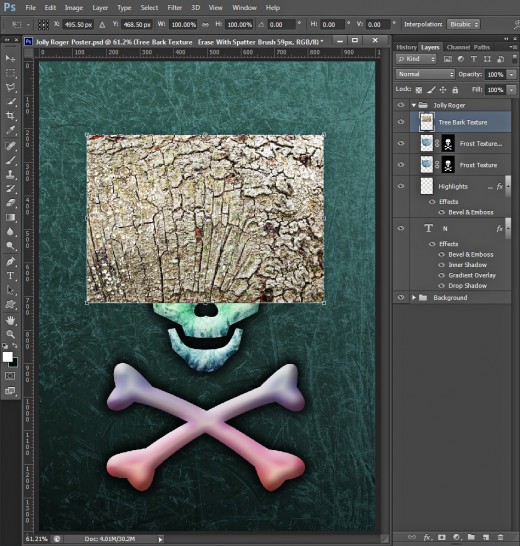
Create a New Layer on top of Jolly Roger group and name it Tree Bark Texture. Paste the Texture there and resize it using Edit, Free Transform so that it covers half of the skull.
STEP 23
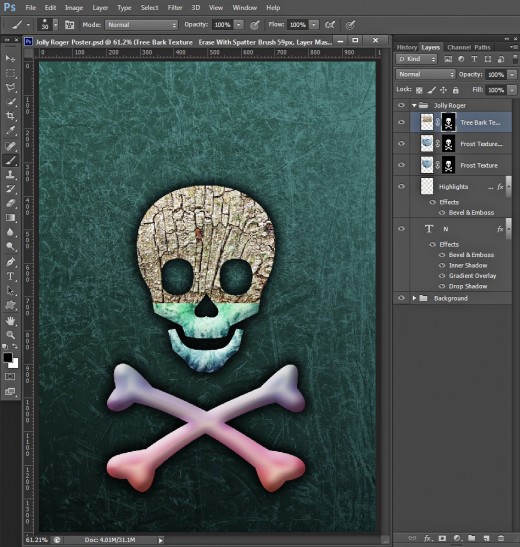
With Tree Bark Texture layer highlighted, hold down Ctrl key and click on N layer's thumbnail to Load Selection, then apply Layer Mask on the Texture (Layer, Layer Mask, Reveal Selection). You should get the following result:
STEP 24
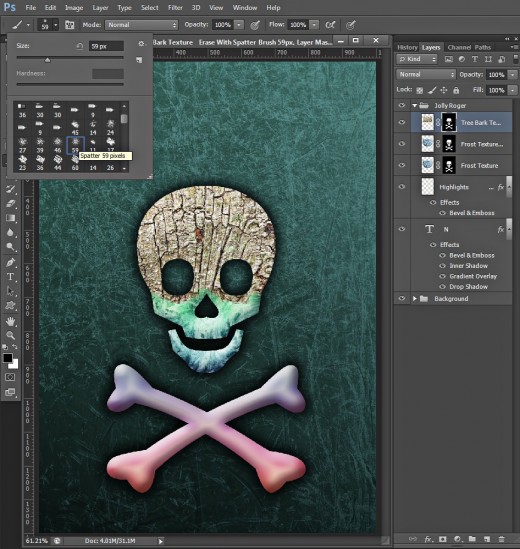
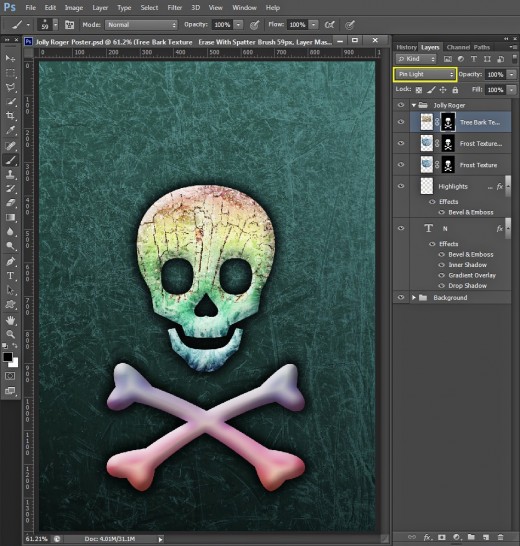
While the Layer Mask thumbnail of Tree Bark Texture layer is selected (Foreground color should be black), grab Brush Tool and find Spatter Brush of 59px Size from the Brush Preset Picker. Start brushing the portions of the Texture around the bottom parts of the eyes holes and nose to make the bottom borders of the Texture looking rough. You should get a similar outcome.
STEP 25
Change the Blend Mode of Tree Bark Texture layer to Pin Light.
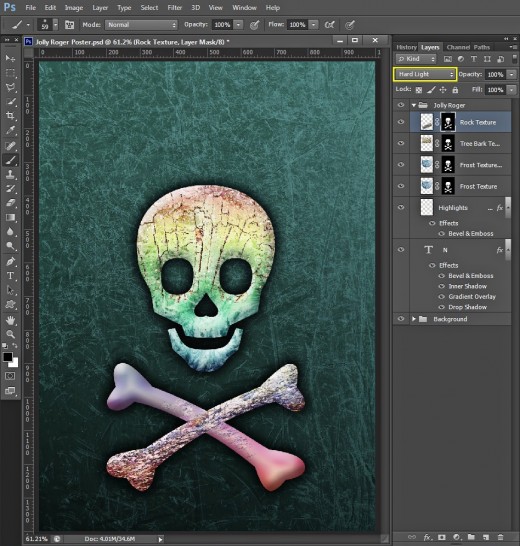
Add Rock Texture to one of the Bones
In Steps 27-30 you have to apply Rock Texture on the bone which will be placed under the upper bone. After you have pasted and resized the Texture, you will use again Layer Mask so that the Texture covers only the bones. You also have to erase most portions of the Texture from the upper bone.
STEP 26
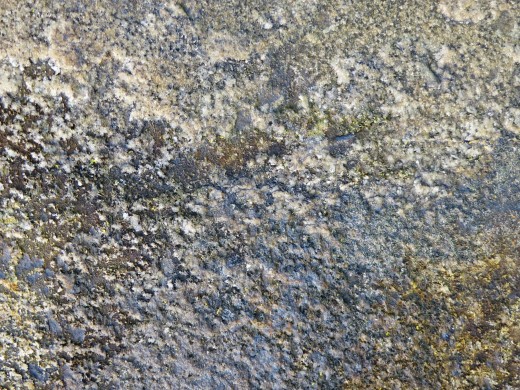
In this step you should download the following Rock Texture:
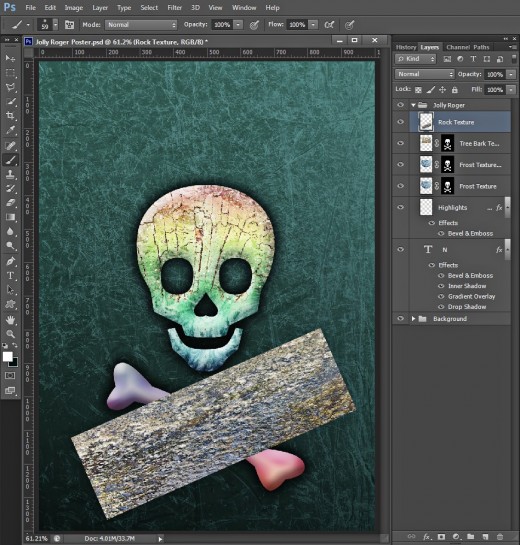
STEP 27
Create a New Layer on top of Jolly Roger group and call it Rock Texture. Paste the Rock Texture there and use Edit, Free Transform to resize and rotate it so that it covers one of the bones.
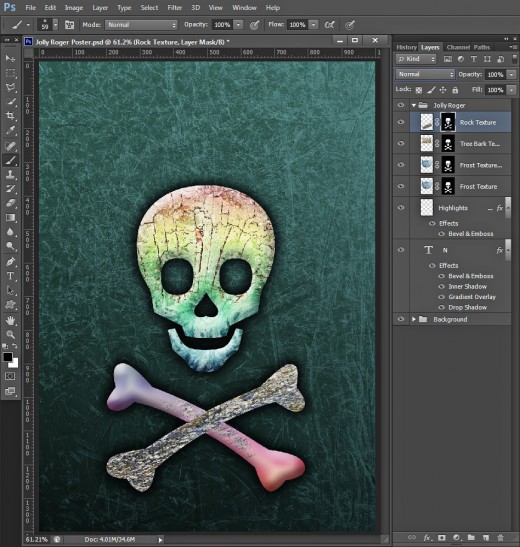
STEP 28
Apply Layer Mask on the Rock Texture the same way you have done it with the previous textures. You should achieve this outcome:

STEP 29
While Rock Texture Layer Mask thumbnail is selected and the Foreground Color is set to black, grab the same Spatter Brush of 59px Size we already used in Step 24, and erase most portions of the Texture which cover the other bone. You can leave traces of the Texture on the other bone, not necessary to erase everything.
STEP 30
Change the Blend Mode of Rock Texture layer to Hard Light.
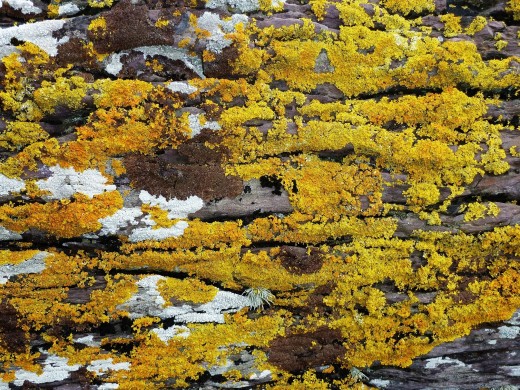
Apply Lichen Texture on the Upper Bone and Add Shadow
In Steps 31-35 you have to apply Lichen Texture on the upper placed bone. You will proceed the same way as with the other textures- Paste it on a New Layer then Resize it. After that don’t forget to apply Layer Mask so that the Lichen Texture covers only the bones. Next, you have to erase most portions of the Texture which covers the bottom bone and leave the Texture intact only on the upper bone.
Your last step is to draw Shadows with black Brush to create illusion that both bones are separated and placed one above the other.
STEP 31
We should cover the other bone with Texture too so it is time to download the cool Lichen Texture given below:
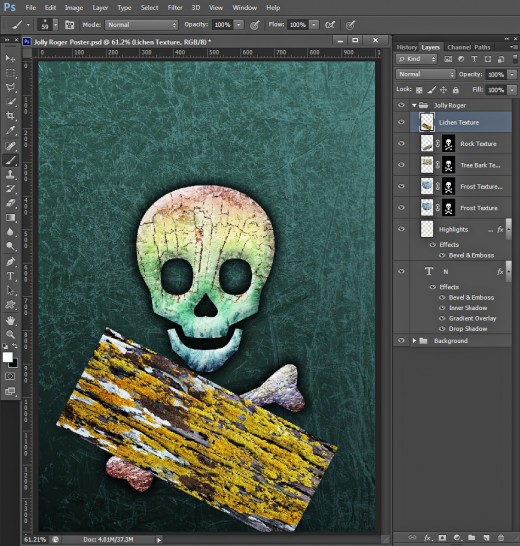
STEP 32
Create a New Layer on top of Jolly Roger group and name it Lichen Texture. Paste there the Texture you got in the previous step and with the help of Free Transform resize and rotate it to cover the second bone. You should get something like this:
STEP 33
Apply Layer Mask (Selection Revealed) to the Lichen Texture layer and with the same Spatter Brush of 59px Size erase most of the portions which cover the bone below.
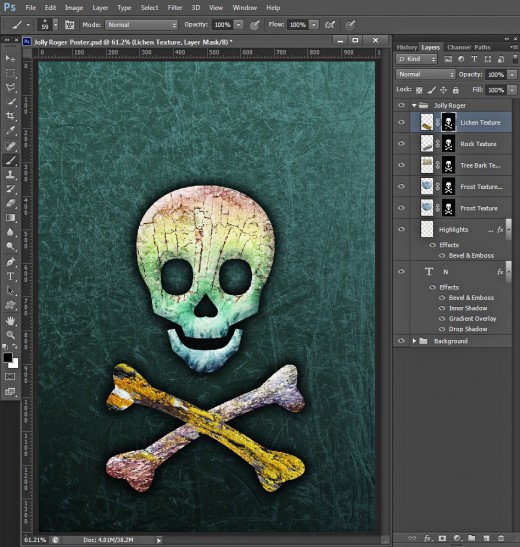
STEP 34
Change the Blend Mode of Lichen Texture layer to Hard Light and lower its Opacity to 80%.

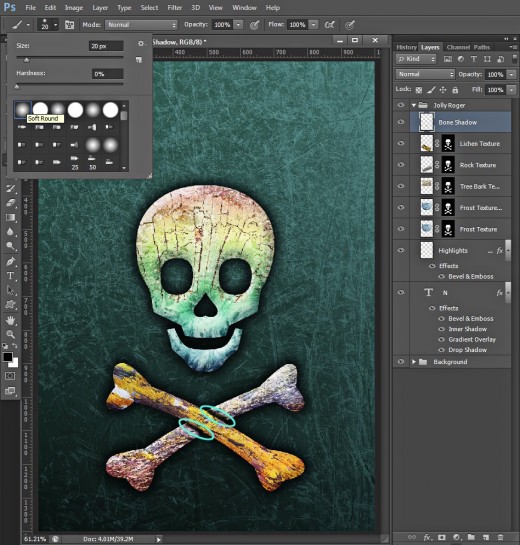
STEP 35
Create a New Layer on top of Jolly Roger group and name it Bone Shadow. Press D key to set Foreground Color to black and grab Soft Brush of 20px Size. Paint shadows where both bones intersect. I have marked both shadows with cyan colored ellipses. You can click on the screenshot to open it in high res for a better visibility.
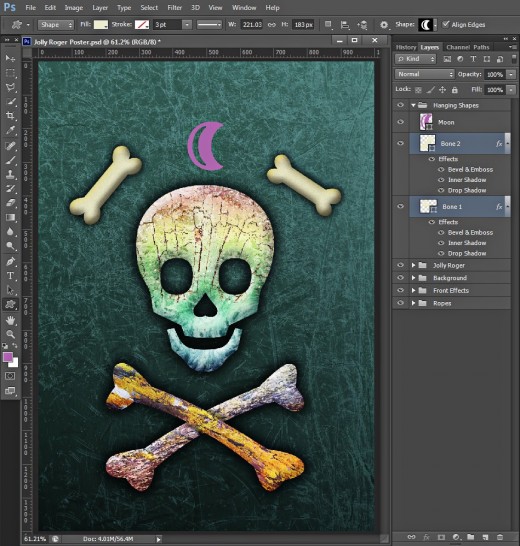
Add More Bones and Moon to the Poster Using Custom Shape Tool
In Steps 36-41 you are going to use Custom Shape tool to draw two Bones and Moon hanging above the skull. You also have to apply layer styles firstly on the Bones such as Drop Shadow, Inner Shadow and Bevel and Emboss to give both hanging Bones a 3D look.
STEP 36
Now change the Blend Mode of Bone Shadow layer to Multiply and reduce its Opacity to 50%. These bone shadows added create the illusion that one of the bones is above the other, not joint as they are in the Custom Shape.
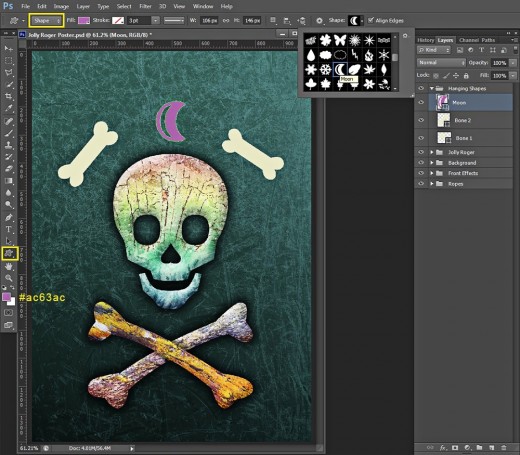
Set Foreground Color to #e8e8c2 and select Custom Shape tool. In the Options bar set its Mode to Shape and find Bone Shape in the Custom Shape Picker.
Draw two small Bone shapes and use Free Transform to Rotate them and place them above the skull. After you are ready with the couple of bones, move their layers on top of Layers panel and place them in a group called Hanging Shapes. Name the right Bone layer to Bone 1 and the left one- Bone 2.

STEP 37
Set Foreground Color to #ac63ac, grab again Custom Shape tool in Shape Mode and find Moon Shape in the Custom Shape Picker.Draw the Shape above the skull and place its layer on top of Hanging Shapes group. Call the layer Moon.
STEP 38
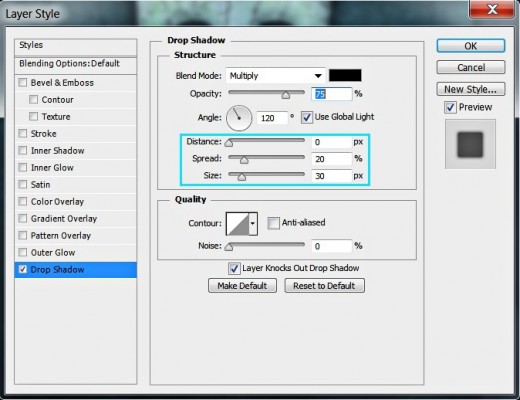
Now select any of the Bones layers, double click on its layer's thumbnail to activate Layer Style box and firstly check Drop Shadow Layer Style. Reduce Distance option to 0%, then increase Spread to 20% and Size to 30px.
STEP 39
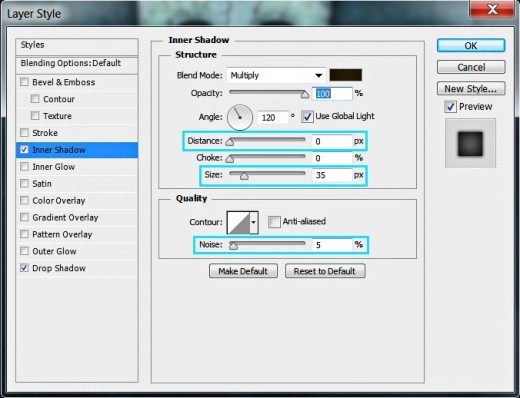
The second Layer Style you should add to the chosen Bone layer is Inner Shadow. Lower Distance to 0px, increase Size to 35px and Noise to 5%.
STEP 40
Apply Bevel and Emboss Layer Style to make the bone eye catching. Increase Size to 24px, Set Color for Highlight to #baa427, increase its Opacity to 100% then lower the Color of Shadow Opacity to 30%.

STEP 41
Right click on the Bone layer on which you applied the previous three layer styles, then select Copy Layer Style. Select the other Bone layer, right click on it and choose Paste Layer Style. This is how the bones will look after this last action.
Add Blending Options to the Moon Shape
In Steps 42 to 45 your task is to apply four layer styles on the Moon Shape to give it 3D look. The Blending Options you need to add are purple Outer Glow, black to white Gradient Overlay, Inner Glow and Bevel and Emboss with yellow Color of Highlight.
STEP 42
It is time to add Blending Options to the Moon Shape too so select its layer, double click on the layer's thumbnail and firstly apply Outer Glow. Increase Opacity value to 100%, Set Color of Glow to #d938c0, increase also Size option to 16px.

STEP 43
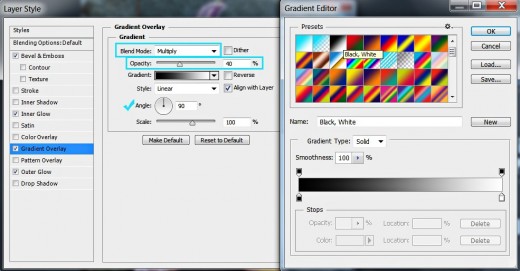
Now tick Gradient Overlay to add more shadow and highlight to our purple Moon. Set the Blend Mode to Multiply and Opacity to 40%, select Black, White Gradient from the Gradient Picker and check if its Angle is automatically set to 90 degrees.
STEP 44
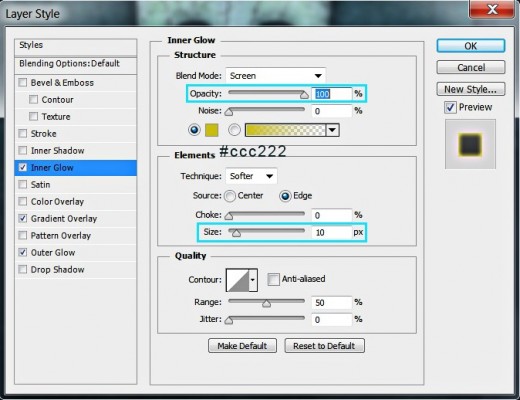
Let us add subtle golden shade to the Moon now. For the purpose tick Inner Glow Layer Style, increase its Opacity to 100% and choose #ccc222 for Color of Glow. Slightly increase also the Size to 10px.
STEP 45
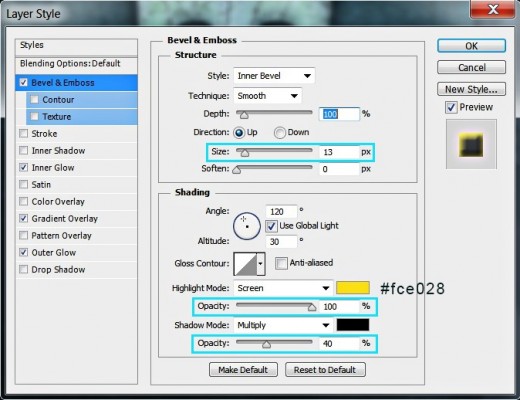
In this step we are going to enhance the golden shade of our purple Moon. Check Bevel and Emboss, set the Size to 13px and Color for Highlight to #fce028. Change also Color for Highlight Opacity to 100% and Color of Shadow Opacity to 40%.
This should be the outcome on your canvas after applying Blending Options on the three Hanging Shapes:

Add Palm Tree Texture to the Right Bone
In Steps 46-49 your task is to add awesome Palm Tree Texture to the right hanging Bone. After you have pasted the Texture in a new layer placed above the respective Bone layer, you have to Resize it so that it covers only the Bone. When you are ready, you have to apply Clipping Mask and change the Blend Mode and Opacity of the Texture.
STEP 46
We are going to add textures to the bones in this and the coming steps. So download this Palm Tree Texture:
STEP 47
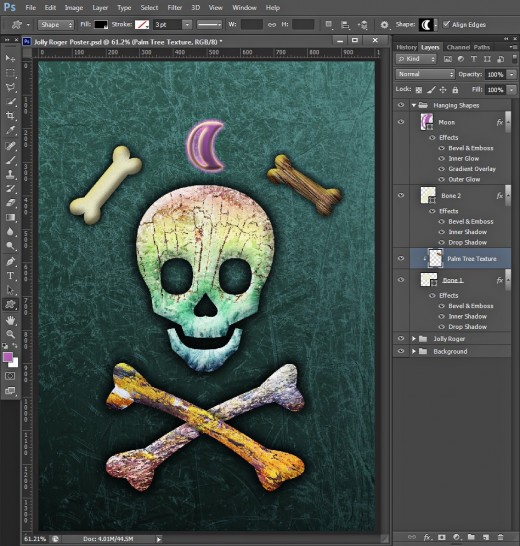
Create a New Layer above Bone 1 layer (the Bone placed to the right of the skull) and call it Palm Tree Texture.
Paste there the Texture you downloaded right now, then apply Free Transform to resize and rotate it so that it covers the Bone.

STEP 48
Right Click on Palm Tree Texture layer and choose Create Clipping Mask from the fly out menu.
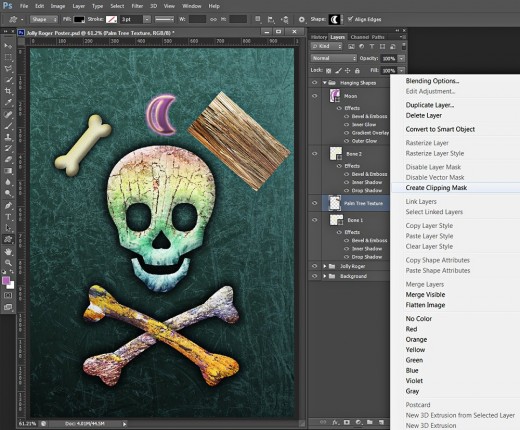
You see that the look of Palm Tree Texture layer changed in your Layers pane. Small arrow appeared at its left side which connects the Texture with its Masking Agent- the Bone Shape in our case.
STEP 49
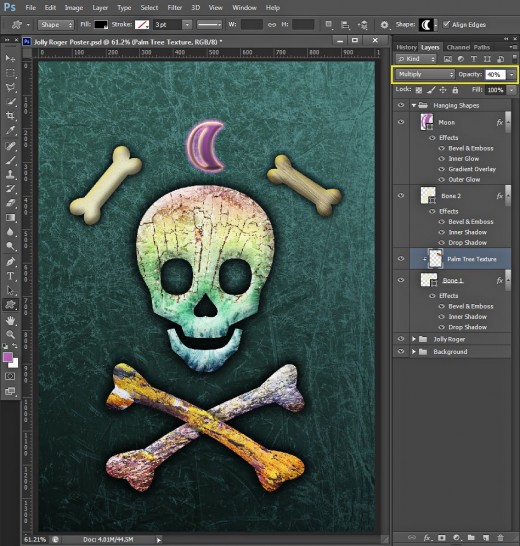
Change the Blend Mode of Palm Texture layer to Multiply and lower its Opacity to 40%. Your Bone 1 will look like this:
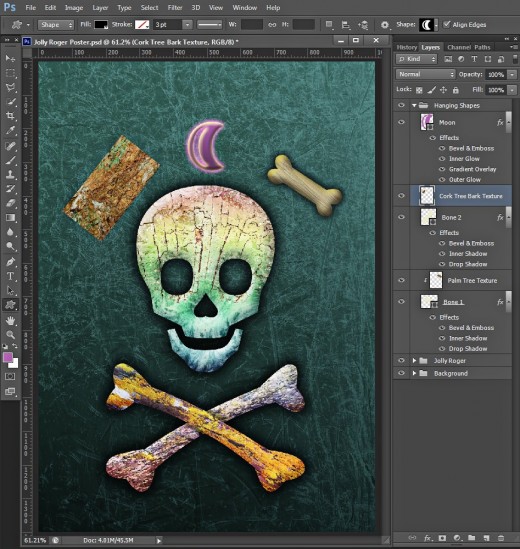
Add Cork Tree Bark Texture to the Left Hanging Bone
In Steps 50-52 you have to apply Cork Tree Bark Texture on the left Bone the same way you did it with the right Bone. You have to Create Clipping Mask on the Texture layer then change the Blend Mode of the Cork Texture to Hard Light.
STEP 50
Take a deep breath. Another Texture– this time Cork Tree Bark is to be downloaded:

STEP 51
Create a New Layer called Cork Tree Bark Texture and place it above Bone 2 layer (the left Bone) in Hanging Shapes group. Resize and rotate the Texture so that it covers the second Bone.
Now apply Clipping Mask and you'll get this outcome:
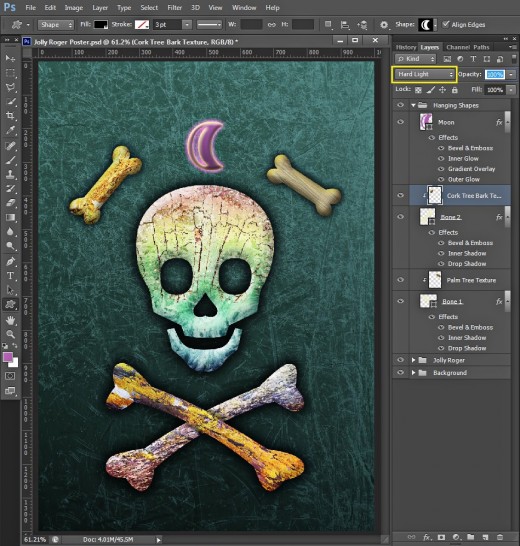
STEP 52
Change the Blend Mode of the Cork Tree Bark Texture Clipping Mask to Hard Light.
Add Ropes to the Hanging Shapes
In Steps 53-59 you'll be using Hard Round Brush to draw ropes, then you'll add layer styles (Drop Shadow, Inner Shadow and Bevel and Emboss) to give the ropes more volume. On the Rope on which the Moon Shape is hanging, you are going to apply golden shaded Gradient and Outer Glow.
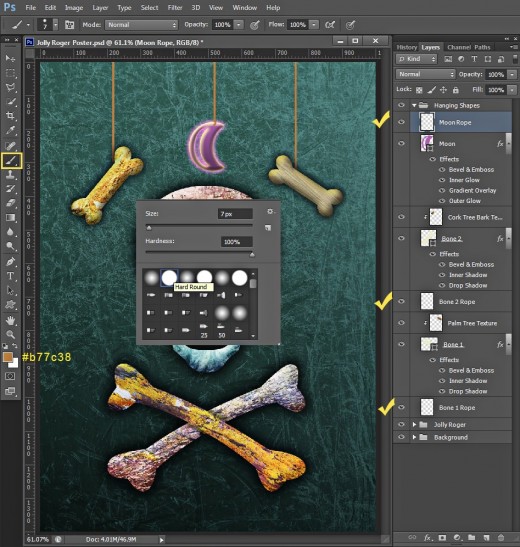
STEP 53
As our Hanging Shapes can't hang on nothing in the air, we should add ropes in this step.
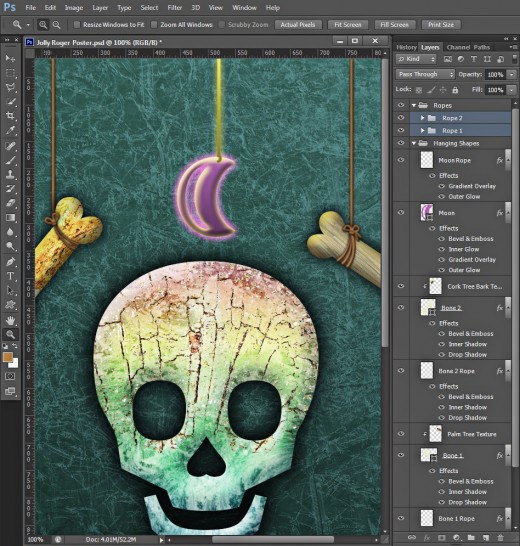
Set Foreground Color to #b77c38, take Brush tool and select Hard Round Brush from the Picker. Set its Size to 7px. Draw three ropes (each one on a seperate layer) with the chosen Brush while holding down Shift key. Put Bone 1 Rope layer below Bone 1 layer at the bottom of Hanging Shapes group, place Bone 2 Rope layer below Bone 2 layer and at last place Moon Rope layer on top of the group. Please click on the screenshot below to open it in high res and to see better the ropes and their layers.
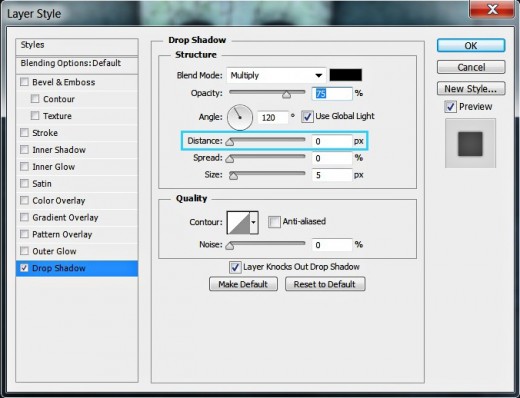
STEP 54
We'll start adding Blending Options to the ropes now. Double click on Bone 1 Rope layer's thumbnail and firstly check Drop Shadow. Reduce only its Distance to 0px and leave all other settings as given by default.
STEP 55
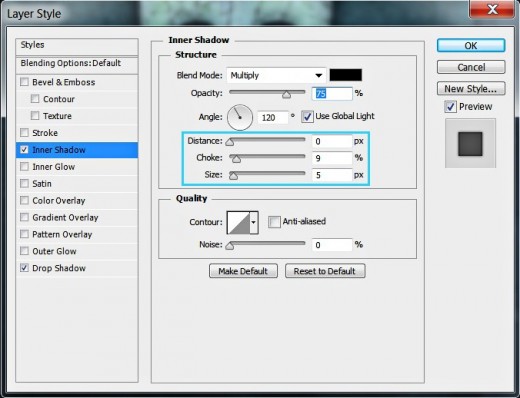
The second Layer Style which is to be applied on Bone 1 Rope layer is Inner Shadow. Lower the Distance to 0px, then change Choke to 9% and leave Size to the default 5px.
STEP 56
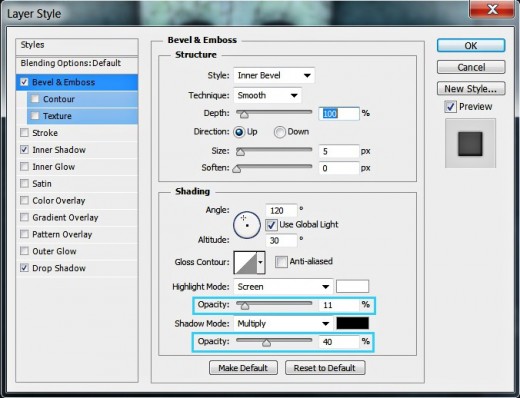
Let us make the Rope looking 3D. Tick Bevel and Emboss Layer Style, then reduce Color for Highlight Opacity to 11% and Color of Shadow Opacity to 40%.
Copy the Layer Styles from Bone 1 Rope layer and Paste them on Bone 2 Rope layer and now your two Bone ropes will look like this:

STEP 57
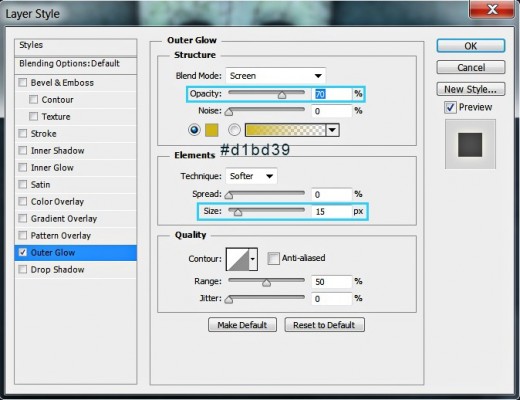
In this and the coming steps we are going to make the Moon Rope golden. Firstly apply Outer Glow Layer Style on its layer. Slightly lower Opacity value to 70%, set Color of Glow to #d1bd39 and increase Size to 15px.
STEP 58
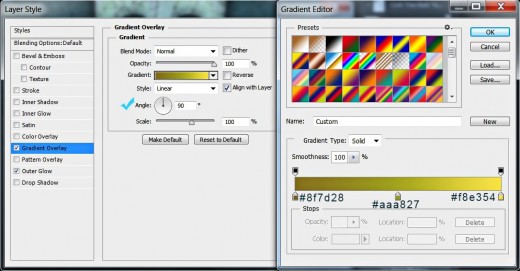
In this step we have to add golden shaded Gradient to the Moon Rope layer. Check Gradient Overlay Layer Style and verify that the Angle is set to 90 degrees. Click on the Gradient rectangle to change the Color Stops as follows:
First Color Stop (Location 0%): #8f7d28
Second Color Stop (Location 50%): #aaa827
Third Color Stop (Location 100%): #f8e354.
The golden Moon Rope is ready:
STEP 59
As the ropes behind the bones look very unnatural, we should paint more ropes segments and ropes bows in this step.
Use the same Foreground Color- #b77c38 and the same Hard Round Brush of 7px Size we already used in Step 53. Paint each Rope part on a separate layer then Copy the Layer Styles from Bone 1 or Bone 2 Rope and Paste them on each Rope segments layer.
Place all Rope 1 segments (the segments of the left Rope) into a group called Rope 1 then put all Rope 2 segments into a group named Rope 2. Select both groups and press Ctrl+G to turn them into subgroups and place them in a group called Ropes. Move this group on top of Layers panel.
Add Timber Texture to Create Grunge Style Vignette Effect
To improve the look of our Poster you are going to add one more Texture in Steps 60-62.
You have to Paste the Timber Texture on top of Layers panel, Resize it to cover your canvas and change its Blend Mode to Soft Light. After that you have to apply Layer Mask, then use Spatter Brush to erase the inner portions of the Texture and create awesome grunge Vignette around the Poster edges.
STEP 60
We are close to the end of this long (hope not boring) tut. Download the Timber Texture shown below.
STEP 61
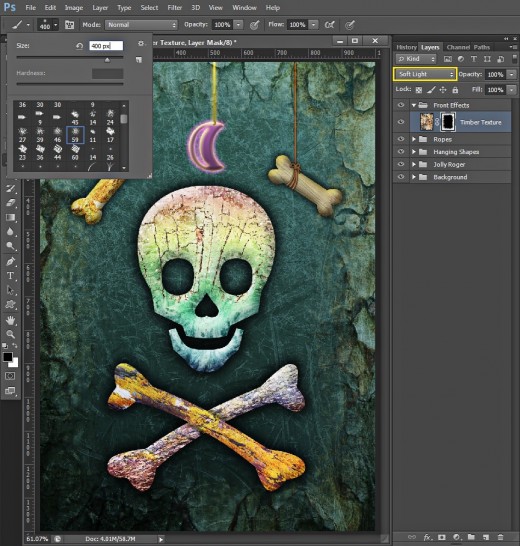
Create a New Layer called Timber Texture on top of Layers pane. Place it in a group which you should rename to Front Effects.
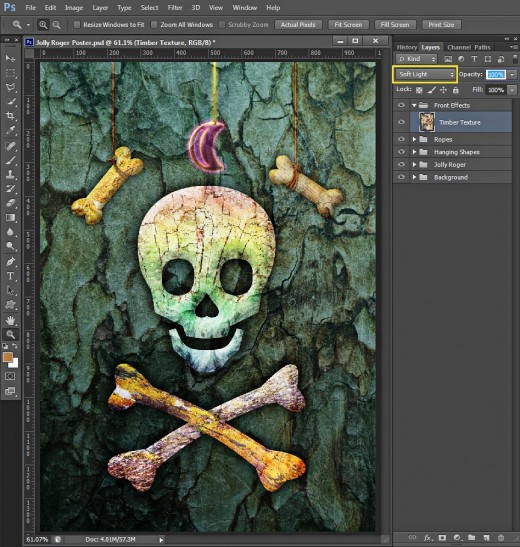
Paste in the new layer the Timber Texture you downloaded in Step 60, resize it to cover your canvas and change its Blend Mode to Soft Light.
STEP 62
While Timber Texture layer is highlighted, click on Add Layer Mask icon at the bottom of Layers panel (Layer, Layer Mask, Reveal All). Check if your Foreground Color is black, grab Brush tool and find Spatter Brush of 59px Size (the same we used in Step 24). Set the Brush Size to 400px and start brushing in the middle of the canvas (the Layer Mask thumbnail should be selected and Foreground Color set to black). Leave only the Texture borders intact to create awesome timber vignette.
Change the Blend Mode of Timber Texture layer to Soft Light.
Improve the Poster Colors with Spatter Brush and Adjustment Layer
From the next step until the end of this tutorial, you have firstly to Create a New Layer and use Spatter Brush of light color to fix one imperfection- the darker part of the Timber Texture at its bottom left corner.
You also have to apply Color Balance Adjustment Layer with changed Midtones, Shadows and Highlights options. This will sharpen your image and improve its colors.
STEP 63
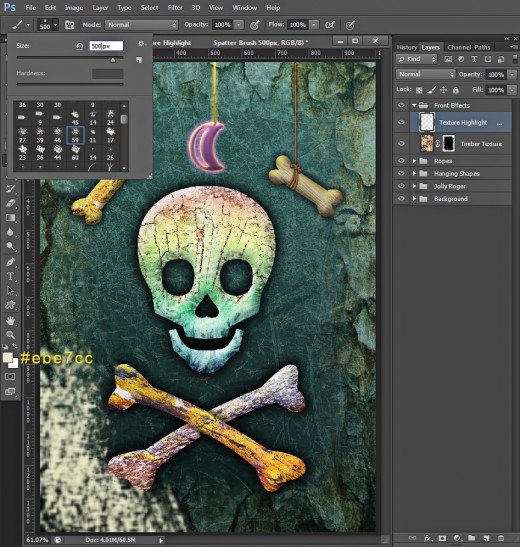
You can see that the Timber Texture we added is darker at its down left corner. We are going to improve its look in this step.
Create a New Layer on top of Front Effects group and name it Texture Highlight, Set Foreground Color to #ebe7cc and take Spatter Brush. Increase its Size to 500px. Make a few dabs at the bottom left corner of the canvas to cover the dark part.
STEP 64
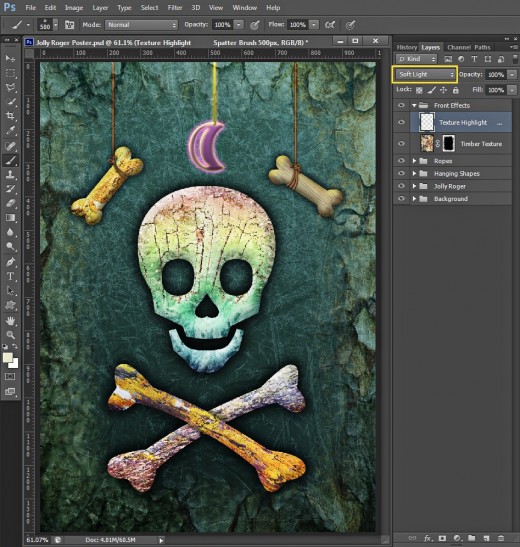
Change the Blend Mode of Texture Highlight layer to Soft Light and voila, the corner is made lighter.
STEP 65
While Texture Highlight layer is selected, navigate to the Menu bar and choose Layer, New Adjustment Layer, Color Balance.

STEP 66
Change Color Balance Settings as follows:
Midtones:
Cyan-Red: -25
Magenta-Green: -52
Yellow-Blue: -50
Shadows:
Cyan-Red: +5
Magenta-Green: -20
Yellow-Blue: -30
Highlights:
Cyan-Red: -35
Magenta-Green: -27
Yellow-Blue: -20.

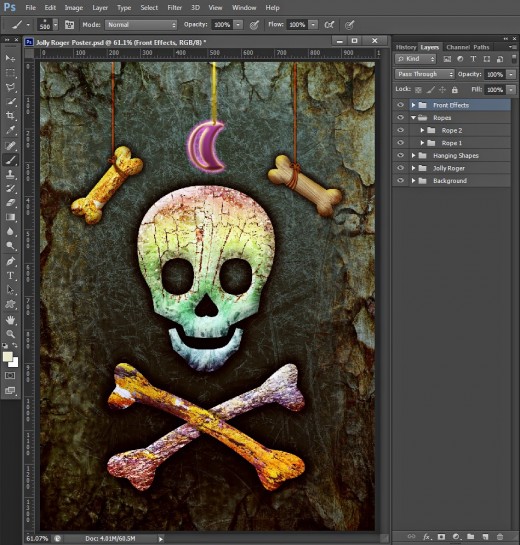
Below is shown the result of adding the Color Balance Adjustment layer.
If you have followed my tut correctly you should have these five groups in your Layers panel (from bottom to top): Background, Jolly Roger, Hanging Shapes, Ropes (with Rope 1 and Rope 2 subgroups in it) and Front Effects.
STEP 67
This is my Jolly Roger Poster saved in .jpg format. After I created the .gpg file, I opened it in Photoshop and applied Filter, Sharpen, Unsharp Mask to improve its quality. You can do the same using Unsharp Mask settings according to your taste.
Hope you like this tutorial and find it useful and informative. Many thanks for reading and God bless! :)


