- HubPages»
- Arts and Design»
- Crafts & Handiwork»
- Textiles
Crochet Vest - Surprised My Friends (Double Crochet Stitch & Half Double Crochet)

Vests
This is a simple Crochet Pattern to make a beautiful vest. I gifted these vests to my friends and cousin.
Let's get Started with this pattern.
Requirements:
Size G (4 mm) crochet hook
Red Heart Super Save Worsted Yarn (Any Solid Color) 7 oz
Red Heart Super Saver Worsted Yarn (Any Shaded Color) 5 oz
Tapestry Needle
Safety pins or Stitch Markers
Measuring Tape
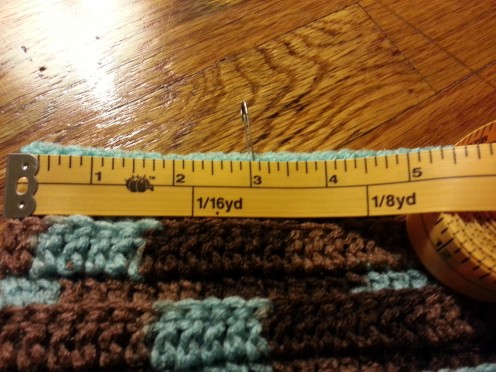
Gauge:
2 lines = 1". It depends on person to person. This is approximate.
Stitches & Abbreviations:
Chain stitch (ch)
Half Double Crochet (hdc)
Single Crochet (Sc)
Double Crochet (dc)
Note: Always Make The Base Chain 2 Inches Smaller than the required size, as the wool Stretches. Please note that all the Double Crochet Stitches are worked in the back loop to give it a ribbing effect.
Pattern:
With the Measuring tape, Measure your Chest size. The Captions below the images are the full round chest size measurement.
Begin with the Shaded Color Yarn.
Chain Stitch (No Fixed number of chains, Measure the chain to the desired length.) Always make Chain 2" less than the required size.
Foundation row: Hdc in 2nd ch from the hook, Hdc in each ch till the end and turn.
Row 1: Sc and Ch 1 in the first Hdc, Dc in back loop in each stitch till the end and turn.
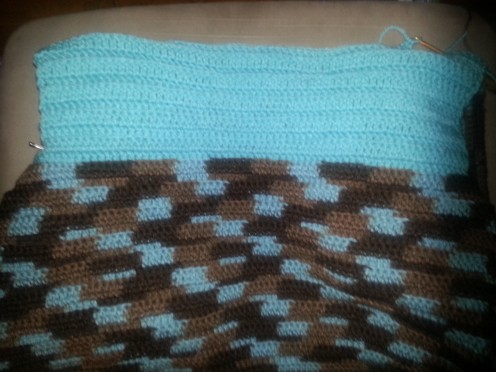
Repeat row 1 till the piece measures 10" in size.
Do not worry if the 5 oz shaded yarn is not enough for the 10" piece. You can join the Solid color yarn to the 10" piece. The 10" requires approximately 20-21 double crochet line including the foundation Half double crochet line.
Double Crochet in the back loop will give you a Ribbing Effect. Always make the last line with the Second Colour Yarn for continuity of the of Pattern


After 10" Patch has been made, fold the patch as shown in the picture below. Note that both the sides should be equal. You can even leave a gap of 2-3" for brim, which I haven't made in this tutorial pattern but is in the other vests pictures I have posted.

After folding the piece as shown, measure 3 inches from the fold on both the sides and place a stitch marker (I used safety pins as well I was feeling lazy to search my box of stitch markers). If you are making a vest for size 30 Inches or smaller, place stitch marker at 2 and half inches from the fold.
Note that the number of stitches from the center to the stitch marker should be equal on both sides (e.g. if one side has 20 stitches other side should also have 20 stitches. Adjust the stitch markers accordingly. 1 cm up down is okay.
Front Straps: Starts from the center as the yarn would be continued from the bottom piece. (Solid Color)
Row 1: ch 1, dc in the next dc, dc in the all the dc till you reach the stitch marker. dc in the marked dc too and turn.
Row 2: ch 1, dc in each dc and turn.
Row 3: We start the decrease in this row. ch 1, dc in each dc till the last 2 stitches, Dc2tog for the last 2 stitches. (Decreases one stitch)
Row 4: Ch 1, Dc2tog, the first and second stitch (decrease for this row), dc in each of the stitches till the end. (repeat row 3-4 till the strap is only 14 stitches)
The next row: Ch 1, Dc in each of the 14 stitches. (repeat this till you have 20 rows)
Note:
- You need to make a total of 20 rows for the straps, which is approximately 10 inches.
- You do not need to decrease, if there are only 17 or less stitches at the beginning. This happens for small sizes vest. (below are images of various sizes and you can clearly see the difference.)
Repeat the same pattern for the other side.
Front

")
Back Pattern
This part is worked on the back side of the vest. The stitches are done between the 2 stitch markers placed. Work with the Solid colour.
Foundation Row: Ch 3, Dc in each of the stitches till the end. (between 2 stitch markers)
Row 1: Ch 3, Dc in each Dc till the end.
Repeat "Row 1" 8 more times. Total Rows made - 10
Back
Back Straps
Begin at one end of the back part made between the stitch markers.
Foundation Row: Ch 3, Dc in the next 13 Stitches. (if you have not decreased in the front part of the straps, Dc in the same number of stitches as the front part)
Row 1: Ch 3, Dc in each Dc till the end.
Repeat "Row 1" 8 more times. Total rows - 10
Repeat the strap pattern at the other end.
Sew the Front and the back straps together.
Edging and Finishing
At the center opening on the front (both) sides
Row 1: Ch 1, Sc in each of the horizontal Dc.
Repeat "Row 1" 2 more times.
Row 4: Ch 3, 2 Dc in the same Sc, *skip Sc, Sc in the next Sc, skip Sc, 3 Dc in the next Sc. Repeat from * till the end.
Repeat this pattern on the other side.
At the bottom of the vest, Repeat the same edging as above all round, beginning from one end.
Tie Strings:
Make 3 on each side at equidistant. (Make 6)
Row 1: Insert hook into any Shell, Ch 15.
Row 2: Skip 2 Ch, Sc in each ch. Tie both the ends to secure.
Enjoy making the vest. Please let me know if you need help with the instructions. I have tried my best to be clear about the instructions. I will be glad to help.
Enjoy Crocheting!
Crochet Clothing
What was the most difficult part in making the vest?
Completed vests
")
")
")
")
")
For Purchase
- Crochet Vest for Women by TrendOWool on Etsy
I made these as a Christmas gift for my friends and cousins. I love to crochet them. This Vest is available in all colours available for Red Heart Custom Made as per size required.


