Easy Zipper Flower Tutorial

I love all of the zipper flowers I keep seeing so I decided to try to make one and now I'm hooked! Let me tell you, if you are looking for an easy, quick and inexpensive project, this is the one for you. Not only are they easy to make but they are popular and so fashionable right now. You can wear them several different ways. Here is just a few ideas:
- Make cute hair accessories like headbands and clips, etc.
- Make brooches to wear on shirts, hats, etc.
- Embellish the tops of dress shoes- like some cute high heels
- Make a bib or statement necklace
- Use small sized ones to make statement rings
- Make bracelets
- Embellish a tote bag or purse with them
- Use them to embellish a decorative throw pillow
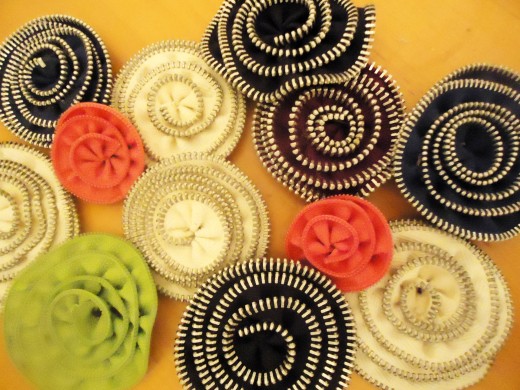
Another thing about this craft that I love is that each zipper makes two flowers. The diameter of the flower depends on the length of the zipper. I personally prefer using zippers that have the silver metal teeth because I love how the silver stands out but you can use any kind of zipper and it will still look nice.

Gather Your Materials
- Zipper
- Scissors
- Needle and strong thread
- Glue gun
- Felt circle- preferably matching the zipper
- Embellishment for the center- a button, gem, etc.

Step 1
The first thing to do is unzip the zipper and separate each side so it's into two pieces. If it's a non-separating zipper just cut it right above where it connects at the bottom and then separate it. Once you have it separated, cut off each end right where the teeth start and take the zipper pull off. You can save the ends and zipper pull if you want. You may want to use them later for something.


Step 2
Now thread your needle with some strong thread and a tie a big knot at the end. The amount of thread I use depends on the length of the zipper. If it's a 22 inch zipper, I use the same length of thread. Once you have threaded your needle, make a running stitch down the length of the zipper as close to the edge as you can opposite the teeth and sort of gather it down as you go. I usually just leave the needle and excess thread attached until I'm done gluing my flower together. The reason why is because I want the excess thread so I can loosen or tighten the gathers as needed when I'm forming my flower.


Step 3
Time to form the flower. Start out by folding over a small amount of the end of the gathered zipper. What you want to do is start a little swirl, putting dots of glue on the sewn edge behind it, to keep it in place. This is the center of your flower. Now just keep going around and gluing each section down to the sewn edge behind it. Adjust the gathers as you go, to produce the look that you want. Keep going like this until you get to the end of the zipper and put a dot of glue on the end and tuck it under being sure it blends in with the edge of the flower. After it is all glued together, cut the leftover thread.


Step 4
Now take the felt circle and glue it onto the back to hide all the stitching and then glue on the embellishment for the center of your flower or if you choose, you can leave it plain. All done! Now you have a cute zipper flower ready to be made into a fabulous fashion accessory :)


***Tips and Ideas***
- You can also purchase zipper trim by the foot to make these.
- When gluing the flower if you pull the gathers tighter while you are gluing it, it will cause the flower to look a bit more ruffly and dimensional, if you gather it loosely it will be more flat and spiral looking.
- The shorter zippers make great ring sized flowers or you could even use both sides of a smaller zipper to make a larger blossom if you wanted. Just stitch and gather both zippers separately. Start the flower with one and finish the outer layers with the second zipper. You could even try using two different colors if you wanted.
- You can use the end pieces that you cut off at the beginning of the tutorial to embellish the flower some way if you like. I have used them to form leaves.
Thank you for dropping by to check out my zipper flower tutorial.. Hopefully I have inspired you to make one or a few :)

Embellished Zipper Flower Photos


