How to Make a Quilt from Old Clothes

How to Recycle Clothing
This is one of my all-time favorite hobbies. Just know ahead of time, though, I've made many of them, and they never end up being perfectly straight, perfectly even quilts like with new fabrics. No matter how hard I iron them, I have accepted that each quilt will have little imperfections, but I look at 'imperfections' as character, so it never bothers me.
I start by collecting old clothes of mine, or whoever the quilt is for, of course. Usually by the time you have roughly six t shirts, a pair or two of pajama pants, a pair of jeans or khakis, and a button-up shirt, you have a very generous amount of cloth for a quilt. The more contrast in the clothes you choose, the better. Button up stripey shirts and plaid pajama bottoms are amazing in quilts!
Once I finally get to the point where I feel I have a nice chunk of old clothes ready to be recycled, I cut all the seams on all the clothes, and lay them flat. I iron them all, while trying to envision what the finished product of my clothing combination could look like. If any of the t shirts have cool logos on the front, I cut a square big enough to show that off, and then I like to have some squares the same exact size to even it out. I try to make the quilt as symmetrical as possible.
I usually cut a few squares in different sizes and arrange them on my bed, so I can get a feel for how many squares I'll need to make it the size it needs to be. I usually cut any logo ones for big squares, and save the rest for smaller squares. I'll usually arrange them in different ways at least three times before I finally get on the right track. Then I make sure I have enough squares cut for the whole quilt, and start sewing each line of squares.
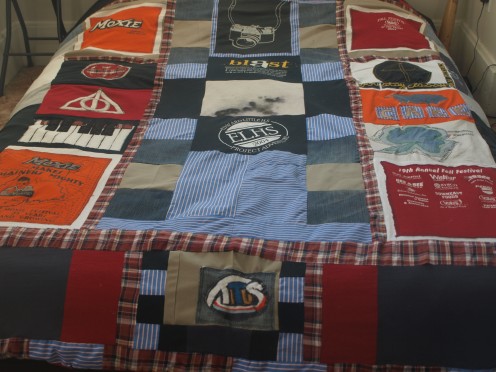
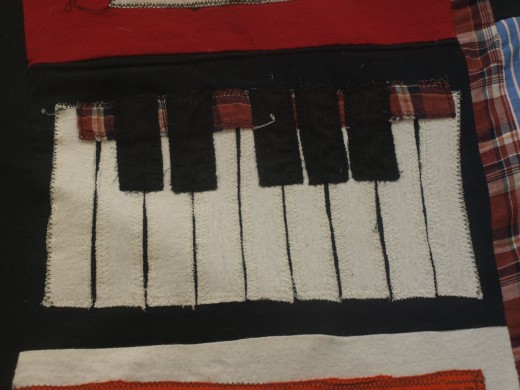
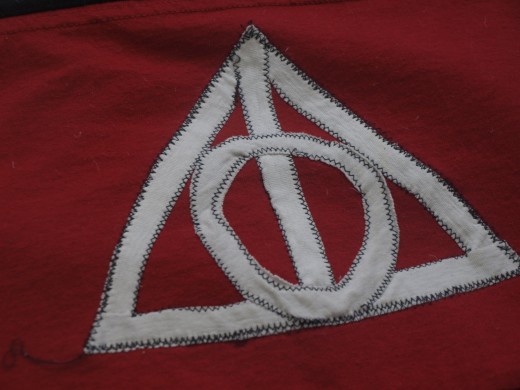
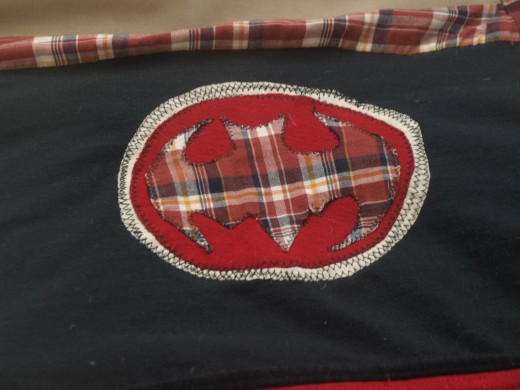
One thing I really enjoy doing is making my own shapes and patches to sew on. These are a few examples, one is a piano, one is a Deathly Hallows symbol, and one is a Batman symbol.
How to Make Your T Shirt Quilt
These can be like time capsules. The one featured in the photos have t shirts from high school in it. Another great thing to do this with is baby clothes.
Another detail I like to add is to take some embroidery thread and a small needle and sew my name and the year I made it on. Make sure all of this happens before you the backing goes on!
Once the entire front side of the quilt is completely sewed, and I'm tired of even looking at squares anymore, I sew it to a blanket (preferably wool, but fleece is nice, too). I personally like to use funky stitches (if your machine has them) at this point. Zigzags look super cool in quilts.
Next I get a flat sheet in a color that I like for the back, iron it, lay it flat on a large open space, and lay down the front piece. Then I fold the backing over the front piece a little and start pinning it all the way around. After I'm done pinning, I sew along the pinned parts, I like to do two switches all the way around, one that is just a straight, tight stitch, and then a zigzag where the backing meets the front. I do a lot of double stitching where I feel like I can get away with it, this will make it last a lot longer with less future repairing.
These always end up being my favorite blankets. Now stop eyeing that closet that holds all your old, useless clothing, and make it into something rad.


")
