- HubPages»
- Arts and Design»
- Graphic Art & Design»
- Design Software
How to Whiten Teeth Using Photoshop

Yellow Teeth in Pictures?
So you have this amazing photograph of yours where you look stunning - your dress is perfect, your hairstyle is right, posture is on-point for once. You would like to upload this picture to a social networking site but then you notice that your set of pearly whites are not exactly white.
This makes you a bit hesitant and you end up not uploading the picture even if you look pretty good in it. Does this sound familiar?
It has happened to me, it has happened to many others as well. It can be a frustrating experience when a good photograph is ruined just because of slight discoloration that gets amplified especially when you try to increase the color saturation even a tiny bit. The intention is to make your dress color pop, but they make something else pop out as well - the yellow tinge of our teeth.
So what can one do in such cases? You know your teeth are not that yellow in real but in photographs, they just tend to stick out a bit more depending on the lighting and color enhancements used.
Photoshop can come to your rescue here. All it takes is a couple of minutes to remove that yellow tinge of your teeth in pictures using Adobe Photoshop. The quick fix procedure is not complicated at all and can be finished in a matter of minutes.
This means that even if you are a novice when it comes to using Photoshop, you can still easily do this to whiten teeth in photographs. There are many techniques out there that will help you to whiten teeth instantaneously and effectively. You can try and test different techniques and see whether there's a particular method that suits your requirements more.
P.S: There are other more professional methods to whiten yellow teeth using Photoshop. The methods mentioned on this page are the least confusing for amateurs (like me) and are recommended mostly for personal use.
So let's get started! For this tutorial, I am going to use the following picture that of a lady with yellow teeth.

As you can see, the picture shows her happy and smiling but the only let down, if there's any, is her off-white teeth. How can you correct this?
Open this picture up in Photoshop and select the lasso tool.

Use the lasso tool to outline the teeth as shown below. You can easily do this if you zoom in to the picture using the "CTRL" and "+" keys on your keyboard.

Go to Image -> Adjustments -> Hue/Saturation. Increase the 'Lightness' value. You will be able to preview the effect on the picture. When you reach the desired 'whitening', you can save the settings by clicking on the Ok button.
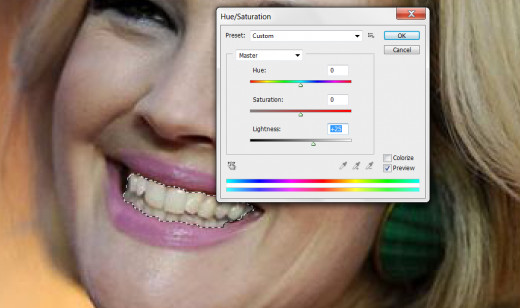
Your teeth will look much whiter after this so much so that you would wish it looked like that for real. Make sure not to increase the lighting factor too much as this would make the color of your teeth look abnormally white and fake.

Keen on More Methods?
The technique shown above is mostly used by amateurs like me who want a quick fix for their photographs. If I wanted to upload a picture of mine on Facebook quickly but would like to remove the yellow tinge off my teeth, then this is the method I go for. But for more professional purposes, this method which would require a tighter selection of teeth is not enough. There can be slight discrepancies in your picture if you end up selecting more than your teeth.
For people who would like to venture into more techniques, check out the videos below.
In the first technique, layer masks are being used.
In the second technique, learn how to whiten teeth in a realistic way using a quick mask and brushes.
There are many more methods like these out there that help you in whitening your teeth. Play around with Photoshop more to see which one works best for you and make quick fixes yourself whenever the need arises. It is handy to know your way around Photoshop so that you can edit your own photographs right in the comfort of your own home.


