Photography And Perspective


Most photographs are taken at the photographer's eye level since this is what comes natural to us. While this is acceptable most of the time, many great photographs are missed because we don't think of changing our perspective.
We see a subject and quickly take the shot, when we could have taken a better shot by simply changing our position. If you look up, there are many shots that can be made and they will usually turn out to be great images besides adding a perspective to which most people are not used to seeing.
By taking shots at ground level, the same effect is accomplished. For example, if under a tree try taking shots that focus on the top branches or perhaps on colorful blooms at the top of the tree. If next to a tall building, try shooting images which emphasize how tall this building is. Focus on the top floors and appendages, like towers or antennas.
The best positions to take for taking upward looking shots is to squat at the base of the subject, if possible, or even laying down. For trees, try to included a portion of the sky to add charm and interest. If photographing a statue, kneel or squat at the base and aim towards the face, this has the effect of making the statue look very tall.
Light fixtures can often be very elaborate and elegant, especially at fancy hotels and restaurants. Focus and shoot with attention to their intricate designs or elements. Restaurants have sometimes very unique and interesting signs, capture their images and add a small portion of the roof. Isolating them also works well.
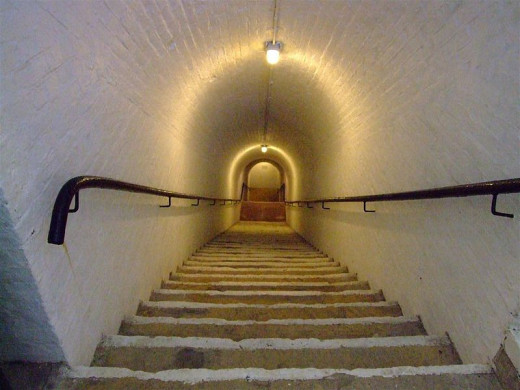
Ornate staircases make for great shots. Here you should kneel or squat at the base and take a shot that includes bottom and upper elements to give the appearance of climbing up.
Shooting at ground level or as low to the ground as possible works quite well when photographing small animals, including your pets, when photographing small children, and for some close ups in nature.
Laying down and taking a photo gives the viewer a new perspective on things, it makes one realize how the world looks to those whose eye level is low to the ground, besides allowing for the capture of some images that cannot really be recorded in their true essence from a higher plane. It is also advisable to include some parts of the low foreground to add interest and to give a much clearer perspective of the subject and its relation to the environment. Don't forget to include foreground and above the subject elements.
You can also get in close with the aid of a telephoto lens to isolate the subject with little or no foreground elements present in the shot.
For this theme, you should use a tripod with the center column removed so that you can spread its legs, alternatively you can use a bean bag onto which to rest your camera. Baring the availability of these two supports, then your elbows will have to suffice, just try to keep the camera as level as possible.
Low angle photography also can create a host of issues which involves the camera sensor and its ability to exposes the shots correctly. Because of the low angle some of your shots may expose wide areas of sky which can override your gear's sensor and make its settings choose these wide areas as the correct ones from which to set the exposure levels.
Set your camera to manual and expose for the subject. If you get a sky element in the final image which appears to be "washed" out, you can always correct this overexposure by digitally manipulating the final product.
It is worth noting that on especially bright days and more so if the Sun is high above the horizon and also due to the low angle, many of your subjects will cast hard shadows that can detract from the overall quality. You might just have to shoot for the subject, hope for the best, accept that you may not be able to compensate for all dramatic changes in lighting conditions, thus resulting in overexposed images and understand that some images might have to be digitally corrected at a later time.
This same issue can also present a problem of exposure with shooting while aiming towards the sky. Again, set the exposure settings for the subject and correct any overexposure digitally.
An alternative if digital is not your cup of tea, is to take a light reading from the subject and for the open space or area of the sky and set the meter for a middle ground. Another good technique which also works very well in most cases is to take at least three shots; one at a normal reading, one underexposed by at least one stop and a final one overexposed by at least one stop.
Although I always recommend for one to plan the activity, sometimes it is just better and simpler to just go out and shoot subjects which appeal to you.
But regardless, it helps if you at least decide what subjects will comprise your area of coverage for your planned photo adventure. If you've decided that your subjects will be trees or buildings, pets or close ups in nature at least you will have a working plan ready to be put into effect.
Like many other photographic genres, these themed photos can be submitted to general photography publications or sold as individual prints. Very good samples can also be submitted to photographic stock houses and to greeting card companies.
For special occasions such as weddings, this theme can be applied to give views from a perspective that is apart from the more traditional ones and tends to give the completed package more appeal and zest.
- Basic Photography Techniques - Perspective.
Perspective refers to the relationship of imaged objects in a photograph. This includes their relative positions and sizes and the space between them. In other words, perspective in the composition of a photograph is the way real three-dimensional ob - http://photoinf.com/General/NAVY/Perspective.htm
Perspective refers to the relationship of imaged objects in a photograph. This includes their relative positions and sizes and the space between them. In other words, perspective in the composition of a photograph is the way real three-dimensional ob
© 2011 Luis E Gonzalez


