How To Make The Background of a Picture Black and White in Photoshop

Five minutes is all you need
A simple yet beautiful photographic technique that has become prominent these days is taking the background of a photo, and turning it black and white (or gray scale). Doing this emphasizes the object of focus, and can have a pretty neat effect on the photo. I'm writing this with the mindset that you don't really need much experience with Adobe Photoshop, as I will be detailing all the procedures and tools used.
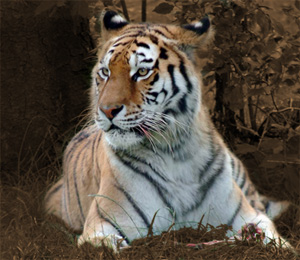
It's very simple to do with Adobe Photoshop, and involves pretty basic functions and so doesn't strain the system all that much. Any version of Photoshop should be able to do this, the version I'm using is CS4 for mac OS X. I will also go over how you can further add color to the background or add effects to further contrast it with the main object. Here is an example picture to show you the results:

Here is what you need to do
- Step 1 - Open up your picture in Photoshop.
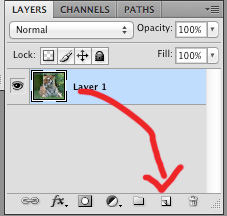
- Step 2 - Delete the empty background layer, it is not needed.
- Step 3 - Make a copy of the layer that you picture is on. To do this, you simply click on Layer on the menu bar at the top, select Duplicate, and then choose what you want to name it. Alternatively, you can just drag the layer onto the new layer option on the Layer window.
- Step 4 - Make the top layer black and white. To do this, go on the layer. Then from the menu bar at the top, click Image -> Adjustments -> Black & White, and then choose the settings for the black and white picture you want.
You have 2 options now, both are pretty much the same but you can do what you feel comfortable with:
- Step 5.1 - Select the Erase Tool from the Tool box, and simply start erasing the portion of the picture that you want in color. In order to do this right, the colored layer must be at the bottom, while the black and white layer is on top.
- Step 5.2 - Switch the layer order by putting the black and white picture on the bottom and the color picture on top. Select the Erase Tool from the Tool box, and then start erasing the portion of the picture that you want in black and white. For this the black and white layer must be at the bottom.
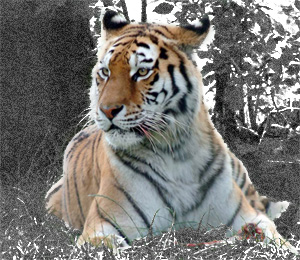
And that's how easy it is! Now you can choose to go even further and change the color of the background from black and white to another dominant color, or add cool effects. Here are a few examples of this:


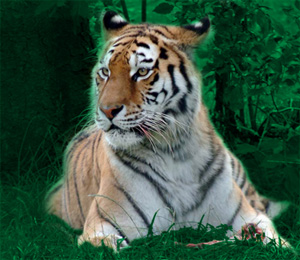


- In order to add color, create a new blank layer between the the color and black and white layer. The black and white layer must be on the at the bottom for this. Click on the new layer, and where it says Normal, change it to Multiply. This will make it so any color you add to the layer gets added to the colors on layers below it. Since the layer below it is all black and white, the color will simply get added to it. Choose the color you want with the Brush Tool and simply add it to wherever you want, or the entire picture.
- In order to add effects to the background, the black and white layer must be below the color layer. Select the black and white layer, and then on the menu bar at the top, simply select the filter you'd like to use. There's plenty of options and settings you can play around with, such as water color, sponge, charcoal, pencil sketch, etc...
If anything about this article was unclear, please comment below so I can clear it up.


