More Tips to Improve Your 3D Renders

A while ago I wrote Tips to Improve your 3D Renders, and while I think it is a useful article, it is by no means comprehensive. Whether you use DAZ Studio or Poser or one of the many other 3D rendering programs, there are a lot of little things that, when added up, can make or break your final product. In this article, I’ll focus on several more techniques you can use to set your renders on a higher level.
(For the purposes of this article, I will focus on DAZ Studio.)

The Backdrop
One might think that this is a small technicality because with DAZ Studio and Poser, the emphasis is on the models, not the landscape, but a poorly done backdrop can really mess with the final render. Basically, there are three ways you can create a background for your character models. The first method is to build it with props you may have. This works if you have buildings, flat planes and foliage, but if you don’t have that stuff, any attempts to fake it with props that kind of look like the above, is going to look silly in comparison to your highly detailed foreground. Similarly, you run into the issue of lighting when you develop larger scenes. Only a distant light is going to reveal everything in the render, but I dislike using the distant light because its shadows aren’t as detailed as the spotlight and it can be hard to get it to point in just the right direction. The second backdrop method you can use is to go to the edit menu and select ‘backdrop’. A window will pop up that allows you to select a file from your hard drive. This will place an unmoving image behind your character that is unaffected by lighting and anything else you put in the scene. This method works really well if you need distant objects and landscapes, but can be difficult to match the lighting and coloring to your character model. Similarly, changing the camera angle will not change the background in any way, so if you’re rendering your character from the top down, it will look like they’re floating awkwardly. The image is altered, however, if you render at a higher resolution. It will stretch and distort the backdrop however you want it, but anything beyond its original resolution might look muddy or elongated. The last method you can use is to render your character on a white background (or blue if your character has white elements) and then take the image into an editing program (like Photoshop) and cut it out and paste it onto a pre-made/downloaded background. This method is great for switching between multiple backgrounds quickly, but can be a pain when cutting out as it tends to leave little jags of white/blue around the character model that you need to manually erase. There are pros and cons to every method and it comes down to which ever works best for that specific render. One might work for today’s project, but tomorrow’s might require one of the other methods. Or maybe a combination of any of the three works best for you. Play around with each option until you find the one that really compliments your scene.
Lighting Color
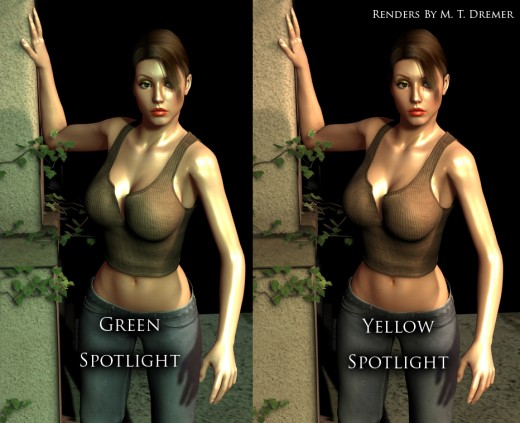
I mentioned the importance of multiple light sources in my first tips to improve 3D renders hub, but I didn’t stress the importance of the color of these lights. (This can be accessed under the parameters tab on the right hand side of the program.) I’ve rendered multiple science fiction themed renders and very frequently I try to represent a red or green light source. What I’ve noticed, however, is that when the spotlight color is changed (and possibly the distant light as well) to one of these colors, it can make your character look sickly and/or washed out. The winning combination is usually one light-yellow and one light-orange as they tend to accentuate flesh tones. But the problem is that those two colors don’t lend themselves well to every scene. My suggestion here is to use point lights for the small light sources like fire, buttons or magical spells, and keep the larger light sources more basic. That’s not to say you can’t use a green or red spotlight; it certainly is possible, I’m just saying that with colors that don’t focus on the figure, they tend to blend into the background and the focus of the image is lost.
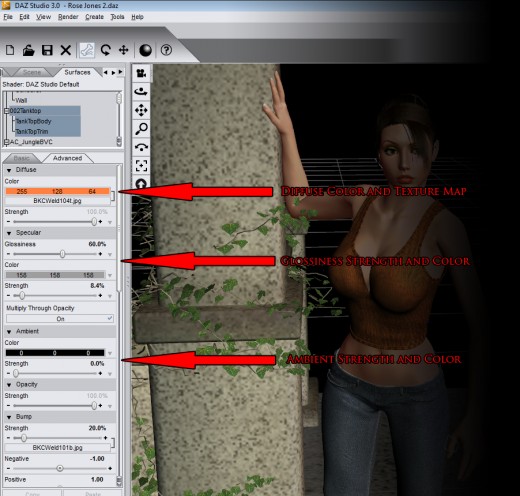
Diffuse, Glossy and
Ambient Settings
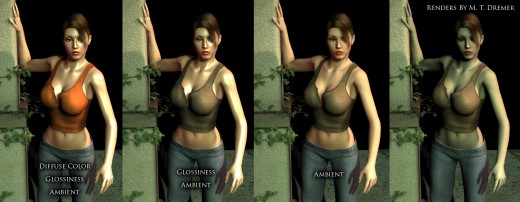
Each 3D model comes with these three settings (among others found under the surfaces tab on the left hand side of the program). I’m focusing on them specifically because they arguably make the most drastic changes to your figure. I covered texture and bump maps in my hub about making custom MATs but diffuse is important because changing just the color of part of your figure can alter it significantly. For example, if I had a hair prop that was only blonde in color, I could add just a little bit of brown to get a brunette or red for an auburn. Or, like I mentioned with the lighting color, making your figure green or blue can make them look sickly, or possibly alien, depending on what the story is behind your scene. If you’re working with a prop that doesn’t already have a texture mat, then color might be all you have to work with; but with the right combinations, a solid color might look better in the long run for things like primitives. Also, some figures have their default diffuse color set to something other than white and changing it may make the character look more to your liking.
Glossiness is an important tool when you’re trying to convey a certain texture. It’s true that bump maps are the more detailed method of doing that, but your glossiness effects how light reflects of your figure. If there is no glossiness, your character will look softer, versus a fine white gloss that can make a figure look shiny or wet. This is particularly useful when creating things like polished stone, wet skin, or shiny leather; all done with a basic tool that comes with the program. Pay attention, though, because most figures have the color of the glossiness set to black, which essentially negates it. You’ll have to switch it to white, or some other light color, for it to show up and adjusting how glossy it is may take some trial and error. Generally, if you drag the arrow to the right, the reflected sections become smaller, like in shiny hard objects, and drag it to the left for the reflected sections to get bigger, like in softer objects.
Ambient light is only something I recently figured out how to use. This one affects the amount of light coming off of your figure. This does not mean, however, that your figure will cast their own light; it just means that the parts of the figure in shadow will be visible because it has its own light. At first I thought this just made the figures look cartoony and un-realistic, but that was before I started adjusting the strength and colors. The result is a more definitive and detailed figure in the foreground. While some renders might still call for full shadows, this is a great way to direct focus and add vibrancy to the image.


Mimicry
I mentioned in the previous article that story is an important factor when developing a render. It serves as a driving force to make all of the little nit-picky decisions for you. Should the character have a weapon? No, because it’s not in the story. Stuff like that. Mimicry operates similarly, but rather than creating an original story, you’re mimicking existing ones. It could be a novel or short story you enjoy that has no artwork. So you then take it upon yourself to pay a sort of tribute to the work by re-creating the characters in a 3D image. Or, maybe there is an artist who you admire; why not recreate their work with your own figures? Now, before you go running to the comment section to tell me that this is stealing, keep in mind that these are recreational renders which are no different than fan art drawn by dedicated viewers. You are not marketing them and you should be giving credit to the source material. But the reason for this is because it helps you to think of uses for your props and figures that you may never have thought of before. Since you’re adhering to an existing image, or description, you will find ways to make it happen, rather than feeling limited by what you’ve downloaded. I’ve created a number of things for tribute renders that were later used in original renders, such as mat files, primitives and poses. Also, if you’re mimicking another artist, it can help you learn and appreciate all the details that go into a great piece of artwork. It’s a fun exercise to not only pay tribute to the things you love, but to help you branch out your rendering skills.

Reflections
I’m not as experienced with reflections as I am the other methods I’ve described in this article, but I’m going to include it because I feel it is a powerful tool for good renders. The reflection settings can be found on the same tab as the diffuse, glossy and ambient settings. There are essentially two ways you can use the tool. The first way, which is the one I use most often, is by assigning an image to be reflected. This can be accomplished by selecting the arrow just to the right of the color setting. By using this, the object will then reflect that specific image in the render, rather than reflecting other objects in the scene. If you do not specify an image for it to reflect, then by default it will reflect whatever is around it. Figuring out which one to use is based entirely on the scene. For example, very often I won’t build an entire scene around a character because I want the camera to have more maneuverability. If I were to use a regular reflection, it might expose the missing walls or oddly placed props. For that reason, it might be better to use an image reflection. If, however, my scene is fully complete, a regular reflection could add an extra element of realism. Image reflections are also useful when you want to create a sense of unusual magic; like a glowing sword or a spell ball and regular reflections are useful for things like mirrors, water and shiny objects.

A lot of these methods and suggestions may seem like beginner material, but when I first started working with 3D renders, there was a lot of stuff I didn’t know about. My biggest concern was figuring out how to place everything properly in a scene, but I didn’t realize how drastically some of these smaller settings could affect the final product. That’s why I’ve categorized them as ways to improve your renders, because they might not always be things we think about, or even know about. Hopefully some of these methods have helped you, or perhaps reminded you of the many options available when creating a 3D image.


