- HubPages»
- Arts and Design»
- Graphic Art & Design»
- Design Software
PhotoShop Scary Spider Poster

From Spider Picture to Halloween Poster
You will learn step by step how to turn your photographs into goolishous digital works of art using PhotoShop digital software. This lesson will center around making poster style artwork. Since Halloween is creeping up on us, our theme will be Scary spiders.
You will learn how to turn the average snapshot of an average spider into a very scary piece of art in just a few minutes. All you need is Photoshop and a bit of technique; which you will be learning here today.
The Picture (Spider Snapshot)
The first step is to go and take a snapshot of a spider any spider will do; if you can incorporate a portion of the web even better. The important thing is make sure that your focus is sharp and that the spider can clearly be discerned from the photograph’s background. That’s it. No big deal.

Loading and Saving Your Digital Snapshots to a Computer
Load the picture onto your computer in a file named “bighairyspider.jpg” (or something you can easily remember). Now save it where it can easily be found.
Open your photoshop program and start a ‘NEW’ file. Name it and choose a canvas size of 4”X6” for our purposes today. You can build a larger file once you have your design technique in place and are ready to print out a poster sized copy of your work. The most important thing to remember when creating art for printing is to account for the pixels-per-inch (ppi – also referred to as dots-per-inch or dpi). I highly advise using at least a 300 dpi file size and as high as 600 dpi when printing for a poster size output. Anything less and the quality of the print will hardly be worth your time. Along these same lines, make certain to create your work using the color pallet CMYK (cyan, magenta, yellow and key—or black) when designing for tangible ‘real’ prints of your art; while the RGB pallet (red, green, blue) should only be used when working on web-only images. This will significantly effect the quality of the image output as well.
Original snapshot of spider before photoshop skills are applied

DPI and Copyright for Digital Photos
When working on web-only art, the dpi can be reduced significantly.
- I usually work at around 125 dpi. Arguably, some will claim you can work at 75 dpi with good results. I choose to stay in the 100+ range and as high as 200 dpi. It’s a quality issue that works well for me.
Make sure you add a water mark to protect any work you copyright (©)
- If you don’t want your work high-jacked by someone else to claim as their own (yes, this happens regularly and is really bad form for anyone to practice, it is also very illegal), then you will want to copyright your work.

What's on your mind?
Did you already know about dpi and copyright watermarking?
Make Art From Snapshots!
Now that you have your file named and your canvas size determined you are ready to start the fun part, making your photograph into poster art. First, retrieve your bigscaryspider.jpg file by ‘opening’ it. It should pop onto your screen. Using your rectangular marquee tool, isolate the portion of the picture you wish to work with. Copy (cntrl +C) the image section and paste (cntrl + V) into your new blank canvas.
Using your Move tool (Arrow) grab the corner of the pasted image and adjust the size to fit your canvas appropriately. A window will pop up asking if you want to apply the size change, you do, so ‘apply’ the change.
Go to the tool bar topic ‘layer’ and drop down choosing ‘duplicate layer’; rename this layer- copy ‘frame’. A new layer of the same image has just been created. It is now adjustable and independent from the first layer. Go back into the ‘layer’ tool and choose ‘layer style' this time. You will see a drop window offering you several choices to use in the modification of the new ‘frame’ layer, choose ‘color overlay’.
When you choose color overlay the default color will appear over your frame layer. You will see a slider bar that is labeled ‘opacity’, reduce this to 47%. You should now be able to see ‘through’ the color layer revealing the image underneath. You can at this point change the color over lay color from the default color to the one you want. To do this by, opening the color pallet and clicking on the desired color. You have now determined your frame color and should see the change on the frame layer; now let’s create the actual framing effect.
Keeping the frame layer (layer 2) in front of layer 1, it is cut away in a rectangular shape. A new image is created when we view the layers as a single image

The Photo shop layer Framing Effect
Make a Custom Frame in Photoshop
The idea in creating the framing effect is to give the layer depth and define that it is on its own; independent yet part of the art work as a whole. We accomplish this using a few layer style applications. You should still be looking at the ‘layer style’ window. If not, drop down the window.
Choose the ‘bevel and emboss’ option. You have many to choose from, inner bevel, outer bevel, emboss, pillow emboss and so on. Decide which to use (I chose inner bevel to give more frame and separation effect). Next, chose the ‘stroke’ option. Decide on your color and size and opacity. Finally, choose the ‘drop shadow’ option. This is the most important effect for the frame application in my opinion. It gives the feeling of dimension and needed depth, causing your viewer to believe they are looking at a dimensional image. Save your work.
I save my work frequently to protect against work loss when mishaps or computer behavior problems happen. You never know when a computer may have a hic-up and you loose all of your unsaved work.
Oh! Now I See the Frame Effects!
Now that you have applied all of the frame effects to the frame layer, we can cut out our actual frame. Up until now, you haven’t been able to really see what you have been creating in terms of the frame effect. Once you do this next step, your frame will appear right before your eyes. Again, choose the rectangular marquee tool and draw a box around the spider within the frame layer (you should still able to see the spider through the color over lay).
Now ‘cut’ (cntrl + X) that section out of the picture, WA-la! The accents and decorations are quite apparent and the styles you applied to the frame layer show them selves. You can now see your frame effects causing the frame to pop right out of the image. Cool, huh? Save your work.
Use PhotoShop contrast and brightness adjustments to intensify any image

Making Your "Spider Poster"
Make a Spider Picture Scary
Now we embark on the best part of our photo shop design. We have the frame layer in place with all of its neat accents and special effects. At this point we are going to return to our first layer, the spider picture that has no color overlay applied. Choose this layer (layer 1) make certain that you are on layer 1 or you will be altering your frame layer, and you don’t want that . Choose the ‘image’ tool on the photo shop task bar (usually on the top bar at third from left), in the drop window choose ‘adjustments’ and then in that drop window choose ‘brightness and contrast’. One of the easiest ways to create drama or intensity within any image is to adjust the brightness and contrast, to the extreme . Since you are trying to create a scary Halloween spider poster, go for it! The thing I have found most effective, is to reduce the brightness a little bit and then increase the crap out of the contrast . When the filter (Poster edge) is applied, it gives a very spooky look to spider images in particular.
Using PhotoShop filters, a beginner can create creepy effects easily and quickly.

PhotoShop Poster Edge Effect
The ‘poster edge’ filter will be applied to layer 1. To do this, choose the ‘filter’ tool on the task bar (usually 6th task from left). Within the drop window, choose the ‘artistic’ filter option; in that window choose ‘poster edges’. A new and independent window will pop open giving you choices to adjust the edge thickness, intensity and posterization. It will also let you preview the effect the applied filter will have on your digital art layer 1 instantly. You should have the ability to (+) or (–) the zoom ratio to see how the changes in the three adjustment choices will effect your big hairy spider layer. Here is where your artistic nature comes into play, adjust the poster effects until you are satisfied with the look of that scary layer. Hit ‘ok’ and you will watch the posterization appear on layer 1 spider. Save your work.
By adding text to your digital art, even a "Beginner" can evoke greater emotion.
Finishing Your PhotoShop Digital Art Spider Poster
Completing Your Digital Poster
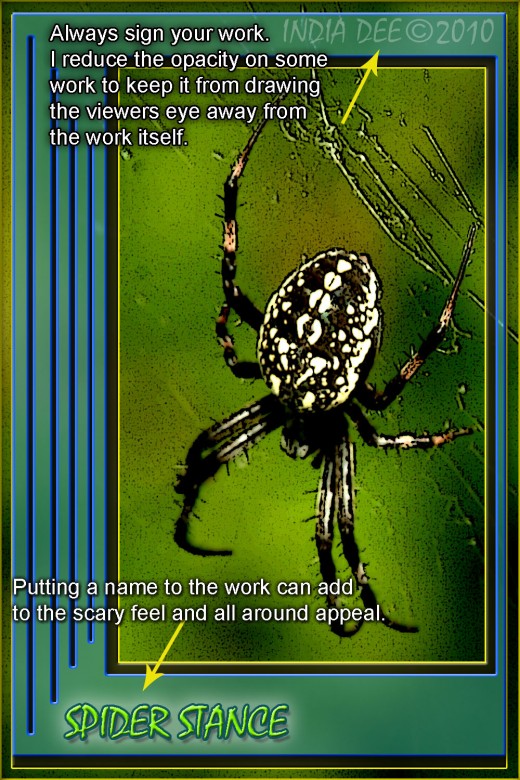
Adding text to the work helps the final photo shop project feel more like a poster. You know, every poster seems to have something to say. I also find that I can add better appeal to the art by using the same cut-out technique we used when creating the frame layer. I use very thin lines to add texture and detail to the frame itself. You can play around with this technique (even by adding additional layers if desired) find a look that you like and then fit it into your project accordingly.
When adding text keep in mind the style of your work. In this PSD project we are striving for a scary feel. Choosing a spooky Halloween font can make all of the difference between your poster looking cheesy (which can be just as fun) or actually having an edge of intensity. I have chosen ‘Mistral’ as my font style and named the piece “Spider Stance”. Now you can use this same idea or be creative by coming up with your own (which you should do).
As I add my text layer, I want to give it an extra boost of character. To do this, I again use the layer style tools and bevel, drop shadow and color overlay to the text layer. You will have to create your text with the text (T) tool and then change to your ‘Move’ tool (arrow) and restrain the text to modify the layer style. This sounds more tasks oriented than it really is. Be sure to save your work.
TOP 5 ONLINE PHOTO PRINTING SITES
Signing and Printing Your Digital Art Digitally
Getting Your Digital Art in Print Form
Last but not least, when you have completed your photo Shop Digital Design project from your original snapshot of a spider, be sure to sign it and copyright it if you wish. Save the file to a folder or external removable drive (or CD). Unless you own a 20” X 30” print capable printer, you will want to take your file to a photo lab to have it printed. Or, there are many online print shops for you to choose from and the prices can be very good.
If the resale of your Halloween poster is your goal, look for companies that offer a price break at set quantities for the best deals. The 4” X 6” canvas size @ 300+ dpi should allow you to make a pretty nice 20” X 30” quality print of your poster. Again, increased dpi will provide a better quality print at any size.
Finished "Picture to PhotoShop Poster" Digital Art Design
Full Frame Prints vs Cropped Prints
How to Get a Full Frame Print With No Cropping
4 X 6", 8 X12", 12 X18", are a few print sizes that allow an image to be printed free of any unwanted cropping. These are known as "full frame" configurations. It is worth noting that these dimensions for prints are common sizes that usually prevent the image from being cropped. When ordering your prints, you want o make sure you referred to your poster artwork as "full frame" prints. A few common PRINT SIZES THAT WILL CAUSE CROPPING ISSUES ARE 3 X 5", 5 X 7", 8 X10", 11 X 14". Make certain to print your 4 X 6" canvas on a print size that does NOT crop the image, or you will lose a portion of your work, or have a tacky uneven boarder on your custom PhotoShop designs, and that is just never a good look.
Good luck and have fun creating your own scary “Big Hairy Spider Photo Shop Digital Art Poster” project!
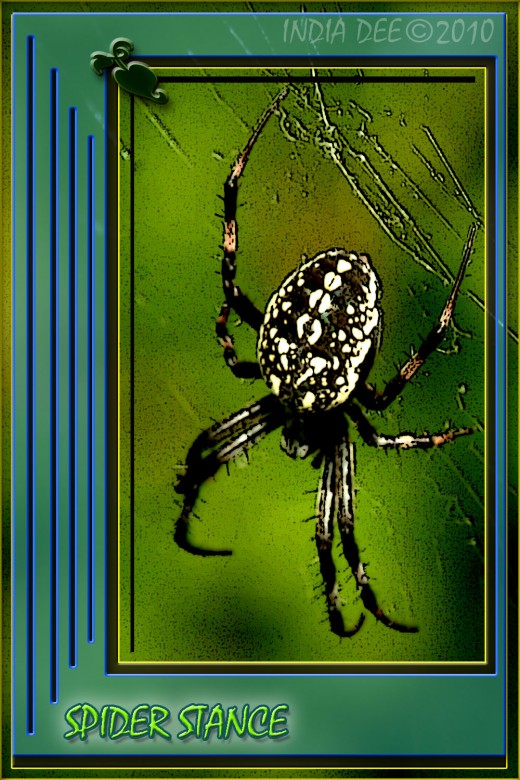
A couple of variations that turn a Spider picture into a "Photo Shop Spider Poster"
Click thumbnail to view full-size


Check out these great links for Photoshop Beginners
- A Guide to Basic Photo Editing with Photoshop
There are a lot of amazing photo editing programs on the market, but to the beginner they can seem intimidating. With a few simple steps one can clean up, modify and enhance their digital photos using Adobe Photoshop CS. - How to add your face to another picture using Photoshop CS4
Whether you would like to have your face placed near by a famous actor/actress, a friend or a trip you have never been to, this tutorial is right for you. The tutorial is designed for absolute beginners. And... - FROM SNAPSHOTS TO ART the magic of digital images for Beginners
On a beautiful sunny afternoon a gull floats into view, 'snap'! The moment is captured, deliberate and graceful, 'The gull taking off'. The brown sandy wall of stones behind the gull bring texture and shadow....


