Recycled t-shirt pillow

Make an easy t-shirt pillow

Easy t-shirt pillow DIY
If you have kids, you probably have at least one t-shirt around that they have outgrown. If your house is like mine, you have many. There's the t-shirt from the first day of kindergarten, the field trip t-shirt, the school spirit t-shirt and a variety of event t-shirts. Pull those t-shirts out of storage because they're the perfect way to teach your child to sew!
Turning old t-shirts into pillows serves three purposes: (1) it teaches a skill, (2) it recycles, and (3) your child gets to enjoy those t-shirts again.
Here's what you need:
- T-shirt
- Ruler
- Fabric pen or pencil
- Sewing machine or hand-sewing needle
- Thread
- Scissors
- Polyester stuffing
How the marked stitch guides will look
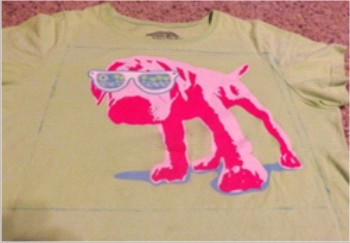
Mark stitch guides
- Smooth the t-shirt out on a flat surface with the front side facing up.
- Use the ruler and fabric pen to draw straight lines around the t-shirt design, forming a square or rectangle (Fig. 1). These will be your stitch guides.
If machine-sewing:
- Keep the t-shirt flat and smooth while transferring it to the sewing machine. Lift the presser foot and slide the t-shirt under it, positioning the needle at one corner of the block you drew. Lower the presser foot to keep the shirt in place.
- Start sewing the pillow by making four or five stitches forward, then reverse back to the beginning point to lock the stitches in place. This takes the place of knotting.
- Sew along the guideline. At each corner, stop sewing and position the needle into the t-shirt (use the hand wheel if needed). Lift the presser foot and turn the t-shirt so the child can continue sewing.
- Sew around all four sides, stopping 2 to 3 inches from closing the block on the fourth side. Reverse a few stitches to lock them in place. Snip threads and remove the t-shirt from the machine.
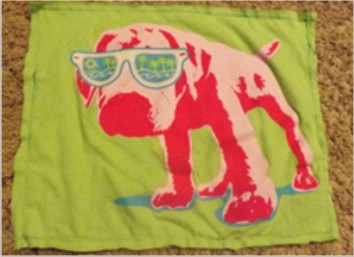
- Cut around the block, 1/4 to 1/2-inch outside the stitch guide lines (Fig. 2). Discard the remainder of shirt (or save it for future crafting).
- Stuff polyester filling into the pillow through the open hole (Fig. 3). Add filling until you reach the desired fluffiness.
- Return the pillow to the sewing machine and place it under the presser foot, lining up the needle with the guide line. Start sewing where you left off. Don't forget to reverse a few stitches to lock in your new seam. Do the same at the end of the seam. Snip threads and your pillow is complete!
If hand-sewing:
- Follow the preparation steps above.
- Thread a needle and pull the ends of the thread together to knot. Stitch the t-shirt together using the lines as a guide.
- When it is time to finish the stitching to leave the pillow opening, sew over the last few stitches to lock them in place without having to knot. Cut the thread away and trim around the stitched lines as described above.
- Fill the pillow with stuffing.
- Knot the thread again and stitch the opening closed. Be sure to end with reversing over stitches to lock them in place.
All trimmed
T-shirt poll
How many graphic t-shirts do you own?
Ready to stuff

TIPS
- If you don't have a fabric pen or pencil, use a No. 2 pencil. Just trace lightly and erase marks later. Over time the t-shirt edges will curl and hide any marks that might remain, so don't stress over them.
- If you plan to pin the shirt front and back together to keep them in place, put your pins in the center of the design well away from the areas they will be sewing.
- This is an easy project to teach your child machine sewing. Be sure to show all safety features, like how to guide fabric through the machine without endangering fingers.
- Having a sleep-over? This is a fun project to do. Have each child bring a favorite t-shirt then help them sew by hand (or use the handy no-sew version in the video below).


