Time lapse Photography - Concept & Techniques

Time Lapse Photography
Introduction to Time lapse Photography
This technique is effectively an automatic version of stop motion video, which
shoots at a very low but constant frame rate. This technique is used to encapsulate large span of time in few seconds or minutes. Instead of shooting studio-based
models it is usually used to capture organic motion or natural phenomena.
Individual frames are recorded, at pretty normal exposures, but with large
intervals in between. The interval could be anything from a few seconds to
hours or even days. The concept is to rapidly speed up events otherwise
impossible to easily observe, such as a flower growing, blooming, wilting and
finally withering, or clouds rapidly speeding by, or the erection of a large building.
Sometimes the event can be orchestrated, as in the assembly of a large
construction, other times it may be completely uncontrollable, such as the
building of a bird’s nest.
Techniques
Although simple in concept and straightforward in theory, timelapse can
involve some very complex planning. Firstly the timing of the shot must be
determined. Here there are two major considerations, the time the event being
recorded will take to complete and the screen time production would like it to fill.
Imagine a shot for Euro TV (25 fps) that must last 4 seconds on screen; it will
require 100 frames. The time for the event should then be divided by this shot
length to estimate the interval between frames. Thus for a plant which has a life
cycle of 25 days we should allow a quarter of a day (6 hours) between each
frame. This is a nice simple example because our plant is being grown in a
greenhouse which is constantly illuminated for the shot. The exposure could be
a normal 1/50 second at whatever stop although this would then create a very
jerky, steppy result. If a smoother, more flowing and graceful movement is
required then perhaps some motion blur should be introduced. This could be
done in post-production (preferable) but it could also be achieved with a long
exposure time achieved by slow film, small aperture and heavy neutral density
filtering (obviously low light would not be good for the plant’s growth).
However, if our shot was of a building being erected and it took say 100 days
to build then that would mean we would expose just one image per day. Over
three months the quality and quantity of light is going to change appreciably and
therefore a number of extra decisions shall need to be made. Will exposure be
varied or kept constant? If the latter, then the image could take on a shimmering
effect as it varies in brightness from frame to frame. But if the former then it
should be done by varying exposure time, since changing aperture could affect
the look of the shot and it might appear to ‘breathe’. The exposure could be
adjusted by shutter angle, neutral density filtering or exposure time. All of these
could work but involve other decisions depending on the equipment being used
and the shooting method adopted (will the camera be attended or completely
on auto?). Having made these decisions it is necessary to decide at what part
of the day it shall be shot: at the same time each day – which will result in the
light appearing to move across the shot, which can be a very nice effect with
shadows smoothly wiping across the frame; alternatively it could be calculated
to offset the exposure by a daily increment so as to maintain a light level (for
example by going half an hour after sunrise).
Other technical issues must also be resolved such as whether a high shutter
speed or long exposure time serves the shot best, whether to use any filtration
at all and what film speed and color temperature to use (is the shot day or
night, dusk or dawn?).
But above all there is also the complexity of camera placement, lens length
and framing. If you are shooting a hole in the ground where a building will eventually
appear it will be necessary to decide on how to cover the two radically different
extremes – the empty start and filled up end. So, is the camera locked off
(most timelapse shots are) and therefore how much room must be left in the top
of frame for the building to grow into? This obviously must be calculated with reference
to the architect and builders. Alternatively, will the camera be tighter and
pan up with the building as it grows. This is very tricky to work out so that a
smooth pan will be created. The pan can be made manually by each day tilting
up the camera by a predetermined amount previously marked-up on the camera
head. The camera could also be motor driven and controlled by either a
computer or special mechanism designed for the purpose. Alternatively, it is
shot on a wide locked off angle and the frame enlarged to permit movement
within it.
Apart from photographic issues, placement and organization of the shot will
also have to be dealt with. Where and how can the camera be mounted to gain
access to the required image? Will a specially built tower have to be constructed
or can the equipment be mounted on an existing structure? What is its exposure
to the elements and therefore will it have to be in a sealed weatherproof housing
with temperature and/or humidity control? Is easy access possible and, if on film,
can reel changes be avoided or, if required, then a system capable of allowing
such changes without moving anything will be necessary. If video is being
used, will the recording media be at the camera head or at some more hospitable
location nearby and more easily accessible?
Finally special arrangements may be necessary for the site operation. In
the example above, for instance, with just one frame per day, people would pop
on and off in single frames which might not be acceptable. Therefore it might
be necessary to agree a certain time each day when the site would be clear –
obviously this might predetermine the time of exposure to be in the middle of a
meal break or other convenient time.
Timelapse, whether on a large scale, such as depicting a building site, or a
small scale, such as recording the life cycle of a chrysalis, can be tackled
using a variety of formats and techniques. The most convenient is a film camera
controlled by an intervalometer – a specialist control box which manages
the variables such as interval between exposures, camera shutter and pulldown.
The intervalometer needs to be used in association with a stop frame
motor. Most rental companies have suitable models for the camera types they
supply.
Video is more of a problem since unlike film the tape cannot be left in contact
with the heads for long periods. Thus it is necessary to edit in the single frame
recorded at each cue point. To avoid errors such as tape dropout it is customary
to record a number of frames for each exposure. Other decisions also need to
be made depending on the circumstances of the shot, such as whether to shut
down the system between exposures or to leave it in standby and whether the
recorder should be at the camera head or remote.
Apart from some DV camcorders which have a built in intervalometer function
most cameras and recorders cannot be programmed to do this. Thus a custom
controller or computer with special control software will be required to
govern the process. A far better approach is to record on to hard disk and for
this option a number of editing programs (such as Adobe Premiere) include the
necessary control functions and a far superior integrated approach. In cases
where the total event time is short – less than 2 hours – then it may be simplest
to leave the system recording at normal speed for the duration and then extract
the necessary frames during post-production.
It is also possible to use still cameras loaded with large magazines. These
can be controlled by an intervalometer and offer the advantage of a much larger
frame. Conversely they will have to be transferred to a digital system for assembly
into a sequence of matching frames. Registration is not always all it might be
in stills cameras although specialist units are available at a ‘price’. The advantage
of a larger frame for TV use is that a locked off shot can be made and then
with appropriate enlargement a move can be added afterwards.
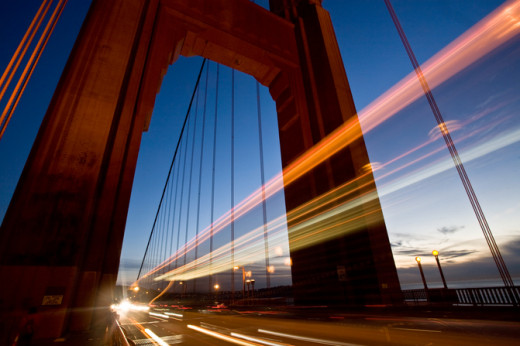
Timelapse can be used for a vast array of subjects to produce both photorealistic
sequences such as we have discussed or for surreal or abstract imagery
by shooting natural phenomena such as clouds and water or specially created
subjects such as growing crystals or other chemical reactions.