How to Upcycle Bunny Ear Costumes into Beautiful Party Favor Bags

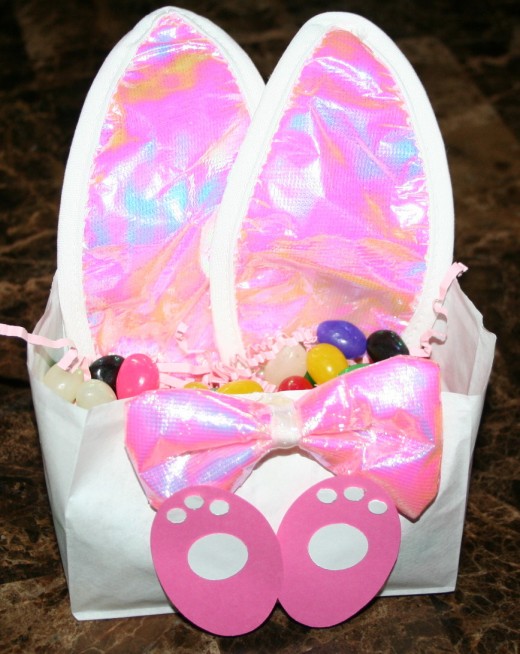
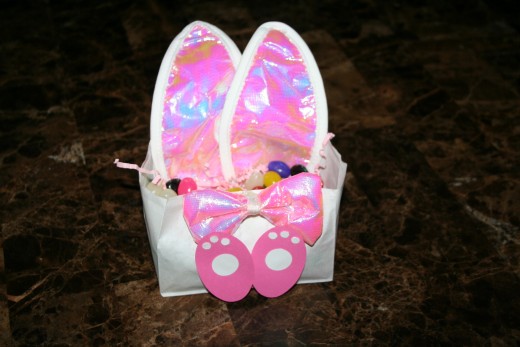
Bunny Easter Bags made from Upcycled Bunny Ears
Introduction.
I purchased a wholesale quantity of bunny ears from a costume supply store when I volunteered at a preschool years ago. I had quite a lot left over in the back storage closet of my craft studio. After coming across them in a bag, I started thinking about what I could do with them now that my children are no longer the bunny-ear wearing age.
What is upcycling?
The definition offered by Wikipedia for Creative Reuse, upcycling, or repurposing is the process of taking materials or products that are unwanted for their original function and transforming them into pieces of art or other useful items.
This is different from recycling where products are broken down to component parts and re-manufactured into new products.
Conventional reuse is when the product is used in its original purpose again.


Time-Saving Tip!
Using an electric paper shredder, shred pink tissue paper cut in half and use to fill the favor bags.
Recycle old tissue paper from gift bags for another upcycled tip!
Decorative Touch. Use an old cookie jar to store your glue sticks.

Supply List.
Here is a list of supplies that you will need in order to complete this project:
- Bunny ear headbands from old costumers such as Halloween or Easter
- White paper bags
- Paper trimmer
- Scissors
- Paper hole punch
- Cardstock in white and pink
- Hot glue
- Cotton Balls (for the tail)
- Other form of strong paper adhesive such as glue dots or double-sided tape
- Shredded basket filler or tissue paper
- Jelly beans or other favors
Sizzix users: alternative to cutting out the circles, use the medium oval die from Tags, Oval Combo Set and the Circle Trio Die from the Windows and Frame Making Set. This will save time instead of cutting out all of the circles by hand, especially for large-scale projects.
Always Protect Your Work Surface!
|
|---|
I use an old desk calendar flipped upside down to catch glue, sample marker color, and provide surface protection for the table in my craft studio. The large white paper gives me a wide work surface and only costs $3 at the local store.
|
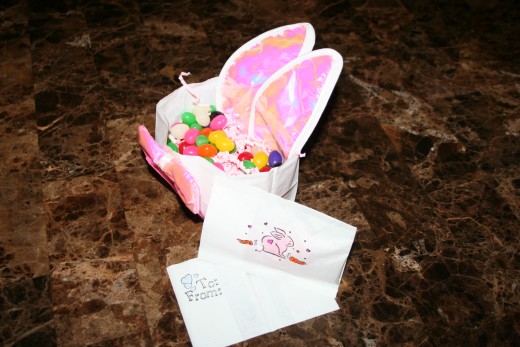
The finished prodcut.


Instructions.
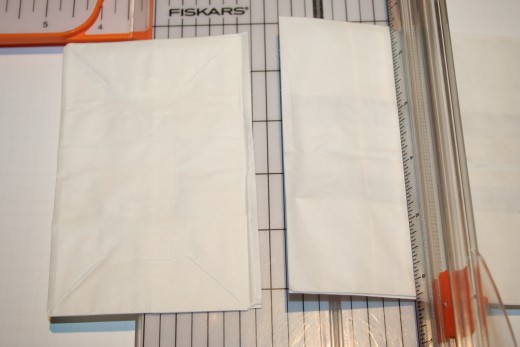
Step 1. Trim off the bottoms of white paper lunch bags with a paper trimmer. Save the tops for later.
Step 2. Cut the bunny ears away from the costume headband and set aside. Save the headbands for later.
Step 3. Cut out two ovals for feet using pink cardstock (per favor bag). Sizzix users, use the medium oval from the Tag Die Cut Set 38-0937. This is the perfect size oval shape.
Step 4. Cut out circles from white cardstock for the paw prints to adhere to the feet. Two size circles are needed. One 3/4" circle per foot plus 3 small hole punch size circles. That's a total of two 3/4" circles and 6 hole punch circles per favor bag. I used a regular school paper hole punch to create the circles for the paws. Sizzix users, use the Circle Trio Die from the Windows and Frame Making Set.
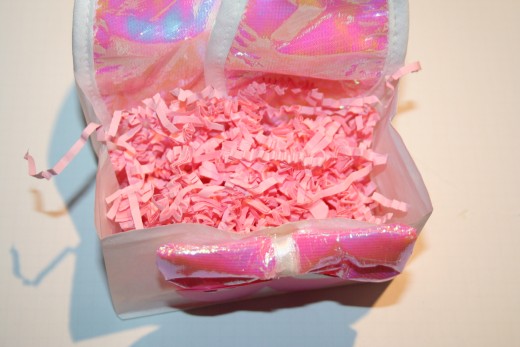
Step 5. Adhere the bunny ears to the back side of the bags, on the inner side, using hot glue. Make sure to align the bottom of the ears with the bottom of the inside of the bag. Don't worry if the bags fall over from the weight of the ears. This will be resolved when you add the paper filler and jelly beans to weight the favor bags down. The paper shreds will hide the bottoms of the ears in the favor bag.
Step 6. Adhere the circles to the ovals, and then glue on to the front of the bags using a strong paper adhesive.
Step 7. Use basket filler or shred tissue paper and fill the bag.
Step 8. Glue a cotton ball on the back of the bag.
Step 9. Complete by filling with jelly beans or other favors.
Bonus: My ear headbands came as a set with bow ties. I hot glued one to the front. You could also try using a pink bow to decorate yours!
For more crafty ideas:
- How to create your own rubber stamped stationery
An illustrated guide to creating unique, one-of-a-kind stationery with rubber stamps. Give away as a gift to that special someone. Teachers will love to receive a handmade gift such as this.
The bag won't be top heavy once filled with basket filler.
Save the discarded pieces for future projects!
|
|---|
Tops of paper bags that have been trimmed off can be saved for future projects such as school projects or created in to more bags! See tutorial below.
|
Use the headbands from the bunny ear to make new headbands.
|
Cash in on these extra projects at the next craft sale at your local school!
|
Create jelly bean packets out of the remaining portions of white bags.
After trimming off the bottoms of the bags for this project, you will have a lot of unused and wasted bag materials.
Here is another creative idea for upcycling the remaining portions of bag.
You will need:
- Unused portions of white paper bags from the favor bag tutorial above
- Sewing machine
- White thread
- Rubber stamps
- Coloring pencils or markers
- Glitter glue
- Jelly beans
Bonus sewn treat bag!


Instructions.
Step 1. Using the remaining portions of paper bag, cut a 3 1/2" section.
Step 2. Decorate one side or both with Easter rubber stamps, flowers, bunny stamps, or sentiments.
Step 3. Color in your design with colored pencils, markers, or glitter glue. Make sure the marker colors don't show through on the back. Insert a piece of wax paper between the layers before coloring with marker. Copic Marker users: Cerise RV06, Pink RV11, and Chrome Orange YR04.
Step 4. Set aside to dry.
Step 5. Sew across the bottom to create a seal.
Step 6. Fill with treats such as jelly beans. Holds approximately 12 jelly beans.
Step 7. Sew across the top to create a seal.
Bonus: Add embellishments for added detail. I used a small white pompom for the tail of the rubber stamped bunny.
Now you have a nice little favor packet completely sealed so nothing will spill out while passing around to friends, school classmates, Easter parties or birthday parties.
Think outside the bag!
What else could you find to fill these little bags with and pass out among friends? How about some of these suggestions:
- Coins
- Gift cards
- Mini Lego figures
- Flat chocolate candies
- Licorice bites
- M&Ms
- Skittles
- Gum balls
- Smarties
- Mini Hershey candy bars
- Nonpareils

Would you rather...
Where to find supplies.
Here is a list of suggested places to purchase the supplies used to create this tutorial.
- Bunny ear headbands can be found in Halloween costume aisles or on clearance after Halloween. Most stores sell them as accessories or with an actual bunny costume. Walmart, Toys R Us, and costume stores have bunny ears for sale mostly once a year, possibly at Easter also, but online sellers will have them year round.
- Check your child's old costumes and closets for bunny ears you can use to upcycle for this project.
- Most grocery stores sell brown paper lunch bags, so it took a little searching to find white bags. I have found the bags at Target, Walmart, and also online. They are normally the same price as a package of regular lunch bags.
- The rest of the items in this tutorial came from craft stores, Walmart, the Dollar Tree or from leftover prior craft projects located in my craft studio. Look around your craft space and see what you have available to start this project without spending a lot of money.
Upcycling Fun!
Turn an old vanity table into a sewing table for your craft room. Vanity tables are usually smaller than craft tables, but include drawers which can be used to store your sewing notions.

Finding items to upcycle at thrift stores.
Plan a day trip to a few local thrift stores.
There's nothing more relaxing to me than having a day where I can take my time and sort through flea markets or thrift stores for the perfect used items to upcycle.
It's not often that I get the chance to do this, so I really make a special day out of it and plan my time wisely.
Check out the used furniture sections starting with wooden cabinets and drawered chests. These are so much fun to repaint and repurpose into new furniture items for your home.
Consider using fabric from old clothing to create doll clothes.
Turn old China cups into candle holders.
The possibilities are endless and are so much fun to imagine!
Conclusion.
The designs for these craft tutorial are my own ideas. I'm so glad to share them with you.
I hope that you will enjoy making them as much as I did. Use them for your next Easter party, baby shower, birthday party, or school party. They will certainly be the tale of the party!


