ArtsAutosBooksBusinessEducationEntertainmentFamilyFashionFoodGamesGenderHealthHolidaysHomeHubPagesPersonal FinancePetsPoliticsReligionSportsTechnologyTravel

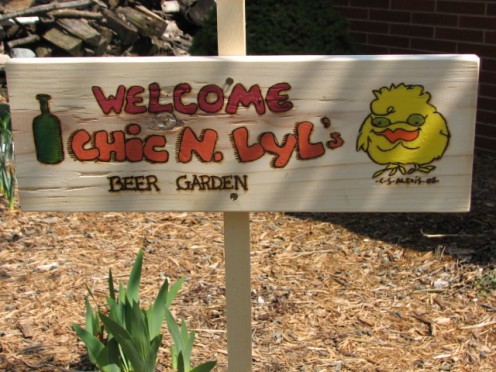
How To Make And Woodburn A Garden Sign and Decorate It With Acrylic Paints

Updated on December 2, 2015
Make your custom sign
Here are the materials gathered to make the sign

List of Supplies and Tools You Will Need

Below is a suggested list of tools and materials you can use to make a garden sign. Keep in mind that in most creative ventures the subject development is not set in concrete. In other words, you can ad-lib if you find a better way, a different way or just want to experiment. That is what makes creating things so much fun.

  • A flat board that will handle the amount of lettering you want to put on it. My only suggestion here is that you use a solid piece of wood and DO NOT use plywood or particle board.
  • Some sandpaper if you would like to smooth the wood
  • Acrylic paints in colors you want to use
  • A stake to post the sign to so that you can put it in the garden. This could be substituted with wire or rope to hang the sign if the garden is fenced or you have some place to hang it rather than using a stake.
  • Nails or screws to attach the sign to the stake
  • a woodburning pen
  • clear acrylic to top coat finished sign (optional)
  • artist's paint brushes
  • pencil
  • paper
  • carbon paper
  • ruler
  • ballpoint pen
  • drill and bits
  • masking tape
  • scissors

Get Everything you Need Together In Your Work Area

The first thing I like to do is gather up all of the tools and materials I am going to need for my project. When I have everything I set it up in the area that I will be working in. This work space can be the most functional if it includes good lighting and a trash can and broom. I also like to have a few rags and a wet rag just in case I need it. You never know if you are going to get paint or dust or something unwanted on your clothes or furniture. I also like to keep a fire extinguisher handy when I am woodburning. Fire is a big hazard and you always want to practice safe working conditions. Try to be very careful and thoughtful as you proceed with your project, no matter what the project is.

Use The Red Arrows Below The Photo To Advance The Slide Show

Click thumbnail to view full-size
Rough SketchMake the paper for your final drawing to fit the woodI had to tape two pieces of paper togetherwrap it around to fit to the boardtrim off the excess paper
Rough Sketch
Rough Sketch
Make the paper for your final drawing to fit the wood
I had to tape two pieces of paper together
wrap it around to fit to the board
trim off the excess paper

Get The Design Ready To Transfer To The Board

The next step is to get a design ready to transfer to the wood. I usually make a rough sketch and then straighten it out. Then I make the finished design on a fresh sheet of paper. The finished one is the drawing you will be transferring to your piece of board. I also like to run over the wood with a sanding block loaded with fine sandpaper. I do this as a safety measure because I hate getting splinters.

The sign is going to be used outside so I do not want to sand too much. I want my sign to have a rustic touch to it. This is my choice for what my design subject will portray. It may be that your design would be nicer if you finished the board you choose more to suit your subject matter. This is all a matter of personal preference. Have fun with your project and experiment. Try to visualize what your finished project will look like as you are working.

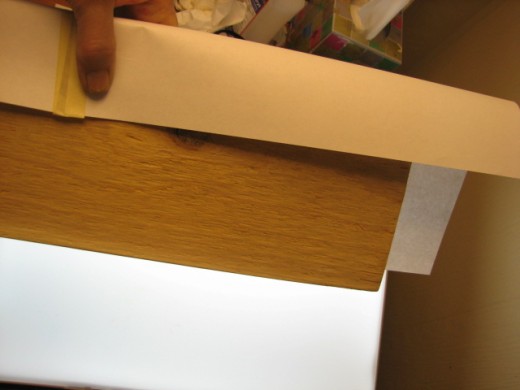
For this project I had to tape two pieces of paper together to make it long enough for the final pencil design. I wrapped the paper around the board and trimmed it to fir with a pair of scissors.

Another Slide Show With Detailed Photos

Click thumbnail to view full-size
Finish your final drawingmake the final design accurate for the transfer processTape the paper down so that the design is laying where you want it to be located on the woodput the carbon paper between the wood and the paper design
Finish your final drawing
make the final design accurate for the transfer process
Tape the paper down so that the design is laying where you want it to be located on the wood
put the carbon paper between the wood and the paper design

Look At The Slides Using The Arrows Below The Photos

Click thumbnail to view full-size
mark a dot to match to the dot on the woodtrace over design with a ballpoint pencheck to make sure you traced all lines before you remove the papers removedNow the board is ready to woodburn
mark a dot to match to the dot on the wood
trace over design with a ballpoint pen
check to make sure you traced all lines before you remove the papers removed
Now the board is ready to woodburn

Use Carbon Paper To Make The Transfer

Take your finished design and lay it on top of the board with a piece of carbon paper under it. You can also use graphite paper to do the transfer but the outline will not be as dark as it is when you use carbon. Sometimes I prefer to use the graphite when I do not want a bold outline. I do want that bold line for this project because I will be using dark colors on a medium color of raw wood. It just makes it easier to see the design outline.

You should secure the carbon paper and the design on top so that it does not slip as you are outlining your work. It is also good to use a ballpoint pen to do the outlining. This helps you to get every line traced (you can see where you have been) and to make a darker transfer. I also mark the exact spot to line up my design on the board. Look at the photo to see how I mark my paper and board to match it up the way I want it to turn out on the board.

Now that you have everything put together you are ready to transfer the design onto the wood. When you have everything outlined make sure that you have all of your lines dark enough to see them so that you can work from the outline on the wood. Do this by carefully lifting up the paper and carbon without completely removing any of it. Check your transfer and make any tracing adjustments that are necessary before you completely remove the papers from the wood. Now you are ready to start woodburning.

do the pyrographics
do the pyrographics

Burn The Design Into The Wood

Start your woodburning and proceed until you are satisfied with the finished pyrographics. This is a matter of personal taste and you should have fun with this part of the project. You can burn it however you like. Sometimes it is good to do test burning on a piece of wood just like the one you use for your project. This testing is good because it will give you better understanding of how the techniques you want touse on your finished product will look before you make a mistake. Use some variety of techniques to make the design more interesting. Whatever you decide make sure to HAVE FUN!

Painting To Decorate Slide Show

Click thumbnail to view full-size
I did this work by each colorMy sign is a pretty simple designBe as creative as you likeUse small brushes for fine detail
I did this work by each color
My sign is a pretty simple design
Be as creative as you like
Use small brushes for fine detail

Paint The Design

I love acrylic paint because it is so versatile and easy to use. This project will be finished when you decorate your design with the paint. I stress that you use your imagination and have a good time with what you are doing. You can mix colors that match or blend into the scenery or you can make the sign stand out by using bright colors. It is your choice. I am going to go with earth tones and a little bright color for accent.

Put The Sign On A Stake

Click thumbnail to view full-size
Use a drill bit that is just a little smaller than the screws you are going to useDrill holes in the middle of the sign as shownPut screws in the holes you drilled just until they are protruding in the backposition the sign on the stake so that the screws are centered on the stake to mark your stake holes
Use a drill bit that is just a little smaller than the screws you are going to use
Drill holes in the middle of the sign as shown
Put screws in the holes you drilled just until they are protruding in the back
position the sign on the stake so that the screws are centered on the stake to mark your stake holes

Attach the Finished Sign To The Stake

I finished painting the sign and let it dry good. Then I got a drill and a bit and two screws so that I could attach the sign to a stake. This sign will go in a flower bed near a table and sun umbrella in a back yard. I drilled holes in the center of the sign where I measured to make it balanced on the stake. Then I put the screws in far enough so that they were poking out the back of the sign just a bit. Next I placed the sign so it was centered on the stake and the screws tips were in the center of the stake. Holding firmly in place I pushed the screws tips into the stake to mark where I wanted to drill so that I could attach the sign.

The marks looked good so I drilled these two holes into the stake exactly where I had made the marks.I was careful not to go real deep so the last couple of turns with the screwdriver would pull the sign up tight to the board. Now it was ready to attach. Using a screwdriver I carefully aligned the screws tips into the holes on the stake. Then I tightened them down...And There You Have IT!

working

This website uses cookies

As a user in the EEA, your approval is needed on a few things. To provide a better website experience, hubpages.com uses cookies (and other similar technologies) and may collect, process, and share personal data. Please choose which areas of our service you consent to our doing so.

For more information on managing or withdrawing consents and how we handle data, visit our Privacy Policy at: https://corp.maven.io/privacy-policy

Show Details
Necessary
HubPages Device IDThis is used to identify particular browsers or devices when the access the service, and is used for security reasons.
LoginThis is necessary to sign in to the HubPages Service.
Google RecaptchaThis is used to prevent bots and spam. (Privacy Policy)
AkismetThis is used to detect comment spam. (Privacy Policy)
HubPages Google AnalyticsThis is used to provide data on traffic to our website, all personally identifyable data is anonymized. (Privacy Policy)
HubPages Traffic PixelThis is used to collect data on traffic to articles and other pages on our site. Unless you are signed in to a HubPages account, all personally identifiable information is anonymized.
Amazon Web ServicesThis is a cloud services platform that we used to host our service. (Privacy Policy)
CloudflareThis is a cloud CDN service that we use to efficiently deliver files required for our service to operate such as javascript, cascading style sheets, images, and videos. (Privacy Policy)
Google Hosted LibrariesJavascript software libraries such as jQuery are loaded at endpoints on the googleapis.com or gstatic.com domains, for performance and efficiency reasons. (Privacy Policy)
Features
Google Custom SearchThis is feature allows you to search the site. (Privacy Policy)
Google MapsSome articles have Google Maps embedded in them. (Privacy Policy)
Google ChartsThis is used to display charts and graphs on articles and the author center. (Privacy Policy)
Google AdSense Host APIThis service allows you to sign up for or associate a Google AdSense account with HubPages, so that you can earn money from ads on your articles. No data is shared unless you engage with this feature. (Privacy Policy)
Google YouTubeSome articles have YouTube videos embedded in them. (Privacy Policy)
VimeoSome articles have Vimeo videos embedded in them. (Privacy Policy)
PaypalThis is used for a registered author who enrolls in the HubPages Earnings program and requests to be paid via PayPal. No data is shared with Paypal unless you engage with this feature. (Privacy Policy)
Facebook LoginYou can use this to streamline signing up for, or signing in to your Hubpages account. No data is shared with Facebook unless you engage with this feature. (Privacy Policy)
MavenThis supports the Maven widget and search functionality. (Privacy Policy)
Marketing
Google AdSenseThis is an ad network. (Privacy Policy)
Google DoubleClickGoogle provides ad serving technology and runs an ad network. (Privacy Policy)
Index ExchangeThis is an ad network. (Privacy Policy)
SovrnThis is an ad network. (Privacy Policy)
Facebook AdsThis is an ad network. (Privacy Policy)
Amazon Unified Ad MarketplaceThis is an ad network. (Privacy Policy)
AppNexusThis is an ad network. (Privacy Policy)
OpenxThis is an ad network. (Privacy Policy)
Rubicon ProjectThis is an ad network. (Privacy Policy)
TripleLiftThis is an ad network. (Privacy Policy)
Say MediaWe partner with Say Media to deliver ad campaigns on our sites. (Privacy Policy)
Remarketing PixelsWe may use remarketing pixels from advertising networks such as Google AdWords, Bing Ads, and Facebook in order to advertise the HubPages Service to people that have visited our sites.
Conversion Tracking PixelsWe may use conversion tracking pixels from advertising networks such as Google AdWords, Bing Ads, and Facebook in order to identify when an advertisement has successfully resulted in the desired action, such as signing up for the HubPages Service or publishing an article on the HubPages Service.
Statistics
Author Google AnalyticsThis is used to provide traffic data and reports to the authors of articles on the HubPages Service. (Privacy Policy)
ComscoreComScore is a media measurement and analytics company providing marketing data and analytics to enterprises, media and advertising agencies, and publishers. Non-consent will result in ComScore only processing obfuscated personal data. (Privacy Policy)
Amazon Tracking PixelSome articles display amazon products as part of the Amazon Affiliate program, this pixel provides traffic statistics for those products (Privacy Policy)
ClickscoThis is a data management platform studying reader behavior (Privacy Policy)