How Kids Can Make or Build Simple Wooden Projects

Bean bag game board

Baseball cap holder

Cap holder with shelf


Answer for J S Matthew
In answer to your question about great "How To" wood projects for kids, here are photos of two articles that I have made. The bean bag game is our family's favorite game, especially on family reunions. For this game, you need two of the boards shown and two sets of four bean bags. The bean bags are easily made from two different colors of heavy material, approximately 8"x4" finished size. You need to leave one end open so you can fill them with beans and then sew shut.
Have you ever seen a counting frame? That is very simple. All you need for that is two pieces of wood for the ends, four 1/4" wooden dowels that are 10" long, and four sets of 10 different colored beads with holes. The end boards should be 2"x2" and 9" long. A counting frame is a very good learning tool for young children and colorful. If you go to the www.absolutelyfreeplans.com website you will see a picture of a counting frame.
I also made several baseball cap holders/racks for my baseball playing grandsons and they really liked them. They would be projects kids could do, with help. One of my cap holders also had a shelf on top and one was shaped like a baseball bat. Once you start working, it seems that ideas just come to mind. To make the cap holder in the picture on the right, you need two pieces of 1" wood 10"x4" for the top and bottom. The top piece is curved around the middle and several wooden baseball decorations were glued onto it. These can be found in any woodworking shop or in the craft department of stores like Walmart, etc. On the bottom piece glue on wooden letters in the name of the person the holder is for. These were just my additons to the project, and don't have to be used. They just made it more personal. The side pieces are also 1" wood 40"x 3 1/2" and then you saw whatever number of "hooks" you want into that side unit. This particular holder has twelve cap hooks on each side and they are placed equidistant from top to bottom. My suggestion would be to make a pattern of the hook to use to mark your wood for sawing. Makes it much simpler. If you don't want to saw the hooks, you could also use metal hooks that screw into the wood. In that case, you would only want the side pieces to be 1"x40"x2." The picture shows the holder sitting on the floor, but it actually hangs on the wall. There are two zigzag holders attached to the back of the top panel. If you have a router and bit that makes keyholes, that would make it really professional. After you have all the units sawed and sanded, just assemble the holder by gluing the side pieces to the top and bottom panels and screw together. Then stain and varnish or finish however you prefer. Paint could also be used to match a favorite baseball team's colors. Just use your imagination. The other picture to the right shows a cap holder with five hanging units and a shelf on top, which I made for my son-in-law.
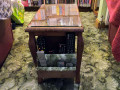
The tool carrier is another very simple project, and one that my 8-year old grandson was so happy to get, especially because I filled it with small tools. For the carrier, you need five pieces of wood and a wooden 1" dowel for the handle. I think you can pretty much tell what you need from the picture. When you decide what size you want to make it, you can decide what size your pieces of wood need to be. I saw a different idea today for putting the child's name on the carrier instead of painting it on. Type the child's name on a piece of paper in large capital letters. Place that on one side of the carrier, tap holes in the wood through the paper at evenly spaced intervals. Then insert decorative screws in the holes to finish it off. This, of course, should be done after you have painted the wood and finished it. The name on the carrier makes it much more personal and children always like to see their name on something.
Another practical wood project is a holder for a hair dryer and curler. My picture only shows a hair dryer and cord on the holder now. All you need for this item is a piece of 3/4" wood, 12"x18" and four smaller pieces of 3/4" wood for the holders. The back piece is then curved on the top and bottom just for design sake. The top two holder pieces are 2 1/2" deep with the notch cut out to hold the curling iron. The bottom piece that holds the end of the hair dryer is 3 1/2" deep and the other that holds the front of the hair dryer is 4 1/2" deep. The piece that holds the end of the dryer has a notch cut out but the other piece is round to hold the larger end of the dryer. Of course, you will need to measure the diameter of both ends of the dryer and the curling iron to know how large to make the notches and the circular holder. When the pieces are sawed and sanded, decide where on the board you need to place the holders and screw them on from the back. Hangars need to be attached to each side of the back for hanging the holder. The holder in my photo was made for my granddaughter when she was in high school and she is now a registered nurse in the neo-natal intensive care unit of a research hospital. It was another project she asked me to make for her. As you may notice, most of my woodworking projects were for my grandchildren.
I was not sure what age children you were talking about so these are suggestions for young children and maybe middle school children.
Wood shelves are also not that difficult to make. Just simple shelves that can be used for trophies, knicknacks, pictures, etc. A key rack would be a very simple project, even for young children, and everybody likes to have their keys handy. The child would be so proud of something that easy that the whole family can use. All a key rack needs is a small piece of wood with pegs for the keys. You can make it as fancy as you think your child is capable of. Also they could make a holder for CD's, books, etc., which would consist of a piece of wood and two end pieces, with a smaller piece under one end to make the holder higher on one end to keep the books, etc. in place. If you are looking for patterns, go to www.woodworkersworkshop.com.
Good luck and have fun.
©joaniebaby - 3-7-12
- Craft Projects for Kids - Make a Trivet
Kids love crafts and this project is one that children of any age can make. The materials needed can be found among your scrap lumber and in your junk drawers. The cost involved is dependent upon your imagination. - 3 easy carpentry projects for kids
Carpentry encourages children to have patience, be creative and take pride in their work. Try one of these three fun and easy woodwork ideas to teach your child some useful skills this year.