How to Make a Band Ring

Making a Band Ring
I have created numerous band rings out of a variety of metals, including fine silver, sterling silver, copper and brass. Any metal you are comfortable working with can be made into a ring.
Band rings are very easy to make. With just a few tools and little expense you can make a ring that you will be proud to wear.
Most often band rings are used as wedding rings. Those are often made of gold or sterling silver and embellished with stones and intricate designs.
I am going to show you how to make a band ring using brass, an inexpensive but beautiful metal that you will love.
Photos: Taken by DesignsbyHarriet

Measure and cut
Make it Easy
First you measure your finger. I sometimes use measuring rings, but my favorite way is to use a piece of folded masking tape, put it around the knuckle of the finger I am measuring and cut it to the size of my knuckle. Then I lay the piece of tape over the metal and trace it with a marking pen.
I put the marking pen lines close to the edge of the metal plate that I know is straight, so I don't have to cut it. That leaves me three instead of four areas to cut. Easy as pie and one less chance to cut a crooked line.
I measure the knuckle because it is often bigger than the area where the ring will be worn. If I make it the size of the ring area, the ring could be very difficult to get over the larger knuckle, especially in warm weather.
If the band ring is to have the same design all the way around, which is how I created the ring under discussion, then if it spins around on your finger, you won't have to worry about whether there is a top or bottom.
All-over design band rings are my favorite, because even if it is slightly larger, the top is wherever it lands on your finger.
A ring can be resized larger even after it is soldered by putting the ring on a metal ring mandrel and hammering it with a wooden or plastic mallet. This stretches the ring, not a lot but enough to help if it is slightly too small.

Cutting the Metal
Scissors or Saw
I hate sawing. I have yet to master sawing a straight line. So when I am ready to cut the metal I get out my trusty Judy Chen Sheers and cut away.
Judy Chen Sheers will cut metal up to 20 gauge thickness, which is thick enough to create a nice, sturdy band ring.
Sawing can be slow, tedious and arm aching work, so if I do not have to create intricate patterns in my jewelry, I use Joyce Chen Sheers.
I know I sound like an advertisement for these sheers, but I am trying to save you as much time and mistakes as I possibly can and these sheers will do the job.
.
Joyce Chen Sheers - For the Sawing Challenged
I learned about Joyce Chen Sheers while taking a metalsmithing class. My teacher told me that to save time when creating jewelry that is to be cut in linear patterns, these sheers work great, provided the metal is 20 gauge or less.
I have used these sheers in place of sawing whenever the work I am creating does not require intricate designs and have never been disappointed.
Pendants, rings, and bracelets are easily cut using these sheers. If the designs are to be hammered and not cut out of the metal, Chen sheers will do the job easier, quicker and for me neater than a saw.


Hammering, Shaping the Ring
Ring Mandrel and Plastic or Wooden Mallet
Before shaping your ring, choose a jeweler's hammer and hammer a design into the ring. There are several jeweler's hammers available with heads that create different impressions on the metal. My suggestion is to start with a ball preen hammer, which is what I used on the ring I made. Use the ball end of the hammer to create your design.
Hammer the design into the flat piece that you cut before shaping it on the ring mandrel. This is easier and gives a better impression than hammering the design on the metal while it is on the ring mandrel
Once the metal is cut to the size and the design is hammered into it, the next step is shaping it. The way you do this is to wrap the metal around a steel ring mandrel, then use a plastic or wooden hammer to shape it around the mandrel.
The ring mandrel has ring sizes on it, so you place the metal over the size you want, which is the size of the masking tape, before beginning to hammer. The reason you use a plastic or wooden mallet for hammering is because it leaves no marks on the ring and does not alter the design you have created..
Ball Preen Hammer


Cut, File
Not Everything is Exactly Easy
First you make sure the ring is cut to the correct size. Fit both ends together and try it on. If you are opening the edges, then the ring is too small. If you have to overlap the edges then the ring is too large. You will have to cut it so it fits perfectly.
To me this next part is the hardest. The cut edges have to meet perfectly so you can solder them together. If there is a gap, even a slight one, the solder will not fill it.
Put the two cut ends together and look at them under a back light to see if you notice any light coming through. If there is light, and for me there always is, you need to file the edges so they meet evenly.
Use a flat needle file, which is a small thin file that jewelry designers use, and gently smooth the ends. If you see light through the edges you can usually tell which side of the ring is causing the problem. The idea, of course, is that both edges are absolutely straight so they meet evenly.
As I said this is the hardest part, and I must admit to a slight bit of cheating. Sometimes I see just a tinge of light, but I proceed with soldering the ring together, because even though solder does not fill spaces, it can still make a sturdy joint if there just a tiny, and I mean tiny, bit of light showiing through the edges.
Do, however, aim for perfect, but rather than throw the ring across the room, try soldering and see if the solder joint holds true.

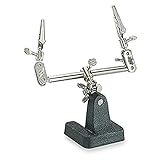
Solder
Use a Creme Brulee Torch
I am a strong advocate of creme brulee torches for home use in jewelry making. Here is one of the best instances for using this torch. You do not need anything stronger for the purpose of soldering the ends of a ring together.
You will need, solder. I use hard solder for this purpose. Flux is the next thing you need, a scissors to cut the solder (don't forget Joyce Chen), a tweezers to pick up the solder, and a third hand.
No I do not mean you need to grow a third hand or get a friend to help. There is a tool that holds pieces together called a third hand or a helping hand. If you do not want to buy a third hand, there are T pins you can purchase at the fabric store that you can place into a charcoal block, to hold the ring in place. Even though I prefer the third hand, this also works well.
A solderite board is a square board that does not burn. It makes a great, flat, smooth support for your work while you solder. A charcoal block is just what it sounds like, a porous black block that is often used with T pins to hold pieces in place. It also does not burn, but is can be messy and doesn't last long.
If you are using the third hand, place the ring with the cut side down and attach the top to the tweezers part of the third hand. Then brush a dab of flux onto the joint and heat at the lowest temperature until the flux turns clear. It will bubble at first, but heat a little longer till it looks clear.
Dip a tiny piece of solder into the paste flux using a long handle tweezers and place it across the joint. It will sizzle and hold the solder in place. Then using the highest temperature on your torch move it all around the board and around the ring and then heat the solder joint. If the solder moves take a metal pick and move it back into place and heat again.
As soon as the solder melts, stop. Your joint should be set tightly.
Take your tweezers and put the ring in water and then in your pickle pot, which is a cheap crock pot with a cup of vinegar and a tablespoon of salt that has been heated. Leave the ring in the heated pot for about 10 minutes.
Brush the ring with a brass brush to clean it off.
You may find that the silver solder shows through the joint. Not to worry. Take a round edged needle file and smooth the joint until the solder fades.
If you torch the ring from the inside the solder will follow the heat and you will have less silver showing through the outside, but you will still have to file the inside to clean away the silver. Also if you used a very small piece of solder, you will have less of a mess to clean up, but you will have to make sure that small piece of solder melts into the joint and not around it.
The Process - Soldering the Ring
Click thumbnail to view full-size


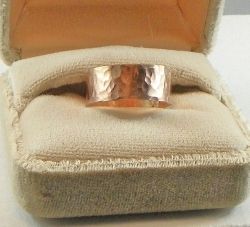
A Band Ring - To Make or Not To Make

Would you Make This Ring?

Other Options
Add a Stone to Your Band Ring
You can take your band ring one step further and add a bezel set stone to it.
The procedure for making the bezel is almost the same as making the band only you have to fit the bezel around the stone and you have to use bezel wire.
Pictured here is the same band ring only I have added a round bezel set ruby zoisite to the band.
I am showing this to you as an added option. For me it is another topic for another day.
Supplies - For Soldering Your Ring
Some of the supplies mentioned can be found on amazon.


This Lens Has Received a Purple Star


