How to Make a Snowman


Building a Snowman Is a Fun Winter Tradition
Stand back, this Californian is going to tell you how to make a snowman!
Don't worry. I lived in snow country. I remember snow days and the blizzard of '78.
I was a crazy snow sculptor back in Pennsylvania: I'd build Minoan goddesses or Egyptian sphinxes or Nessie across the lawn. Nowadays, I'm a little out of practice. I still make a snowman or critter when I visit for Christmas, just to keep my hand in.
I did it again this year, and took pictures. Let me show you how it's done. Afterwards, I'll show you where to build your OWN virtual snowman online.
The Right Snow for Making a Snowman
My parents moved to Utah, which usually has dry, fine powder snow. It's great for skiiing; lousy for making snowmen. You need wetter snow. But you don't need icy styrofoam-like snow that has to be carved with garden tools (I've done it).
Here's what you want:
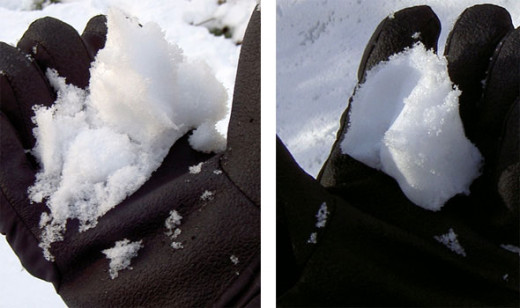
Left: If you close your fist around a handful, and it mostly falls apart, you'll have trouble. This is tricky snow for little kids to manage.
If it just won't stick enough to roll a ball, try piling it up high with a snow shovel instead, pounding it so the innards get compressed enough to hang together, then gently carving away loose snow and shaping the compressed core with sticks, garden tools or sand toys. Don't feel bad if it looks funny.
Right: PERFECT! If you close your fist around a handful, and it leaves the imprint of your fingers and glove, you've got sticky snow that's ready to roll or carve.
Step One - Roll the Bottom Snowball - Make a Solid Foundation
But I know what to do!
Friction causes heat, making snow wetter, slushier and stickier. Weight causes snow to compress, squashing it together. Both these things happen when snow plows push snow into heaps beside the road! I cheat by grabbing a "snowplow snowball."
Be sure to get all the dirt off, because dirt, bark, twigs, any dark patch makes snow melt faster. Avoid rock salt, too.
The science of snow and ice: White reflects sunlight and heat away, keeping it cooler. Dark absorbs heat. That's why scientists are so excited about the arctic icecap melting, exposing dark water that makes the remaining ice melt faster.
The same principle applies to your snowman. That's why I don't often use sticks or dark stones for decorations. Come back in a day or two, and you'll find they've fallen off or drilled their way deep into the snow.
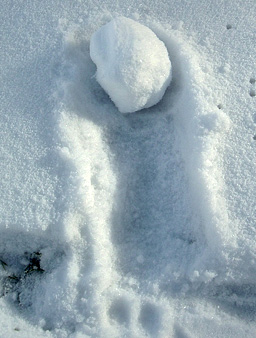
Right: Large snowball left by snowplow. Yes! That's the one. It's big enough that when you roll it, the weight should press the snow underneath and pull some of it up. Or you can just gather and pack more loose snow onto it. There's often warmer, wetter snow near the street.
Don't go IN the street, of course!
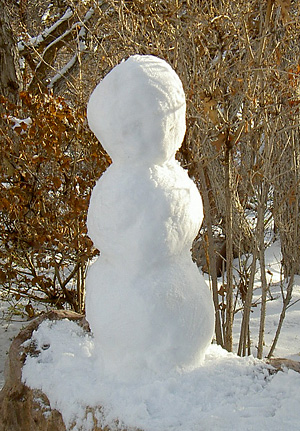
So now we shape and roll our bottom snowball. It doesn't have to be perfectly round. In fact, since it's the base, I like to have it a bit wider than tall; it's less tippy. Roll it, pat snow onto it, or gently carve away lumps until you've got a good shape:

Now we need to roll it to a good spot. I've occasionally used the ancient Egyptian trick of building a ramp to lift something heavy, but no need this time.
Here we go! That's a foundation, that is.

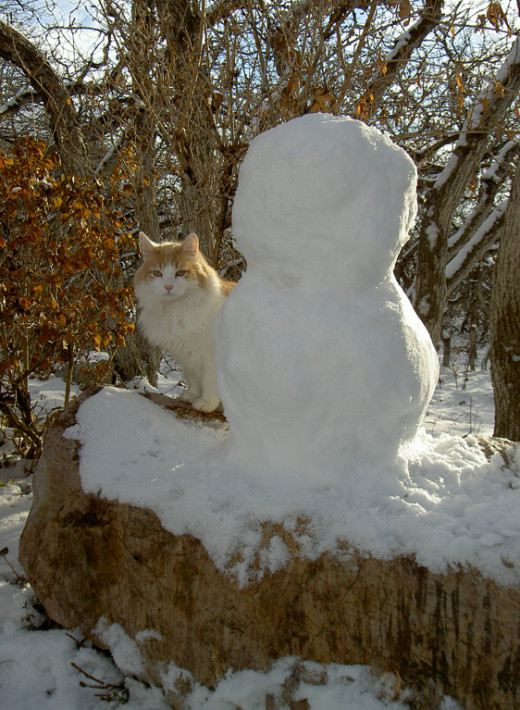
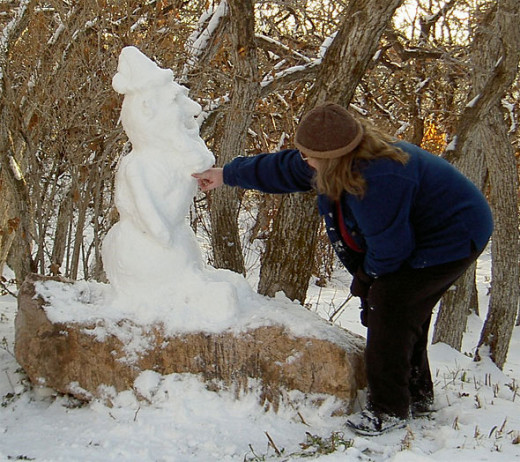
I often use rocks or treestumps as bases to give snowmen more visibility. Even great sculptors put their statues on pedestals!
Sadly, I am mindful of jerks who stop at the side of the road and knock down snowmen for kicks. It's not too much of a problem where my parents live, but I still place the snowman well back from the road, where pranksters would have to wade through deeper snow to reach it. If you're in a well-trafficked area, you might prefer the safety of the back yard to showing off your snowman in front.
Repeat the steps above for the middle snowball, making it slightly smaller. (Tip: sweep away a slightly flat or even concave "socket" on the top face of the bottom snowball, sized for the snowball that's going to rest on it.)
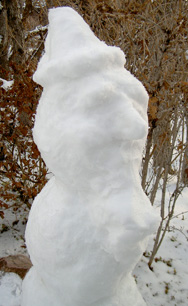
Pack in snow to make a "waist" between the two snowballs to prevent wobble.
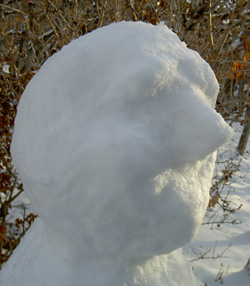
For the head, you'll do the same. You may want to roll an egg-shape to get a bit of chin.
Joining Two Snowballs on Your Snowman
Here's what I mean by forming a "waist." I gather loose snow and push it gently into the joint between two snowballs.

Then I pack it in with a sideways chopping motion, using the outside of my hand. The goal is to make a firm joint that doesn't wobble and gives plenty of support.
It's always a good idea at this point to have the building inspector stop by.
Tip for head: If the snow seems a bit fragile, I'll sometimes shape the head before attaching it. If I screw up, I just remake the head and don't damage the body. Sometimes I prepare the middle snowball by sweeping a slight socket on top or adding a neck of loose, wet snow that the head can sink into.
Giving Character to Your Snowman - Now It's Time to Decorate
Once you've got the three balls together and have packed in the joints, it's time to start decorating.
First, smooth and polish the snow all over. I sometimes take my gloves off and use my hands, very briefly, for areas I'm sure I'm not going to build on. Body heat slightly melts the surface, and it refreezes as ice, making a hard skin. You can't do this too much, though, as you'll get frostbite!
Next, decide which way it's facing. It's so easy to get hips and shoulders and feet facing different directions, so I keep checking myself once I've added a nose.
Like I said, I tend to avoid using sticks, twigs, leaves, dark stones as decorations, although you can certainly do that. Creativity is the key! I also used to use old sunglasses, scarves, even mittens hung on sticks to make arms. Just remember they may get damaged or carried off by stray pets or humans.
Nowadays, I prefer to carve the snow like a sculpture. I am a Greekgeek, after all, and I've looked at a lot of Greek sculpture. I'll pack snow on in clumps, shape it with my cupped hands or fingers (in gloves), and carve fine details with a stick.
Tip for shaping snow: Snow supported by packed snow beneath it tends to stay up. Snow that sticks out tends to fall off.
Shaping a snowman's head: Anchor it with the nose, then fill in the face around it. Exaggerate facial structures like puffy cheeks, Jay Leno chin, and Neanderthal brow ridge. It's like stage make-up, for a different reason. In this case, it's not distance washing out features; it's just that it's hard to see snow on snow. So exaggerate all the features, taking as much advantage of shadows as you can.
Don't forget the ears! Hair, though, is optional, as it's hard to make any kind of plausible hair.
Hats, however...
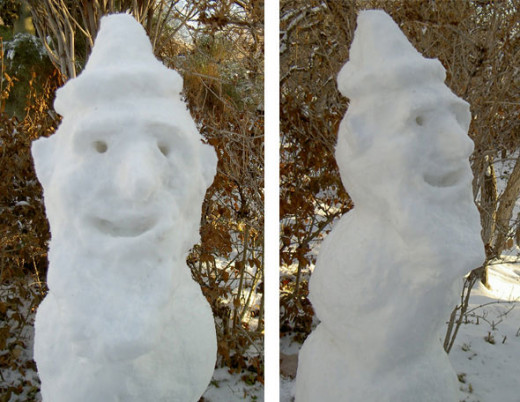
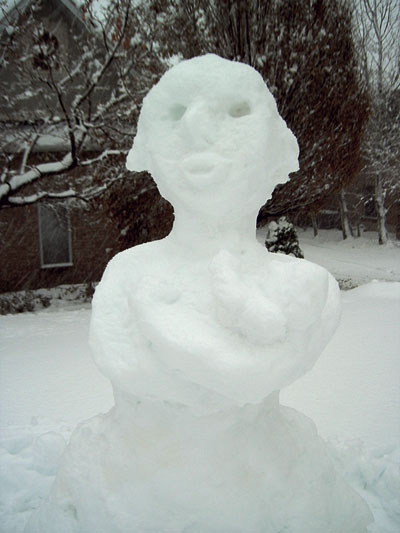
I was thinking of making Santa Claus, but it looks more like a gnome.
Well, I'll give him a beard, anyway. Notice it's supported from beneath. It still took a few tries before it stopped falling off.
Tip: When adding arms, beard, nose, or any details to the upper snowballs, try to place a hand on the back of the main snowball to brace it, whenever possible.
You can't see it, but there's a pom-pom on the back of the hat, which is flipped over. Again, I've got the pom-pom supported; it's resting on the back of his head.
Now, since I'm not going to use twigs for eyes and mouth, I have to carve them. Be patient, whittling away a little at a time. It's easy to cut away too much by accident at this point.
Afterwards, I'll add lips with my bare fingers. (It stings. Ouch.)
Yep, definitely a snow gnome. Or perhaps one of Santa's Elves.
Finished Snowman, Er, Snow Gnome
Where'd Those Silly Feet Come From?
No snowman is ever perfect. I rushed the arms and feet a bit, and it shows. Nonetheless, you get the basic idea.
I give you *drumroll* a Snow Gnome:
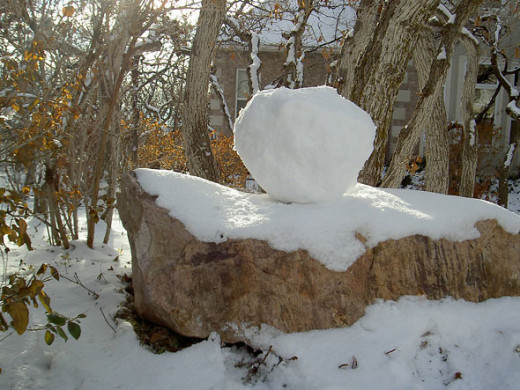
Another fun trick if you've got a rock or wall: build a snow sculpture with its legs hanging over the edge. You can be more creative if you've got something to support the snow.
Snow Art Poll - Have You Ever Made a Snowman?
Poll: Have you ever built a snowman or other snow art?
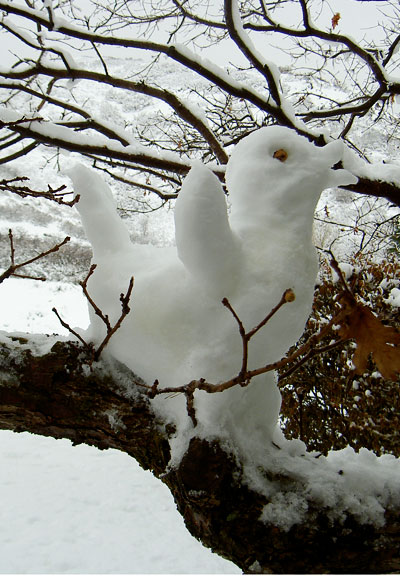
Now This Is a REAL "Snowbird" - A Partridge in a Pear Tree...

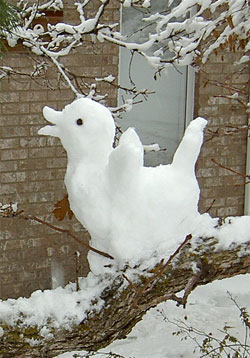
A major blizzard roared in the next day, making it almost too dark to photograph -- but not too dark to make some more snow creations.
Mom said she might come out and help. She's an artist and a crafty type, so I get the snow sculpting bug from her.
While waiting for Mom, I created a partridge in a pear tree. Which looks more like a duck in an oak tree, oops.
Tip: Take inspiration from surroundings: benches, trees, rocks, woodpiles can all suggest a shape.
(I don't worry about dark decorations where the snow is in the shade.) Here's another view.
It was a good thing Mom came out when she did. For once, this was heavy, wet snow that rolled into enormous balls after just a turn or two. She helped me get the middle into place (always the hardest part, IMO, because it's heavy), then we conferred. We determined that my idea for a spear-carrying, busty Snow Brünhilde might alarm the neighbors. Instead, Mom suggested a pioneer woman. People in Utah are huge on their pioneer heritage.
Snow Woman and Baby
It Was REALLY Snowing Today!
After building the basic 3-ball snowman body, we started with the woman's head and worked our way down. That way, any snow that falls down doesn't cover up finished details.
There's a problem with this method, if it's snowing really, really hard. By the time we broke out the camera, her face was "furry" from all the snow piling up! (If you look closely, you can see streaks of heavy flakes falling against the dark background).
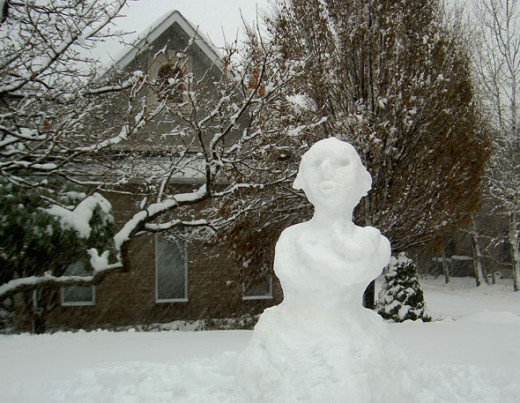
You see what I mean about using exaggeration to get white-on-white details to show up. Mom did the baby with upraised arm; I did most of the face except the upper lip. It's hard to get a mouth that doesn't look like a clown's, but these features are visible at a distance.
To get that middle snowball in place, we had to build a bit of a ramp and then roll the snowball up the side of the base snowball, using a trick I learned while studying how ancient Egyptian built pyramids.
It was definitely a two-person job!
You wouldn't think snow would be heavy, but remember what carrying a jug of milk feels like. Snow is water, it's just frozen.
I forgot to photograph it, but she's got a bonnet or bun in the back.
And that's about it!
Snowmen and women don't have to be perfect to bring a smile to passersby. Just play and experiment, and you'll find a building method that works for you.
Minoan Snow Goddess at Bryn Mawr College
Photo of something I built in college
I didn't have any photos of her, but I heard that the art & archaeology department has a slide of her, and they occasionally show her when covering the ancient Minoan civilization in the Mediterranean!
So I emailed them to ask for a copy of the photo.
Del Ramers was kind enough to scan it and send it to me. Here she is!
I used sticks for the snakes. Here's a little information about this famous figure from ancient Mediterranean art.
Free Educational Activities About Snow
My mother creates free educational resources and activities for K-12, including special needs accessibility.
She was very busy this winter creating snow-related eBooks, unit studies, clip art and more!
Check out her Snow 2010 page with all these great activities, or try out the online version of "Making a Snowman" -- virtually!

Please share this page with your friends, your kids, your grandkids!
And if you're hunkered down waiting for a blizzard to blow through, how about taking a trip back in time with me to see some amazing pictures and video from The Blizzard of 78?


