★ How To Make Your Own Cinemagraph | Part Animated GIF | Part Photograph ★

DIY Cinemagraph Tutorial Using Photoshop
A cinemagraph is a photograph with a subtle, repeated movement built into it; basically a mix of video and photography. The majority of the image is still like a regular photo, whilst one part moves a small amount, which often causes people to double-take.
The term 'Cinemagraph' was created by Kevin Burg and Jamie Beck in 2011 and quickly became popular on the web, usually as a means of artistic expression.
Cinemagraphs are created as a GIF file, and on this page I'll provide ideas for what kinds of motion works the best, plus I'll show you how to take your video clip and make it into a GIF file with Photoshop. The repeated movement is often only a few seconds long and is simply set to 'loop' forever in a cycle - so unlike a regular video clip which stops at the end, the movement in a cinemagraph continuously repeats itself.
Read more about the creation of cinemagraphs here.
I hope you find this tutorial useful...and fun!
How to Shoot the Movie Clip
And Ideas For What Scene To Shoot
The idea of a cinemagraph is that it's supposed to look like a still photograph at first, and then surprise the viewer when part of it moves. This 'surprise' factor is best achieved with either a) a very subtle continuous movement, such as a flag moving slightly in the wind, or b) a single movement that happens every few seconds, such as someone blinking.
Ideas for repeated or continuous motion that you can film include: a waterfall, a tap running, the wind blowing blades of grass, steam rising from a vent, a spinning wheel or fan. To make it easier to create a continuous cycle, you might want to choose an action which starts and ends exactly the same; such as the blink of an eye, the turning of a page in a book, bouncing a basketball on the floor and catching it, or the reflection in a window of a person walking by.
If you haven't made a cinemagraph before it's best to keep it simple :)
To make a cinemagraph that looks particularly effective, it's best to have a least one thing in the scene which would naturally be a moving object. For instance, a person, an animal, running water, a tree, a vehicle etc. If you keep one of these things as a still object in your cinemagraph, the small movement you do introduce will look more unnatural in contrast to the rest of the image.
To shoot the original video clip you will need a camera capable of shooting video (or a video camera), a tripod and any props or people you require for the image.
It's very important that the camera itself doesn't move when shooting the clip. It can be an extremely quick project if not much setup is required, because you only need a very shot amount of footage. The length of the video footage does depend on what you are shooting, but it's usually under 10 seconds that you actually use; sometimes as low as 1 second or even less.
Make sure you plan beforehand exactly what you need to shoot to make the GIF and decide how you are going to create a 'loop' of footage without it being jerky. The GIF will play the same short clip over and over continuously without stopping (i.e. on a loop) so the transition between the last frame of the video and the first needs to be as smooth as possible to look the best. If the movement is not a natural loop there are a couple of ways around it, including reversing the clip to bring it back to the beginning again before the whole thing is repeated.
Fabulous Examples of Cinemagraphs
The best from a range of sources including clips taken from movies, fashion shoots and artistic ideas. Great for inspiration.
- Ann Street Studio
A series of stunning clips including many of New York. - 40 of the Best
A well chosen selection including many fashion shots. - 60 Most Beautiful Cinemagraphs
A few ideas here that would be very easy to replicate. - Cinemagraphs; The Originals
Website of Jamie Beck & Kevin Burg, who first created the term 'Cinemagraphs'. - 13 Brilliant Examples
I love the one with the Emperor Penguins.
Open Photoshop & Edit Video
.")
Open your version of Photoshop. For this demo, I'm using CS5.
(I'm assuming at this point that you will have your movie clip shot and uploaded onto the computer.)
Click here to see the video clip I'm starting with.
The movie clip I have is short (35 seconds) but if yours is long then you can first edit the movie down to a manageable size. This is an optional step. Usually cinemagraphs are very short clips on a loop; often only 1-10 seconds of footage is used. If you have video editing software then it will be easier to cut the video down now to a short clip, rather than doing this in Photoshop. All you require is a clip of just the movement you want to use; everything else is excess.
Make sure the clip is saved as a MOV or AVI file.
Changing from 64 bit to 32 bit Photoshop
In Photoshop, go to: File > Import > Video Frames To Layer
If you get a message (like I did at first) that reads something like 'Import video frames to layers not available in 64 bit version of Photoshop', then you will have to switch to using the 32 bit version, which sounds complicated and to be honest I have no idea what it means (!), but this is how I sorted it out:
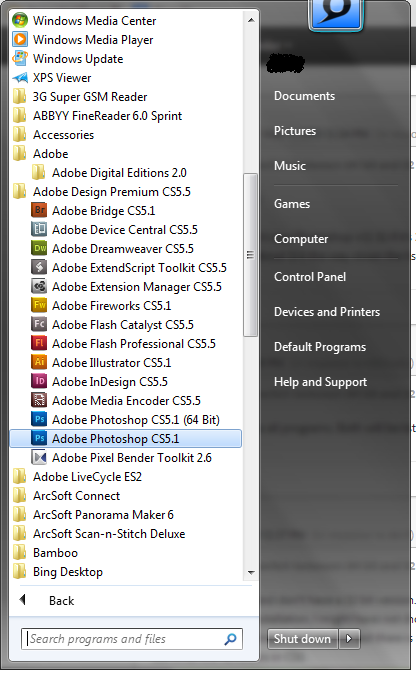
- Go to Start > All Programs > Adobe Design Premium CS5.5 (or whatever Adobe software package you have) > Click on the Adobe Photoshop option which doesn't have '(64 bit)' after it.
- When you click on the program, a small blue screen should pop up to show it is loading. In small writing in the top-left of this box, it should say 'Version' and after it there should be the number '32' somewhere. If you see the number 32 you are on the right track!
Import the Video
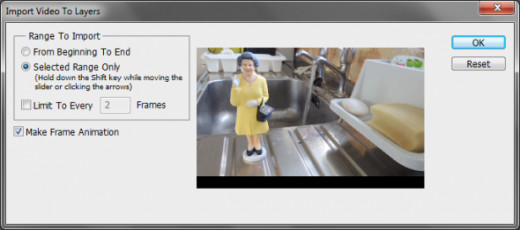
If 'File > Import > Video Frames To Layer' does work, however, then the screen shown above should appear.
If you have edited your movie down to the short clip that you are going to use in full, on a loop, then click the 'From Beginning to End' box.
If you have a movie clip that hasn't been edited down to just the section you want (like mine hasn't) then click the 'Selected Range Only' box. Hold down 'Shift' like the instructions say and click on the video screenshot at the point you want the movie clip to go up to. You don't really want to import more than 15 seconds or so into Photoshop because the file will be too large and slow.
Make sure the 'Make Frame Animation' box is clicked.
Click OK.
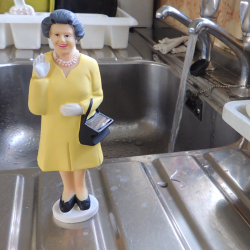
P.S. Just in case you were wondering, my clip is of my solar-powered Queen of England toy (whose hand 'waves' in sunlight), on the side of a sink whilst the tap runs in the background. Obviously.
It's not a classic GIF, I'll admit, although the Queen is pretty funny! However, I chose this idea to highlight the importance of using a small subtle movement (the hand waving) in the same image as something that should be moving but isn't (the running water). It's the contrast of static image and video clip that makes a cinemagraph so attention-grabbing.
The Video Has Now Been Split Into Layers
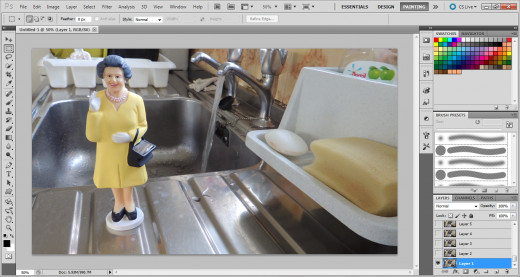
When I opened my movie clip, 167 'layers' appeared in a list in the bottom-right corner, with only layer 1 visible on the screen.
Editing Down Your Movie Clip
If, like me, you haven't narrowed the movie clip down to just the seconds/layers you want to use, now is the time to do that. So the aim is to find where you want the clip to start, and where you want it to finish.
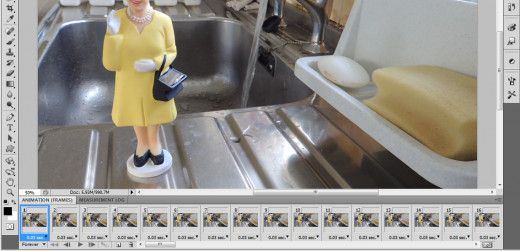
Click on the 'Windows' menu, and choose 'Animation'.
This will display your video clip in a series of animation frames along the bottom of the screen. If you click on the play button you can watch the clip.
* Because you are going to loop the clip, you will need the clip to finish in the same position as it started in, otherwise you won't get a GIF that flows smoothly.*
Work out which frames contain the movement you want; I worked out that frames 9, 16 and 28 in my clip look almost exactly the same in terms of the position of the 'waving hand' of Queenie. So that gives me a choice of keeping frames 9-16, 16-28 or 9-28. I decided to use 9-28 for a longer clip, although this still only works out at less than a second. This is fine for my example because the waving is a very quickly repeating movement, whereas you might need a 10 second clip because the movement you've captured is a 10-second cycle.
Now I just need to delete all of the frames except for 9, 28 and everything in between. To do this, start deleting the last frames first (trust me, it gets confusing if you don't!) Scroll along to the last animation frame and click it, then scroll back to the last frame you want to keep, hold down 'Shift' and click the frame AFTER the one you want to keep. For instance, I clicked frame 167, then held down shift and clicked on frame 29. This selects all of the frames towards the end of the movie clip that you don't want to keep. Click on the little trash can/rubbish bin icon under the animation frames to delete them.
Now you will need to delete the equivalent layers e.g. delete layers 29-167. So, in the list of layers in the bottom-right corner of the screen, click on the layer at the top of the list, hold down 'Shift' and then click the layer above what you want to keep. So in my case I would now have layers 29-167 now highlighted.
Right click on these highlighted layers and choose 'Delete Layers'.
Now you need to do exactly the same for the frames you don't want at the start of your movie clip. In my case I deleted frames 1-8, then layers 1-8. This left me with just frames 9-28 left, which is what I wanted.
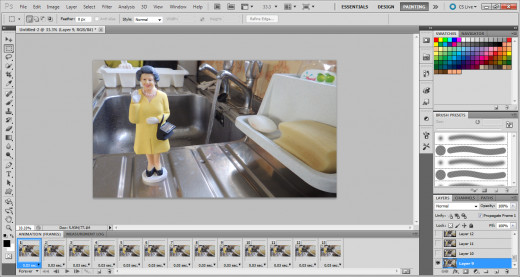
Click the play button to check this is the loop you want. When I did it I wasn't happy with the loop as it was a bit jerky so I deleted a few more frames to correct it. Therefore I was left with 13 frames in total, rather than 19 I originally planned.
My Edited Movie Clip; 13 Layers & Frames
Flatten Frames into Layers
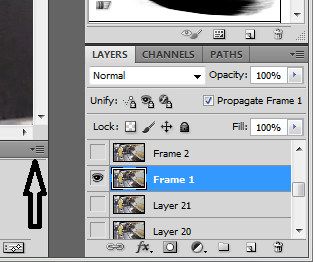
Click on the menu button at the top-right corner of the animation frames section (where the arrow is pointing on the screenshot above).
Select 'Flatten Frames into Layers'
This will turn the frames into layers in the layer list. Delete all of the 'layers' in the layer list now, leaving just the 'frames'.
Choose the Main Photo Image
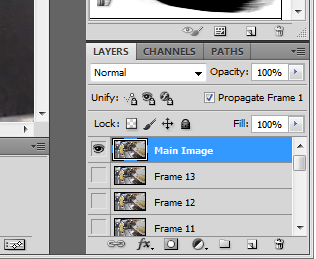
Choose a frame layer to use as the static background of your clip i.e. the majority of the photo which won't move at all. You can pick any layer for this; I'm just going to use the layer at the bottom of the list; 'frame 1'. Don't worry about which one you choose.
Right-click on the chosen layer and click 'Duplicate layer'. Name the new layer something like 'Main Image' and then drag the layer to the top of the list.
Make the Areas of Movement Transparent
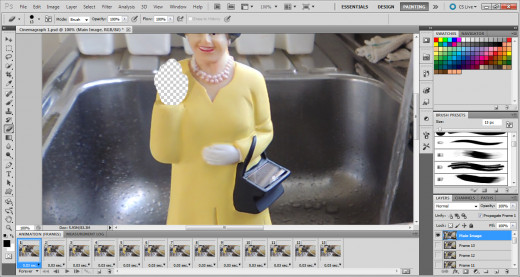
Make sure this top layer ('Main Image') is the only layer to have an eye symbol next to it in the whole list of layers.
Click on the eraser tool in the left-hand toolbar. Making sure that the top layer ('Main Image') layer is selected, use the eraser to delete the section of the photo where you want to display movement. In my example, this means I have to delete Queenie's hand. You don't have to be accurate, just make sure the whole area of movement is erased. Because it's the only layer visible at the moment, the area you delete should now be transparent (represented by the grey and white check pattern).
Go to the 3D menu and make sure 'Auto-Hide Layers for Performance' is unchecked.
Make sure the 'Main Image' and 'Frame 1' layers are the only ones visible i.e. the only ones with the eye symbol next to them.
Click the play symbol under the animation frames section to test how your video now looks.
Save for the Web
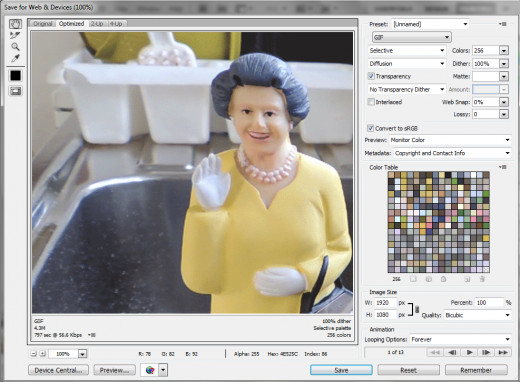
Go to File > Save for Web & Devices
This will save the file as a GIF so that it is optimized to display on the web.
Finished!
If you need any extra guidance, or you are having a problem with making the video clip loop smoothly, then have a look at (mainly) step 11 on PhotoJojo. P.S. Where it mentions 'tween' and 'reverse frame' options, these can be accessed by clicking on the little drop-down menu button at the top-right of the animation frames section.
The Finished Cinemagraph
Click here to view the finished gif animation :)
More Tutorials - If You Need More Help
There are different how-tos for making cinemagraphs on the web and they can differ a bit from each other, especially depending on the software you're using to make them. If you would like to see more tutorials to help you with certain parts of the process, have a look at these pages:
If these don't help with any extra questions you may have, please ask me in the comments section and I'll try to help :)
- DIY Cinemagraph
How to create a GIF of flowing hair. - Using Reverse Frames
How to make a loop out of a movement by reversing the frames. - Making a Cool Image in Photoshop
A detailed how-to with instructions on how to tweak the colours too. - A New Take On GIFs
A succinct tutorial for making an escalator cinemagraph. - Photos That Move
Including handy info on resizing the GIF file. - Tips for Making a Simple Cinemagraph
Similar instructions to my own. - For Photoshop Newbies
A clear walkthrough for people who are quite new to the software. - A Video Tutorial for Photoshop CS6
A video lesson showing you how to use software a bit newer than mine. - Photoshop Step-by-Step
A good visual explanation of how the process works.


