Learning to Knit: Knitting A Hooded Scarf

My First Knitting project. An Enjoyable Challenge
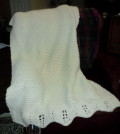
This is my first knitting project after learning to knit. Let me show you what I learned during the process of creating this lovely scarf.
Knitting something I love, with yarn I like to look at, yarn that feels good to touch, encourages me. I am anxious to keep picking up those needles, working towards the goal of seeing my project completed.
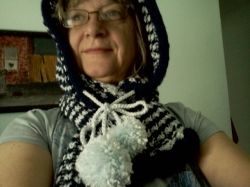
I fell in love with this hooded scarf the moment I saw it. I changed the colors, choosing a combination of dark and light blue.
The pattern for the scarf was from the Gocrafty booklet 'Knit Accessories'. Their pattern was done in 3 colors, blue, beige and green. I like my combination of dark and light blue better.
I had a lot of fun creating this!
Note: Unless otherwise noted, photos in this lens are my own.
I Taught Myself Knitting Beginners Kit - The book that taught me how to get started knitting
I always wanted to knit, but it wasn't until my daughter started, that inspired me to start a knitting project of my own.
My daughter started knitting with instructions from the Klutz Knitting book.
The book I used is "I Taught Myself Knitting" which comes as a kit.
This book is very helpful in getting started, and is still useful now, even after I have mastered the art. I now use it as a reference guide.
As I work on new projects, I often refer back to this book for tips on infrequently used techniques, as I did while creating the Hooded Scarf Project.
I found this book very easy to use. It not only gives instructions with easy to follow diagrams, but it gives projects you can start knitting right away. They are labeled as to the degree of difficulty. So if you do not want to start on a moderately difficult project such as the hooded scarf, you can follow the patterns in the book until you feel comfortable enough to advance to the many patterns that are available.
My Hooded Scarf in the Making
-
Start knitting the scarf

Use circular needles to easily add two colors. Knit with color A, slide the project to the other side, then knit with color B

Knit right and left sides of scarf. Then sew them together to form a long scarf. Mine is longer than suggested


Start on the Hood
Mark location of where the hood is to be placed
The hood is attached to the side edges of the scarf. The instructions tell you to pick up 85 stitches along an 18 inch length of scarf. Huh? (Actually, it said to measure 9 inches either side of the seam joining the two scarf halves together. That is 18 inches.)
What they want you to do is measure the section, divide the section into smaller sections, then put the proper number of stitches into each section. I used a combination of stitch holders and cable needles to mark off the sections. You could also use safety pins. If you divide it into six 3 inch sections, then you would have picked up 14 stitches in each section plus one stitch on the center stitch where the two scarf halves join. It may sound complicated, but once you get into it, it is quite easy to do. Refer to your basic book, such as 'I Taught Myself Knitting' if you need a refresher on how to pick up stitches.
This is how it looks once you picked up all 85 of the stitches


Knitting the hood
My advice, take notes
I am working on the hood and everything is going great! Until, we have to split the right, left and center sections of the top of the hood. My advice is to write down the instructions so that you can follow them easily. Especially when you start on the left side of the hood. The instructions say to reverse the shaping of the right side of the hood.
You may be able to do that conversion easily in your head, but I needed to put it on paper so that it didn't get too confusing.

Sipped Stitch?
A stitch slipped off my needle when I wasn't looking!
It is important to not slip a stitch. If you end up with an extra stitch, or not enough stitches. You need to go back and unknit the garment until you find the area where you either did not slip the previous stitch off the needle, or you accidentally allowed a stitch to fall off the needle and it is just hanging there. In the later case, the stitch could unravel down to the beginning giving you a long run in your project. I got very good at unknitting. In fact, I can now unknit a project as fast as I can knit! Ha ha! Not something that I want to do very often, but I am glad I took the time to learn.

Fix it!
The trick is to cheat! ha ha!
Accidents do happen though. What happens if you dropped a stitch without realizing it and have already bound off the edge? This happened to me and I had to figure that one out for myself. The 'I Taught Myself Knitting' book does not cover this. The book only told you how to pick up a dropped stitch and bring it up to the working row.
This is what I did.
I was looking over the scarf after I bound off the edge when I discovered I had a slipped stitch. First, I brought it up to the row where it was dropped from. I then tied a piece of yarn onto the stitch and weaved it into the pattern. You cannot even see where it was. I know this is cheating, but I will be the only one who knows.
Tied a piece of yarn onto the stitch and weaved it into the pattern


Pom Poms
Once this is done, you can stitch it up, hide the loose strings and start on the Pom Poms. I bought a cheap pom pom maker. I didn't like it. It was just a circle that you are to wrap the yarns around.
I ended up borrowing my daughters Pom Pom maker. It was so easy, my 5 year old granddaughter is able to do it!
Go Pom Pom Crazy!

Beware!
Knitting can become addictitve!
It was for me!
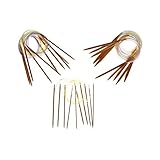
Other knitting supplies


Very Warm Fur Lined Hooded Scarf
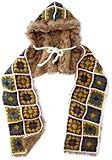
Copy right under creative commons 3.0, some rights reserved
This is your opportunity to tell the world what projects you are working on.
Brag about yourself. Tell of the obstacles you over came. Or pose a question. Maybe I could answer, or you could get advice from another reader.
I want to hear about all the needlework projects that are going on out there!