Recycling and Upcycling Plastic for Crafts

Fed Up of all those Plastic Bags? I Know I am!
Now I have a small child crawling around the house it's become even more important to get rid of all those plastic bags that seem to accumulate around the home - even though we use reusable bags! Seriously, where do they all come from?
As I love arts and crafts, I started thinking about how I could upcycle these bags. And not only bags but other bits of plastic packaging too.
On the page below you will see a range of upcycled projects including plastic pages, plastic collages, plastic stencils and plastic stamps.
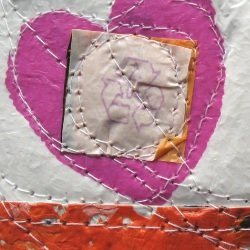
Image: Close up of one of my stitched plastic padded envelopes.
Health and Safety First!

Protect Your Lungs!
Some of these techniques and processes involve heating plastic - if you do any of this yourself always make sure you're working in a well-ventilated area and never breathe in any fumes!
If you're using heating equipment like soldering irons, heat guns etc, then please be careful not to burn yourself or set anything on fire. You shouldn't need to apply much heat to plastics before you see them start to respond.
I'd recommend getting a decent mask if you're doing any craft work that involves dust or fumes. You can get a simple mask quite cheaply or you can go a little more high tech.
Whatever you do, don't breathe in those harmful plastic fumes!

Tools and Materials
Stuff You Might Want...
Plenty of Plastic and...
Any kind of plastic that's lying around your house:
Plastic Bags
Packaging
Milk Bottles
Bottle Tops
Thick plastic from broken items e.g. I used some old plastic art portfolios
Baking Parchment - This is for protecting your iron when you "laminate" your plastic bags. Apparently you can also use waxed paper or just use some brown paper bags
Household iron - Different irons will work differently so experiment with your plastic bags to see what temperatures work best.
Soldering iron - I use this on thicker plastic like milk bottles.
Heat gun - This has long been one of my favorite tools for craft. The heat gun will make your plastic crumple up whereas the iron generally keeps plastic flat.
Plastic Pages

Plastic Pages
A lot of the projects on this page started off as plastic pages.
These are very simple to make.
Work out what size you want your pages to be and cut several layers of plastic bag.
Layer up your bag pieces and sandwich them between 2 pieces of baking parchment.
Gently iron over the top of this sandwich, being careful not to set your iron too hot.
Keep your work area well ventilated and don't breathe in any fumes.
There's really nothing to it but if you want more help watch this Etsy video.
Detailed Instructions for Making Plastic Pages
- Make sure you're in a well ventilated area.
- Work out what size you want your pages to be.
- Cut the handles and the bottom off your bags.
- Flatten out your bags.
- Sandwich your bags between 2 layers of parchment paper.
- Gently iron over the top of this sandwich - don't set your iron too hot.
- Let the plastic cool for a few seconds.
- Peel back the paper and check that the plastic is completed bonded.
- Layer up your bags. I like to use 4 bags (I use them like tubes so that the back and the front of 4 bags make 8 individual layers).
Plastic Pages Gallery
Click thumbnail to view full-size
.")


.")


Colouring Plastic
Opposite and below are some of the mini plastic bag pages I've made and colored with acrylic paint.
I got this idea from FollowThePaperTrail on Youtube whose pages looked so much neater than mine!
These plastic pages are fantastically grungy-looking and would be great for any project where you want things to look old, antique or deteriorating.
Basically you iron your plastic bag in the same way that I have above and once it's cooled you color it with acrylic paint. This process wastes quite a bit of paint because you're rubbing most of it off again but it leaves you with some really cool texture. I used some old fabric to wipe my paint off which I can use in a mixed media art piece later. I used cheap acrylic paint which worked fine.
I love the pages below that went a little "wrong" - where the edges didn't fuse in properly and they're a little ratty.
These pages could be used to make a journal or they could be used in a mixed media art piece or perhaps sewn together to make a wall hanging.
Painted Plastic Pieces

Canvases and Textures

Plastic Pages as Canvases
The plastic piece featured below turned out really thick. I made it by stuffing a plastic bag with other plastic bags (similar to the "atlas" featured below). I sandwiched this stuffed plastic bag between 2 pieces of baking parchment and then squished the whole lot with a hot iron.
I painted the piece with acrylic but to protect the paint I intend to coat the whole lot with PVA glue.
This canvas would look cool as part of a mixed media art piece. The piece shown below makes me think of the ocean or gnarly whale skin!
Plastic Canvas
Click thumbnail to view full-size


Covers for Books

Plastic Covers
One year, for Nanowrimo I decided that I wanted to make an atlas for my story - as a prompt for when I had Writer's Block.
I had a stack of old diaries that I'd doodled and written loads of notes in. I was going to chuck them out (I was going through a big decluttering phase) when I realized I could re-use them. After all, people make altered books, why not make an altered notebook?
I went through the pages and pasted them together, collaged them and tea-stained them. I wanted the pages to look old and thick and weathered.
The only problem I had then was how to make the cover look cool.
I was playing around with making plastic pages one day when I made this really thick page (see canvas above!). I later covered it with paint, loved the texture it had and realized maybe could iron plastic bags right onto the cover of my atlas - it might just work.
So that's what I did.
I slipped each cover inside a bag and then stuffed both sides of the bag with loads of other plastic bags, placed a piece of baking parchment on top and then I went to work with the iron. It was a little fiddly and I had to be careful to cover the spine too but it worked out quite well.
Once I'd painted the cover I coated everything in thick PVA glue to stop the paint rubbing off the plastic.
Atlas Gallery
Click thumbnail to view full-size


Plastic Collages

Making Pictures with your Plastic Bags
You can make plastic collages in 2 ways.
You can either cut out shapes and place them on top of your background plastic pieces and then iron the piece or you can make lots of ironed plastic pieces and cut out your shapes afterwards.
I prefer to cut out the pieces and stitch them together afterwards (you could also use glue).
The image shown here is the beginning of a collage of a city skyline - "skyscrapers" are cut out in a different plastic, than the background, and stitched in place.
In the gallery below you can see how I've layered up different colors together to try to get new colors.
Plastic Pages made for Collage
Click thumbnail to view full-size


Fish Collage
Below you can see how I used some of the collage pieces to make a goldfish collage.
These collages can be used as art pieces or to decorate an upcycled tote bag.
Making the Plastic Collage
Click thumbnail to view full-size

.")


.")

The Finished Fish Collage

Make Your Own Padded Envelopes

Stitched, Padded, Plastic Envelope
I made the envelope, shown opposite and below, by "collaging" pieces of the plastic pages similar to the ones above. Basically I just sewed everything in place, making a very solid rectangular padded piece.
I then folded the plastic piece so that one half was longer than the other half. I stitched paper onto the very top part of the longest side for a return label. I then stitched another piece of paper lower down on the longer side to be the address label.
I stitched down the length of the shorter half on both sides. I then had a padded envelope with a flap.
In the image above, the envelope folds over just above the "T" and below the flap part is everything above the orange strip.
Image: Plastic, padded, stitched envelope (with address censored).
A Doodled Explanation

Sewing Your Plastic

Plastic Bag Wash Bag
I loved the idea of the make-up bags that were featured on an Etsy video and decided it would be fun to try to make something useful out of my plastic experiments.
I decided that I'd go a little bigger than a make-up bag and make a wash bag for taking on holiday.
All this took was 2 sheets of laminated plastic, a zip, a sewing machine and some thread.
I sewed the zip to the inside top of each plastic sheet. I then simply sewed around the sides and bottom of the bag and I was done.
I even recycled the zip from an old garment.
My Recycled Washbag

So Many Plastic Bags...
...so little time!
Just don't forget to keep some back to reuse for your groceries!
Upcycled Plastic Stencils

How to Make your Own Stencils
I recently bought the book Alabama Studio Sewing + Design (shown below) which features some gorgeous handsewn clothes. The patterning on the clothes is made by using a stencil. Seeing as I couldn't afford the actual Alabama Chanin stencils and I was having trouble locating the proper products to make the stencil I decided to improvise.
I remembered this thick plastic I'd been saving up for a few years with no particular purpose in mind. The plastic came from some old portfolios I had from my college days that had got wrecked from being stuffed too full of artwork.
I whipped out the see-through portfolio plastic and used a permanent marker to draw my own design onto the stencil.
I used a craft knife to cut out all the shapes - this needs to be done very carefully. I did it the stupid way and ended up with loads of little cuts all over my fingers - that was a miserable week or so waiting for them to heal! I thought it would be hard to cut out the shapes but when I had the knife at a slight angle it worked quite well.
In the image below you can see that I didn't cut out a lot of the shapes I drew - I pretty much designed it as I went along and made decisions whilst I was cutting about what shapes I wanted. The smaller shapes would have been too fiddly for me to cut out.
Using the Stencil
In the image below I tried out the stencil in my art journal. I got this idea from Journalartista on YouTube. I painted my page with gesso and let it dry and then I painted pink acrylic over the top. Whilst the acrylic was still moist I laid down the stencil and sprayed water through it. I left the stencil in place for a couple of minutes and then removed it and wiped a damp cloth gently over the page - where the paint was still very wet from the spray it came away leaving the gesso background.
Stencil Design

Using the Stencil with Fabric
I used the stencil above to make the fabric below.
My Alabama Chanin Style Fabric

Alabama Studio Sewing + Design: A Guide to Hand-Sewing an Alabama Chanin Wardrobe
This is a gorgeous book if you're interested in hand sewing your own wardrobe.

Plastic Beads

Wrapped, Melted Plastic Beads
I made these years ago to decorate my handmade bags.
I used to love buying beads but that can leave you with a huge hole in your pocket!
These beads were made by wrapping thin strips of plastic bag up with cheap synthetic material. The bead opposite was made with silver plastic bag and red fabric. I wrapped the thin strips of plastic and fabric around a mattress needle and then melted them with a heat gun.
Milk Bottles

Bottle Top Stamps
I made the stamps opposite with milk bottle tops and fun foam.
These are so simple to make.
All you need to do is glue the fun foam to the milk bottle top and away you go!
I used PVA glue to glue the foam in place which was a mistake. I'd recommend glue gun.
I made these stamps for art journalling but they'd also be great for kids.
Fish Stamps

Soldered Milk Bottle

Milk Bottle Plastic
This milk bottle was "vandalized" with a soldering iron.
I'm not sure what I'm going to do with this plastic yet but I think it's a pretty cool texture. The closed-over holes were made by pressing the soldering iron lightly into the plastic and the open holes were made by forcing the iron right in.
Remember: Never breathe in the fumes from melted plastic and don't lean over your work as you're melting. Work in a well-ventilated area. And don't work on your lap!
Plastic Art

Membrane - A Knitted Plastic Textiles Piece
This piece was made using bottle tops from bubble bath and knitted plastic bags.
The plastic bags were cut into strips, knitted and then melted with a hot air gun. As I was heating the knitted pieces I stretched them out and as they cooled they stayed in the stretched-out position.
The bottle tops were glued into place.
I think if I had these bottle tops again I'd probably alter them in some way by stretching fabric or plastics over the top.
Seraphim - A Paper and Plastic Art Work
I recently started work on another art piece using plastics. You can see its progress in the gallery below.
Seraphim in Progress
Click thumbnail to view full-size


Using Packaging as 3D art pieces
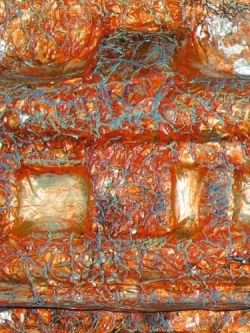
Making Rusty Plastic
Plastic packaging comes in some fantastic shapes so I've been saving bits and bobs for some high relief mixed media art pieces.
Opposite and below you can see some packaging that I'm altering for use in a city scape art piece.
To me, this packaging looked like some sort of building or train carriage.
I used tin foil, acrylic paint and oil pastels to make it look like some sort of rusty metal.
Rusty Plastic in Progress
Click thumbnail to view full-size


Making a Journal with Plastic Pages

Using those Plastic Pages in a Journal
Recently I've been really interested in making recycled journals out of junk. I thought this lens would be a great opportunity to make a journal out of plastic bags.
This is also a great way to use up all those left-over plastic experiments I've made for this lens!
I've mainly used my plastic pages as "binders" to go around my signatures of scrap paper. A few of them have pockets sewn onto them from other pieces of plastic so that tags and letters can be slipped into them.
I'm also going to staple paper and other bits to the plastic pieces - now I wish I had some "rusty" distressed staples to fit in with the look of my journal!
It's possible that I could write onto the plastic pages but I haven't found the right marker for that yet so I've used them as binders.
Journal Gallery
Click thumbnail to view full-size


Fantastic Plastic Upcycling Links
- Upcycled Plastic PET Bottles
Fabulous Jellyfish-like Bowls made from melted bottles. - tertium non data
More gorgeous Upcycled Plastic PET Bottles (same artist as above). - Handmade Future
Items made out of recycled plastic bottles - including jewelry stands and garden planters. - Lou's Upcycles
A whole website about upcycling plastics.


