ArtsAutosBooksBusinessEducationEntertainmentFamilyFashionFoodGamesGenderHealthHolidaysHomeHubPagesPersonal FinancePetsPoliticsReligionSportsTechnologyTravel

Saguaro Cactus Candles

Updated on December 17, 2014

A Simple How-To Procedure

I have always loved cacti and Southwestern décor and have come up with a simple way to make candles shaped like Saguaro cacti. If you love cacti as much as I do and would like to try your hand at making a Saguaro cactus candle, I will walk you through my procedure step by step.

Don't worry if you have never made a candle before. As it turns out, neither have I, at least not from scratch. The methods I will be employing here make use of premade candles and other simple materials, with some minor assembly.

Saguaro candles are great if your house is decorated in a Southwestern theme. They also make the perfect gift for someone you know whose home décor is similarly themed.

All images on this page are by DIY Mary unless noted otherwise.

Do you like Saguaro cacti and cactus art?

See results

The Saguaro Cactus

The Saguaro (pronounced "suwaro") is a large, tree-sized cactus that is native to the Sonoran Desert in Arizona, Northern Mexico and parts of California. This majestic cactus can grow up to 50 feet tall and can live up to 150-200 years. Saguaro cacti grow very slowly and over time, they often develop sidearms which generally curve upwards.

Saguaro cacti vary widely in shape, but most tend to have a main trunk with sidearms that are larger at the base than at the top. These giant cacti can sprout up to around 25 sidearms in a lifetime, and even the sidearms can grow ones of their own. Like many cacti, they are covered with prickly, protective spines. In the late spring, they bloom with white and yellow flowers, and in the summer, they produce edible red fruit.

A saguaro cactus in Scottsdale, Arizona.

Image credit: Wikimedia Commons

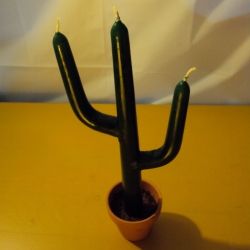
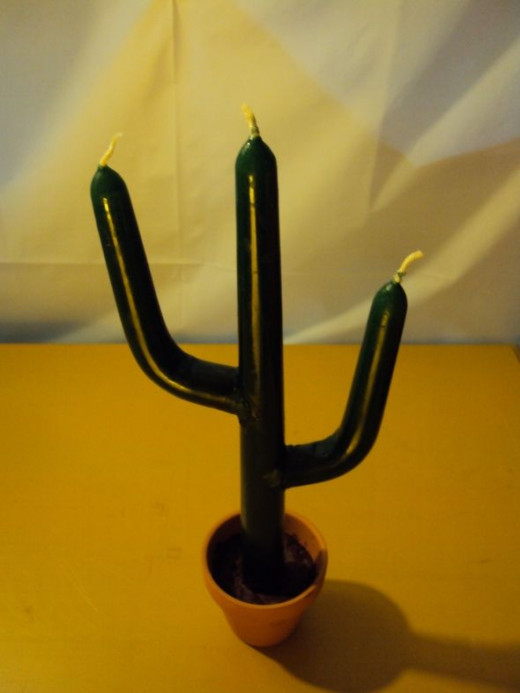
Make your own Saguaro cactus candles.

The steps below will walk you through the process of making a Saguaro cactus candle. With my simple techniques, you do not need any prior experience with candle making. All the necessary materials can be readily obtained online or at your local hobby supplies store, and most of the tools required are most likely ones you already have at home.

Step 1: Assemble starting materials and tools.

Materials (see photo below):

  1. Three green candles, tapered (length: 10-12")
  2. One small terra cotta pot (height: 2.5")
  3. Two 1-1.5" tall votive candles (diameter: 1.5")
  4. One green crayon
  5. One brown crayon

Tools (see photo below):

  1. Kitchen knife
  2. Matches
  3. Razor blade
  4. Food thermometer (range: 0-220F)
  5. Large candle (for use as a heat source)
  6. Tweezers
  7. Large Styrofoam cup
  8. Phillips head screwdriver

Step 1 Photos

Click thumbnail to view full-size
MaterialsTools
Materials
Materials
Tools
Tools

Step 2: Prepare the terro cotta pot.

  1. Trim the bottom edges of one of the votive candles using a razor blade (see photo below) so that it sits securely in the pot. The diameter of the votive candles (1.5") may be slightly larger than the inner diameter of the base of the terra cotta pot (about 1.3-1.4"), depending on the exact shape of the pot.
  2. Remove the wick and flatten the top of the bottom votive candle by scraping with a razor blade (see photo below).
  3. Place the trimmed votive candle in the terra cotta pot and stack the second votive candle on top (see photo below).
  4. Light the top votive candle and let it keep burning until the wax becomes molten and fills the pot.
  5. Once the top candle has completely melted, remove the metal base of the wick with tweezers (see photo below).

Step 2 Photos

Click thumbnail to view full-size
Part A (trim votive candle bottom edges)Part B (trim wick and flatten votive candle top)Part C (stack votive candles in terra cotta pot)Part E (remove metal base of wick)
Part A (trim votive candle bottom edges)
Part B (trim wick and flatten votive candle top)
Part C (stack votive candles in terra cotta pot)
Part E (remove metal base of wick)

Step 3: Prepare the sidearms.

  1. Cut around 1/3-1/2 off the tops of two green candles. Use a sharp kitchen knife dipped in boiling water and bear down firmly enough to cut the wick. (The heat from the knife will melt the wax as you make your cuts, which greatly speeds up the process.)
  2. Fill a large Styrofoam cup about halfway with hot tap water. Run the water under the faucet until it is hot enough to soften the candle, but not so hot that it melts the wax. Use a food thermometer to make sure the temperature does not go above 130F.
  3. Form the elbows in each sidearm as follows. Immerse each candle in hot water. Let candle soak for several minutes and remove from water. Push candle with fingers firmly, but do not apply too much force or it will crack. As the wax softens, take the candle out of the water, bend it a few degrees, and put back in the water. Repeat this step until a right angle bend (90 degrees) about 2/3 down from the wick is achieved (see photo below).
  4. While forming the sidearms, continually monitor the temperature of the water so that it is between around 105-125F (see photo below).
  5. Let the candles (sidearms) cool to room temperature undisturbed. (See below for a photo of the finished sidearms alongside the trunk.)

Step 3 Photos

Click thumbnail to view full-size
Part C (form elbow in sidearm)Part D (monitor water temperature)Part E (sidearms and trunk)
Part C (form elbow in sidearm)
Part D (monitor water temperature)
Part E (sidearms and trunk)

Step 4: Join the sidearms to the trunk.

  1. Using a Phillips head screwdriver and kitchen knife (both dipped in boiling water), dig a V-shaped hole or groove about 3/8 from the bottom of an uncut green tapered candle. On the opposite side of this candle, dig another hole about 5/8 from the bottom. Grooves should be fairly deep, but do not cut through the wick (see photo below).
  2. Using the heat from the flame of a candle, heat one of the grooves (see photo below) and the fat end of one of the sidearms enough to melt the wax at the surface. (Do not hold either candle in the flame for more than a few seconds.) Join the sidearm to the trunk while the wax is still molten on both candles by firmly pressing the sidearm into the trunk.
  3. If the grooves are not deep enough, remove some more wax and repeat the above step until the sidearm is securely affixed to the trunk.
  4. Melt a green crayon using the flame from a candle and drip the crayon wax along the joint between the sidearm and the trunk (see photo below).
  5. Repeat Parts B-D for the second sidearm.
  6. Let the assemblage (see photo below) cool undisturbed to room temperature.

Step 4 Photos

Click thumbnail to view full-size
Part A (V-grooves)Part B (melt wax in groove over candle flame)Part D (apply melted green crayon wax to sidebar-trunk joint)Part F (Saguaro cactus candle)
Part A (V-grooves)
Part A (V-grooves)
Part B (melt wax in groove over candle flame)
Part D (apply melted green crayon wax to sidebar-trunk joint)
Part F (Saguaro cactus candle)

Step 5: "Plant" the Saguaro cactus in the terra cotta pot.

  1. Using a Phillips head screwdriver and kitchen knife (both dipped in boiling water), dig a hole of about 0.75" diameter and 0.25-0.5" deep into the wax in the terra cotta pot (see photo below).
  2. Heat the bottom of the Saguaro cactus candle with the flame of a candle and press firmly into the hole (see photos below).
  3. Melt a brown crayon with the flame from a candle and apply to the wax in the terra cotta pot until it is completely covered with brown wax (see photo belows). Apply extra crayon wax around the joint between the terra cotta wax and the cactus.
  4. Let assemblage cool to room temperature undisturbed.

Step 5 Photos

Click thumbnail to view full-size
Part A (dig a hole)Part B (heat bottom of cactus over a flame)Part B (press bottom of cactus firmly into hole)Part C (melt brown crayon over a flame and apply to wax in terra cotta pot)Part C (cover wax in terra cotta pot completely with brown crayon wax)
Part A (dig a hole)
Part A (dig a hole)
Part B (heat bottom of cactus over a flame)
Part B (press bottom of cactus firmly into hole)
Part C (melt brown crayon over a flame and apply to wax in terra cotta pot)
Part C (cover wax in terra cotta pot completely with brown crayon wax)

Et Voila!

working

This website uses cookies

As a user in the EEA, your approval is needed on a few things. To provide a better website experience, hubpages.com uses cookies (and other similar technologies) and may collect, process, and share personal data. Please choose which areas of our service you consent to our doing so.

For more information on managing or withdrawing consents and how we handle data, visit our Privacy Policy at: https://corp.maven.io/privacy-policy

Show Details
Necessary
HubPages Device IDThis is used to identify particular browsers or devices when the access the service, and is used for security reasons.
LoginThis is necessary to sign in to the HubPages Service.
Google RecaptchaThis is used to prevent bots and spam. (Privacy Policy)
AkismetThis is used to detect comment spam. (Privacy Policy)
HubPages Google AnalyticsThis is used to provide data on traffic to our website, all personally identifyable data is anonymized. (Privacy Policy)
HubPages Traffic PixelThis is used to collect data on traffic to articles and other pages on our site. Unless you are signed in to a HubPages account, all personally identifiable information is anonymized.
Amazon Web ServicesThis is a cloud services platform that we used to host our service. (Privacy Policy)
CloudflareThis is a cloud CDN service that we use to efficiently deliver files required for our service to operate such as javascript, cascading style sheets, images, and videos. (Privacy Policy)
Google Hosted LibrariesJavascript software libraries such as jQuery are loaded at endpoints on the googleapis.com or gstatic.com domains, for performance and efficiency reasons. (Privacy Policy)
Features
Google Custom SearchThis is feature allows you to search the site. (Privacy Policy)
Google MapsSome articles have Google Maps embedded in them. (Privacy Policy)
Google ChartsThis is used to display charts and graphs on articles and the author center. (Privacy Policy)
Google AdSense Host APIThis service allows you to sign up for or associate a Google AdSense account with HubPages, so that you can earn money from ads on your articles. No data is shared unless you engage with this feature. (Privacy Policy)
Google YouTubeSome articles have YouTube videos embedded in them. (Privacy Policy)
VimeoSome articles have Vimeo videos embedded in them. (Privacy Policy)
PaypalThis is used for a registered author who enrolls in the HubPages Earnings program and requests to be paid via PayPal. No data is shared with Paypal unless you engage with this feature. (Privacy Policy)
Facebook LoginYou can use this to streamline signing up for, or signing in to your Hubpages account. No data is shared with Facebook unless you engage with this feature. (Privacy Policy)
MavenThis supports the Maven widget and search functionality. (Privacy Policy)
Marketing
Google AdSenseThis is an ad network. (Privacy Policy)
Google DoubleClickGoogle provides ad serving technology and runs an ad network. (Privacy Policy)
Index ExchangeThis is an ad network. (Privacy Policy)
SovrnThis is an ad network. (Privacy Policy)
Facebook AdsThis is an ad network. (Privacy Policy)
Amazon Unified Ad MarketplaceThis is an ad network. (Privacy Policy)
AppNexusThis is an ad network. (Privacy Policy)
OpenxThis is an ad network. (Privacy Policy)
Rubicon ProjectThis is an ad network. (Privacy Policy)
TripleLiftThis is an ad network. (Privacy Policy)
Say MediaWe partner with Say Media to deliver ad campaigns on our sites. (Privacy Policy)
Remarketing PixelsWe may use remarketing pixels from advertising networks such as Google AdWords, Bing Ads, and Facebook in order to advertise the HubPages Service to people that have visited our sites.
Conversion Tracking PixelsWe may use conversion tracking pixels from advertising networks such as Google AdWords, Bing Ads, and Facebook in order to identify when an advertisement has successfully resulted in the desired action, such as signing up for the HubPages Service or publishing an article on the HubPages Service.
Statistics
Author Google AnalyticsThis is used to provide traffic data and reports to the authors of articles on the HubPages Service. (Privacy Policy)
ComscoreComScore is a media measurement and analytics company providing marketing data and analytics to enterprises, media and advertising agencies, and publishers. Non-consent will result in ComScore only processing obfuscated personal data. (Privacy Policy)
Amazon Tracking PixelSome articles display amazon products as part of the Amazon Affiliate program, this pixel provides traffic statistics for those products (Privacy Policy)
ClickscoThis is a data management platform studying reader behavior (Privacy Policy)