Host your own website easily

A simple guide to host your first website
Have you ever wanted to host a website or blog yourself and confused where to start and how to do it? And ‘bang your head’ over all the technical jargons and thought this is not ‘your cup of tea’? I would say you were wrong, provided you have some basic idea about internet. Let me see if I can help you.
Before we start it is better to have a quick idea of Domain name and Web hosting terminologies.
What is a domain name?
In the internet world, a domain name is a unique phrase, word or group of word which will locate or identify a specific web server/space (organization/entity) and mask the IP (Internet Protocol) address of the web server/space (Examples: www.hubpages.com, www.google.com). By masking the IP address, the domain names help us to easily remember the web address of web server/space (where the resources we are looking for is available). Think how easy to remember www.hubpages.com rather than some IP address like 198.162.0.1 (just example).
Hence every Domain name will have a corresponding IP address which will be stored on domain Name Server (Name Server/ DNS Servers). This is called DNS (Domain Name System). Whenever user access a web site, the request goes to the Name Server and finds the corresponding IP address, locates the web server for the request and re-directs the request to that server.
To get a desired domain name for your website, you need to register the name in a Name Server provided by domain name registrars. Godaddy.com, 1and1.com are some examples of domain name registrars.
You may read more about domain names here.
What is hosting and webspace?
A webspace is a space allocated for you on a web server. You will get an IP address (Multiple IP addresses, depend on your hosting service) for this space. Uploading all your internet resource files (html, images etc.) in to your webspace is called hosting. Hence, as explained above, once you register your domain name you need to point your new domain name to your webspace. We will see this in detail below.

Let see how to register and host your website.
1. Register a domain name
Once you have identified a good domain name, you need to register this. Hundreds and hundreds of domain registrars can be found on internet. Pinpointing which one is good is almost impossible. However godaddy.com, 1and1.com are some of the well known registrars and I have an account with each one of them.
Getting the desired web site name registered is another challenge here. Most of the common word and phrases have already been registered either by individuals or domain reselling companies. (Try yourself, just enter any common word/phrase in the web browser and suffix with .com and hit enter, 99% you will get a website in that name!!) To register your domain name you need to have an account with the registrar. However you can freely search for your desired domain name on these registrars to see if it has already been taken by someone.
Remember every registrar is performing search on the common Domain Name Servers for it’s availability and hence you need not search again on another registrar for the same domain name (Obviously, we cannot have two websites with same name J).
Once you identified a domain name which is available for you, then you can register it by creating your account on registrar and providing all the required details requested by your registrar. In most registrars these steps are self explanatory and can be completed easily.
To register your domain name with GoDaddy go here: Domain Sale! $7.49 .com at GoDaddy

2. Buy a webspace.
After you completed with registering a domain, now it’s time to buy a webspace where you can upload all your internet resources. Most of the domain registrars also provide web hosting services. However you can always have your domain name registered with one provider and your webspace from another provider. Sometimes I found it is better to have two separate services – one for domain and one for web hosting – mainly to reduce the cost of services.
Here also, there are many web hosting companies out there. It is your choice which one should select. Both Godaddy and 1and1 has hosting services. There are also many cheaper hosting companies we may consider to start and test our first site. Remember cheaper the price lesser the quality of service, however to start with, it would be a good choice and as your website growing you can change the hosting company as per your need. (Incase of Domain names, I would recommend always register your domain with a good company from the start itself)
As in domain registration process, the webspace registration process would be as simple as giving some of your details with your domain name and pressing submit button. Once you registered you will be provided with your IP address of your space, DNS names (important), control panel access to manage your webspace etc.
There are also different types of hosting services, shared hosting, VPS hosting, dedicated server hosting etc. among them shared hosting being the cheapest type and a good option for beginners.
To buy a web space from GoDaddy go here: $1.99 Web Hosting
Or to get a cheaper web hosting service to try, go here: $11/yr 2GB hosting
3. Point your domain name to your webs pace (DNS Names)
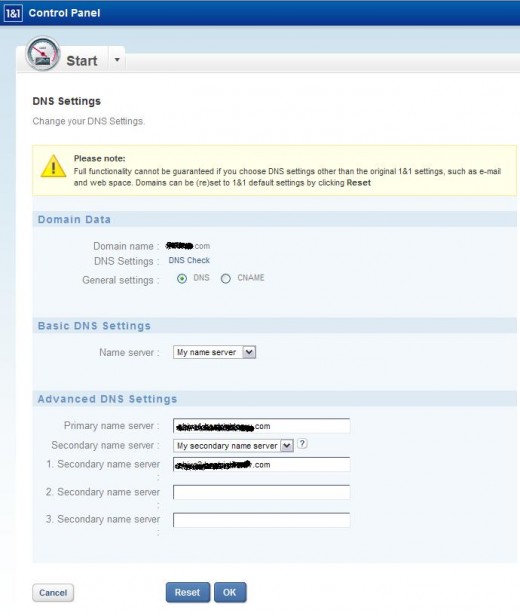
Now you have bought both domain name and webspace. Now you need to link this two. That is, if some one type your domain name on their web browser and hit enter/Go, they should be redirected to your webspace to view your website. DNS names provided by your web hosting company plays a major role here. These DNS names should be updated on your domain name account so that it can be pointed to your webspace.Usually you will get two DNS names, one is 'primary name server' and another one is 'secondary name server' from your hosting company. It can be more than 2 in some cases.
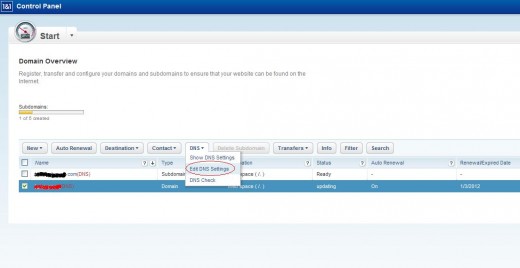
To do the same, login to your domain name account (where you registered your domain name, eg: Godaddy). Go to settings of your domain name management/control panel. It would be different registrar by registrar. However you should be able to find the setting option where you can modify the DNS settings, if not, get in touch with your registrar support team. Once you found where you can update your DNS names, enter the DNS name got from you hosting company there and update the settings. The changes will take up to 48 hours to reflect. Due to this, if you check immediately by accessing your website it will not redirect you to your web-space but will be redirecting to a default webspace provided by your registrar (if available.)
After the required wait time is over, if you check your website, you get either a ‘Not Found’ error or a default web page provided by your hosting company. So now it’s time to upload your website!
Sample DNS settings
4. Uploading your files (website)
Before you upload files, we should know something about the root directory and default documents on the web server. The root directory is the folder available on the web server where the web browser check for internet resources (your website files) once it is redirected to the web server. You can get detail about your root folder from your hosting company or from your hosting control panel.
The default document is the file which one is accessed by the web browser if no specific file name has been mentioned in the web address (URL). For example we usually type www.hubpages.com but not something like www.hubpages.com/index.html (just sample), however we will land in the main web page. The default document serves as a default file to the web request if no file name (full URL) has been mentioned in the URL. Usually the default file names would be default.htm/index.htm/home.htm etc.
Either there will be an option in your hosting company control panel to select the default document for your site or you have to rename your main web page to a name suggested by your hosting company to identify as a default document for your site.
Once you identified your root directory and default document, you can upload them to your root directory. To upload you can use any FTP client software such as FileZilla (freely available) etc. Or you can also use your hosting control panel to upload your documents (if such option is available with your hosting company). If you have many files to be uploaded, an FTP client is recommended.
You can also have sub folders in your root folder (directory). Sub folders will help you to organize your content well. For example http://hubpages.com/hub where ‘hub’ is the sub folder.
If you have successfully uploaded your files, you can try accessing your website, you should get your new home page (default page) in your browser!!
5. Manage your webspace (Plesk Panel)
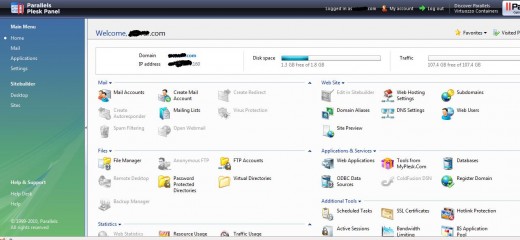
You will be provided with you a control panel (settings screen) by your hosting company where you can manage your webspace. This include managing your root folder and files, space allocation, server password management, IP address management, email management, database management etc. etc.
Most of the web hosting companies use a third party provider to provide a web interface for your control panel. One of them is Parallels® Plesk Panel. I have given a sample screenshot of the Parallels® Plesk Panel below.
Content Management Systems
Though it is not really in my scope (well actually not in my plan) of writing about CMS (Content Management Systems) in this article, however I thought giving a summary would be good.
CMS are the web applications which can be installed in your webspaces and will help you to manage the contents of your website easily. Imagine the effort of uploading files one by one every day for your site update, managing comments, forums, archiving your files etc. manually!!! Content Management Systems will help you to automate all these tasks plus do many more; even the best part is you need not be a good programmer/coder to do all these.
Some of them are: joomla, dotnetnuke, drupal and wordpress.
May be I will find some time write on these later. Now try hosting your website today and let me know your feedback/queries.


 for Website Building")