How to Teach Vocational Skills on Functional Levels - Fun Learning Projects for Developmentally Disabled Students.

Flower pens in desktop pot

Teach vocational skills, independence, and good work habits.
Vocational skills training for functional level students is a required part of transition planning under IDEA. Just because the class is about work, that doesn't mean it should not be fun.
This article will detail a few projects that are fun and educational for functional students learning vocational skills, pre-employment skills, appropriate work behaviors, working on fine and gross motor improvement, and also, are just all out fun for any kid. Isn't childhood supposed to be about having fun?
Let us provide them with activities that bring on the fun, while promoting good work behaviors and productivity.

Let's concentrate on all things flowers in the projects, mostly because they sell well all year.
Let the learning begin as the children walk through the garden of knowledge.
Why do crafting in class anyway? Shouldn't school be about rigorous lectures, papers, and research? Not necessarily.
For functional level students to attain true understanding, doing is required. If you don't read or write very well, chances are you are not going to benefit much from extended periods of verbal instruction. Further, the chances of boredom and behavior issues in the class will go up as the time of verbal instruction is extended.
When working with functional level students, always encourage verbal communication... From them!
Keep your instruction to short, fun bursts followed up by activities that implement doing what it is you're teaching. How can we teach staying on task without providing real life work tasks to stay on? How can we teach working well with others, safety, sharing, being responsible for finishing on time, and a host of other work related concepts to a population that thinks on a concrete level verbally? We can't.
Dump the lecture mentality and bring on the fun learning. You will enjoy it as much as they will.

More activity ideas for vocational training with functional level students. - Good teachers know how to turn activities into learning.


1.) Make Flower Pens
Flower pens are so cute.
Making a flower pen is the easiest project there is, and costs very little to produce. This project is good for working on fine motor skills improvement through crafting in functional settings. The materials required are light weight and somewhat forgiving, making it possible for lower functioning students with hand coordination issues to still come out with a good looking flower pen. Who wants to do a project that looks bad after putting in all the effort?
As a fund raising project, it works well. Fundraisers on campus tend to be good money makers when they hit a certain price point. It has been my experience that good looking products at the dollar price point are sure to sell to staff, students and parents.
Use this as the valuable opportunity it is to have students do real time money taking, change making, and writing of receipts. Have them compute how much was made total and how much was profit. Have them inventory supplies, sort supplies, make suggestions for new needed supplies for new pens. Take advantage of every second to get them thinking and doing.

What do we need to do this flower pen project?
Surprisingly little, considering how cute it is.
* Artificial flowers with stems attached
* Floral tape - Duct tape
* Scissors
* Pens
* Paintbrush (optional)
* Mod Podge (optional)
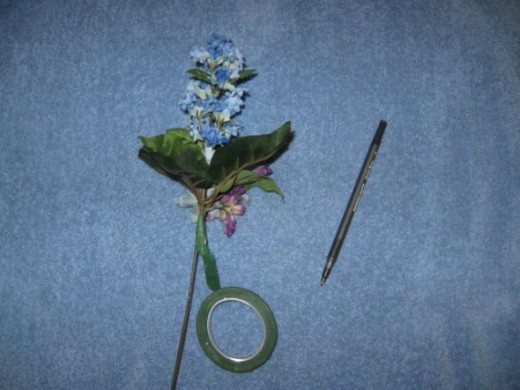
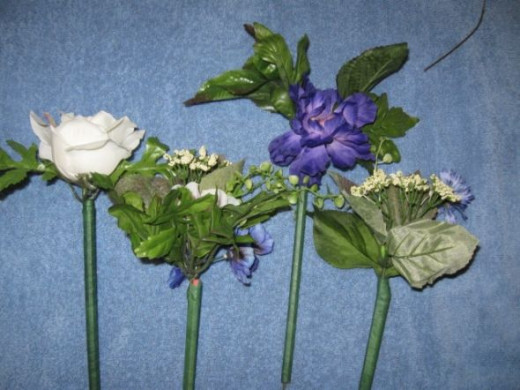
The basic materials -
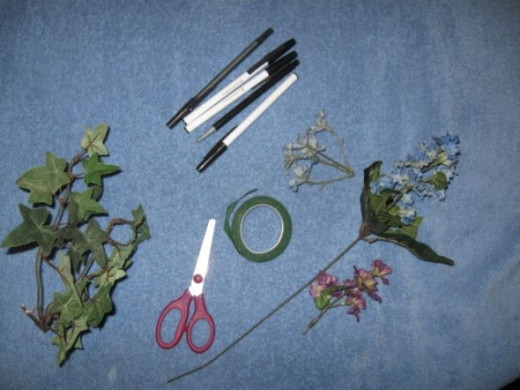
For the purposes of this illustration, I used some old artificial flowers I had around the house. I cut the stems to size using a pair of wire cutters.


How do we make a flower pen?
* Step one is to assemble the materials.
* Step two is to select the specific flower desired. Offer lots of choices.
* Step three is to place the flower stem right beside the pen where the flower sits atop the pen, like a flower atop a stem.
* Step four is to wind a piece of floral tape around the stem at the top and again at the bottom. This is not needed for adults and some higher functioning students. For lower functioning students or those who may have a difficult time with hand and finger fine motor manipulation, the taping will hold the flower in place so the child can devote effort to wrapping the pen properly.
* Step five is to wrap the pen in floral tape, neatly. Start at the top and work down.
* Step six is to apply a coating of Mod Podge over the florist tape using a paint brush.
If working with more than one flower, tape them first.

I used three different flowers here, so the first thing I did was tape them together to make them easier to handle.
Flowers, flowers, and more flowers. Fun!

Making the connection.

I cut this with wire cutters. You may need to do this step for students.
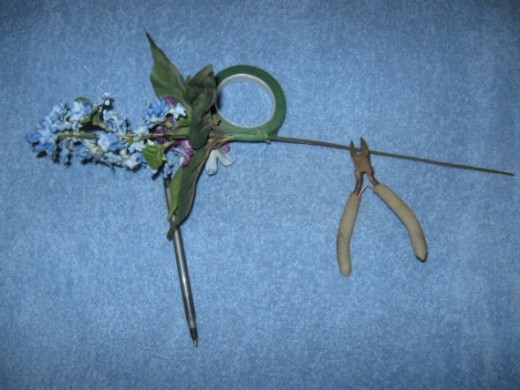
It's a good tool for students to lean to use, but teach it first. I like to do the project the first few times with functional level students using picks that don't need to be cut.
Wrap the pen.
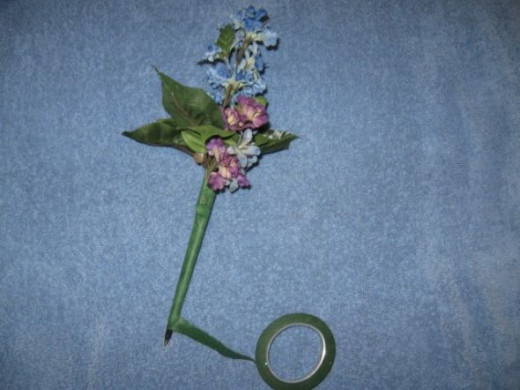
When winding the tape around the pen, be sure to keep it somewhat taught. It's great to work with because it comes right up if you miss a spot. Simply cut or tear and press down the edge of the tape. At this stage you can seal it by painting on Mod Podge, or you can cheat and just spray on hair spray. It works well.


Make modifications for anyone that needs them.
For those students that simply can't work with Floral tape due to physical limitations, consider using a piece of Duct tape cut to the length of the pen. This tape comes in all kinds of colors and patterns now.
For a really sophisticated pen look, use black and white checkered Duck tape and top with a black rose. It would go over great at Halloween.Lay the pen on the edge of the sticky side of the tape.
All the student has to do is roll it up.This type of modification is easy to implement and allows everyone to be successful. Duct tape really is for everything!
Everything you need for modifications -


Taking it to the next level.
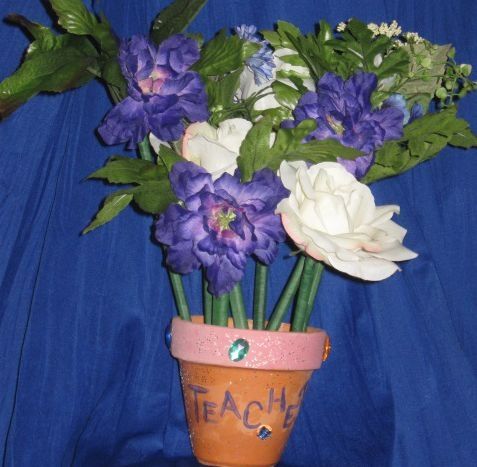
Now, use your flower pens to create a desktop flower pot.
Take a clay pot and have students embellish it by gluing on jewels, painting on a design from a stencil, or maybe, a combination of both.Fill the clay pot three quarters full with small pebbles. Insert the flower pens. It's the cutest thing. It's great to have on a desk. Teachers love them as gifts.
Another one.
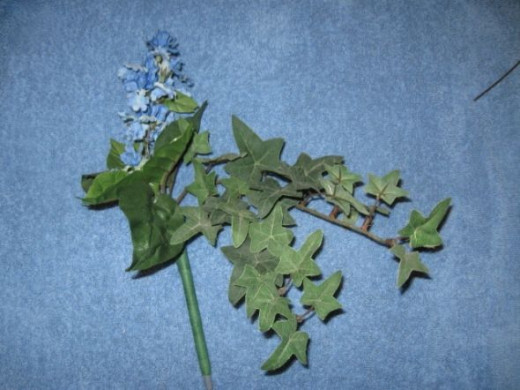
If going for the flower pen pot, consider adding in some vines or something. You can let the students get really creative here.
Make a few more.
Put them all in a pot.
A student made this pot for me years ago. I love it. She was very low functioning and suffered from multiple disabilities. I think she did a great job!
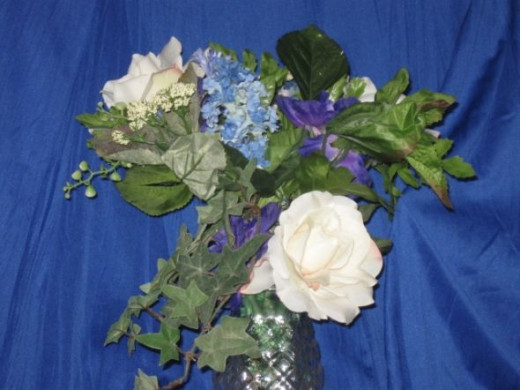
Jars and vases work well, too.
Absolutely adorable little girl teaches how to make a Duck tape rose pen
Check out the future Martha Stewart. She's so cute and gets the job done! To me, there exists no better way to show a great project for kids than having a kid do it.
How to make a duct tape rose pen by a 6 year old by Kristy Taylor

2.) Make flower power buttons with peace signs.
Peace signs are very popular with teenagers.
I don't know what it is about it, but girls will buy flowery things with peace signs all day long. Guess what, boys will buy them too, if you leave off the flowers. But, this lens is for all things flowers, so here is what you do to get boys to buy flower power buttons. Go with black or Gothic looking flowers and skull pictures with your peace signs. When doing buttons, go with a few different designs and allow students to chose the ones they want to make.
This project is good for accessing technology in classrooms and working on fine and gross motor skills improvement. At the dollar a pop price point, these will fly out of the classroom.
Vocational training is all about empowering students to one day be able to earn money. Have them dive right in and start doing it.


What do we need to make flower power buttons?
Mostly, it's all about imagination.
* Button making machine*
Button back holders
* Something to put inside the holderAnything flat will work. From hand made art to a flower, from something printed out on the computer to a piece of cut out fabric, anything can be on a button.
* A internet accessible computer. This is optional, but why not let the students access technology?

Computers are cool, if monitored.
Be sure to always monitor computer usage. School filters typically block anything students should not see, but they are not one hundred percent effective.
Be sure to communicate in pictures and in words your computer usage procedures and expectations. Keep a visual aid in a prominent spot by computers at all times detailing the rules.
This is work time, not time to play games. Game time is OK for a reward, but make it clear that when you assign them to find art for making buttons, games are not allowed.


How do we make flower power buttons?
With a smile, of course.
* First, select the flower image desired.
* Second, have students print the images they select from sites you assign.
* Third, have students cut out the images. Scissors will work for this and that's good for some students who need to work on scissor skills. Consider a more age appropriate cutter for higher functioning and older students.
* Fourth, have students load the button backs.
* Fifth, insert loaded backs into the machine.
* Sixth, press the handles together or pull the lever depending on the machine you are using.

Here's what you need.


3.) Make flower shaped soap.
Mom's will love to get this at Mother's Day.
Soap is very easy to make without much effort or money.
With just a few things, students will create a good looking product while learning about changes in states of matter, small appliance safety and measurement.
These are fun to crank out. You can apply the instructions to any shape or color of soap desired, but for the purposes of all things flowers, you know which shape we are going with.


What do we need to make flower shaped soap?
Most likely, you need stuff you already have.
* Crock pot or pots
* Perfume free, dye free soap bars
* Food coloring
* Body glitter
* Flower scented oil
* Flower shape molds
* Baking sheets

How do we make flower shaped soap?
Easily, with some tunes in the background.
Step one is to decide what color and scent you want for the soap. Pink soap scented with rose would be a good choice, or maybe, lavender scented purple soap.
Step two is to assemble your materials.
Step three is to plug in your crock pots.
Step four is to grade the soap.
Step five is to put the soap in the crock pot.
Step six is to add one to three drops of food coloring per bar of soap used. If using body glitter, add a half a pinch for each bar of soap used now.
Step seven is to measure out one to three drops of scented oil per bar of soap used.
Step eight is to wait for the soap to melt.
Step nine is to very carefully pour the melted soap into the molds. Put molds on sheet pans first in case of spillage.
Step ten is to wait for the soap to harden. Chill overnight.
Step eleven is to pop the soap carefully out of the molds.

Grow some learning in your classroom.
Whatever you decide to do in your functional vocational setting, always remember, keep it real world applicable, keep it simple, and keep it fun.

All acrostic art, word art, and dividers are American made by Vix at cooltext.Image credits; Vix
- Beating the Back to School Blues - Tips for Making it as Stress Free as Possible.
Tips for parents to make back to school as stress free as possible for the whole family.

© 2013 Rhonda Lytle


