The Perfect Baby Shower Gift: How to Make a Diaper Cake


What do Expectant Moms Need?
I love baby showers! I have had my share of baby shower invites and have searched many stores for that perfect baby shower gift. Not being a mom at the time, I turned to my mom and asked for her opinion on what she thought I should get the expectant mother. "DIAPERS, DIAPERS and more DIAPERS!" And thus was born my "go to" gift for every shower thereafter. Diaper Cakes! But just not any diaper cake, my own diaper cake creation that never is the same as the last. Making your own diaper cake can be a fun and creative experience.It takes time and some work but the end result will be a beautifully created heart warming gift that's truly one of a kind. So if you want to be original and skip the horror of purchasing the same gift someone else purchased due to improper usage of "the baby registry", then let your artistic side read on.
Supplies Needed:
1. Diapers - "the cake batter to the cake" (sizes can vary from newborn to size 3)
2. Cardboard cake circle - you need something to serve the cake on. You can also use actual cake serving platters for a fancier look.
3. Rubber Bands in various sizes - small rubber bands (or hair plastic bands) to wrap each individual diaper and larger ones to encompass each tier.
4. Tape
5. Ribbon
6. Glue gun and sticks
7. Clear Cellophane
8. Streamers and Bows
Optional:
9. Baby supplies and toys - rattles, small bottles, pacifiers, spoons, nail clippers, brush, etc.
10. Baby Clothing/Blankets - onesies, burp cloths, receiving blankets, etc.
Steps:
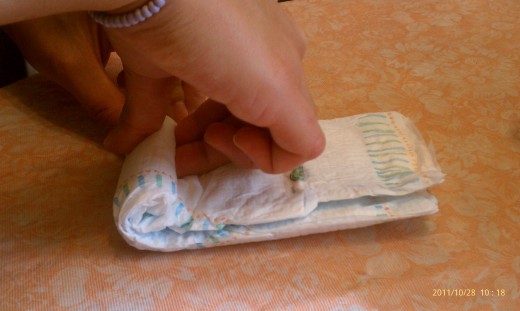
1. I like to start rolling all the diapers before I begin setting them up into tiers. Usually diaper cakes are about 3 tiers and if you use size 1 diapers then you can create using an entire box of bulk diapers. The amount of diapers really depends on the size you use and the amount of tiers you want to create. Rolling them can be started from either end but it’s a little "neater" if you begin rolling them from the “open” end (the end with the sticky flaps). Secure them with the smaller size rubber bands. I use plastic bands in either black or clear.
2. Once you have rolled and secured the individual diapers, get a larger rubber band and start placing a few rolls within to create your first tier. Keep adding rolls until the rubber is stretched and tightly bounds the tier. Keep in mind to use a size of rubber band that stretches to the amount of diapers you want in a particular tier. If not, you can always use a rubber to hold the diapers together and then if it’s not tight enough you can secure it with a string.
3. Continue prior steps to design additional tiers, using less diapers with each new tier.
4. Once all tiers have been created, place biggest tier on cardboard cake circle. You can get these at a local craft store and they come in a variety of sizes. I roll a few tape strips (sticky side out) and place them on top of the cardboard cake circle. Then, place the tier on top. You will find if the tier is securely together, it will not slip or slid from the cake circle.
5. Build the cake using step 4 with all remaining tiers.
6. After all tiers are securely built, choose a medium sized ribbon in your color choice/design to wrap around each tier covering the rubber band/string used to keep all diapers together. Hot glue the ends.
7. Now is when you can let your artistic side take over. You can decorate it anyway you like. You can use things like rattles, pacifiers and burp clothes to attach to the ribbon around the tiers. Use the chosen theme as your guideline to what baby toys and supplies you can use.
8. Top off with a stuffed animal of your choice or one that goes with your theme. Then wrap the entire cake with clear cellophane, tie with streamers and bows......
And Viola! You have yourself an exceptional gift that the mom to be will not only enjoy but put to good use. She will surely be touched by your time and dedication to creating and designing her perfect gift!
Tips
- A miniature version of a 3 or 4 tier cake can be made for table centerpieces for baby showers. In this case, one would make only one tier and top it off with a stuffed animal. You can attach some helium balloons in the same color scheme and this would make a lovely gift for mom-to-be to take home.
- It will take a lot more diapers to fill specific tiers if newborn sizes are being used. Take into account the purpose of the cake when making it. Is it a gift before baby is born or one given after baby is born? If it’s before, you may consider using newborn and/or size 1 diapers which mom to be will find more useful. If it’s after the baby is born, you can use size 1, 2 and/or 3 diapers. Babies grow very quickly and they seldom stay at the newborn size very long.
- You don’t only have to use one size of diapers for the whole cake. You can mix it up with the largest tier being made of the size diaper the mom will most need (typically size 2) and the smallest tier being the size the baby will outgrow the fastest (newborn and size 1).
- For a different look, you can fold a receiving blanket or any baby blanket and wrap it around one or all of the tiers. This will give the cake more use than just diapers. Once all your tiers are created you can pull some diapers out and insert rolled onesies instead as little surprises mom can find.
- I use tape because all supplies being used will also be used by baby and tape will not destroy some of the items like the hot glue will.
- You can make the top tier one of onesies instead of diapers. This can add more originality and value to the cake.


