How To Cake Decorate The Easy Way Step 1

Painting On Cakes

When you went to school did you take art?
In your art class, did you draw and/or paint?
What was your art work graded at?
Did you feel that you accomplished something with your art work?
Know matter if you can or can’t draw, you can be an artist in other ways. You don’t have to know how to draw or paint. It is amazing how you can surprise yourself in other ways you would have never thought of.
We see a lot of beautiful work on canvas and they are displayed on the walls and they last forever. But you can also make beautiful cakes that are art work too. Mind you cakes don’t last long for the amount of work you put into them. However, the accomplishment that you get from those cakes when people see them and say that they don’t want to cut into the cake because they are like a picture. Now that would make you feel like you are on top of the world so to speak. But the most rewarding part is when you see the look on peoples faces when they see your cakes.
You don’t have to know how to draw. That is what I like about this. I’m going to show you how to paint on cakes for beginners. You will need just a few decorating tips to get you started and some equipment you will need.

Here are some supplies that you will need to get you started
Making your stencil you will need:
- Clear tye-tac or another name ( example: Clear Adhesive, etc.). It comes in a roll and it’s sticky on one side once you remove the paper. You will need to cut two pieces of the same width that covers the picture you choose to use for your drawing. I will explain this a little more later.
- Coloring book (any kind). But for beginners I would suggest a simple one that has just one character or item on one page. Later when you get better at decorating your cakes then you can go for more of the challenging coloring books.
- Cutting mat, scissors, exact-o knife (the kind that is shaped like a pencil with a sharp angle blade).
- Small Ruler for making your lines straight when printing on your cake. I mention printing because it is a lot easier to print for a beginner instead of writing.
- Copier to blow up the picture or you can use your printer with a copier. There are also coloring books that have just one item on the page that you don't have to blow up at all. But you still need to copy it because you will need the original picture to use as a guide.
Once the stencil is made you will be putting that stencil on top of your cake and you will be drawing that picture on your cake. But before you do that we have to do some cake decorating techniques. There will be 4 Hubs on "How To Cake Decorate The Easy Way Step1, Step 2, Step 3, and Step 4. The reason why is this; I want to make sure you understand and to make sure you get all the information down right. I will show you step by step instructions on how to do this. In Step 2 you will be making your stencil. In Step 3, I will show you some decorating techniques. And in Step 4, I will show you how to put this all together on a cake.

Here is the list of items you need to start decorating
- Any size square or rectangle cake pan.
- Butter cream icing for practicing. You can make your own or use already made icing. The only thing with ready made icing I found its too soft to work with. So I had to add lots of confectioners sugar to thicken.
- Cake tips # 3 (round tip), #16 & #18 (star tips). You will need one # 3 & one # 18. For # 16 will depend on how many colors will be used. (Using 4 colors then you need 4 tips.)
- Couplers will depend on how many you need. You need for each tip.
- Clear decorating bags. So you can see the colors. And the bags can be washed and reused over again and again.
- Tip brush for cleaning the tips
- Sewing ripper for outlining your stencil on the cake. - Margarine containers for mixing and storing your colors of icing. Or clear containers that you get from Chinese restaurants are better, because you see the colors.
- Colored pastes, not food coloring.
- Small stainless steel cake spatula, great for dipping into the pastes and mixing into the icing.
- Assorted plastic spatulas for scooping the icing into the bags. The real tiny ones are great for using each color and the big ones are good for the bigger amounts of icing.
- Storage Case (optional), This is for storing your tips to keep them in good shape and you can even put your tip brush and ripper in there too along with one coupler. You can purchase the case with tips already in it but you might find that you won't use all of them. So I found it better to buy the tips separately. Also you will have a lot of couplers that need storage which the clear containers or margarine containers are great for that, And ice- cream pails are good for storing your pastes, used decorating bags and your spatulas.


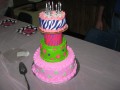
These are just a very few cakes I have done
These are just some cakes I have done in the past. You are probably thinking that you can't do that. Right? If that is what you are thinking, well guess what? You can do it!! Maybe not at first but with practice the more cakes you do the better you will get. And the faster you will be too.