Oh No!! Not another chocolate brownie recipe!!....Sorry I felt it was selfish not to share it...

Oh Yes!! If you like your chocolate brownies extra chocolatey, fudgey and teeth rottingly gooey, then read on...
I know that there are already a number of chocolate brownie recipes on this site and I mean no disrespect to them, but after spending the last couple of years in pursuit of the best chocolate brownie recipe,I felt that I had to share what is in my opinion and in the opinion of the rest of the judges - read that as family and friends - the best recipe I have tried so far. It's not the simplest recipe either compared to some I have tried, but well worth it.
Now for the ingredients...
- 185gr butter
- 185gr really good dark chocolate
- 85gr plain flour
- 40gr cocoa (100% cocoa gives the best result)
- A good pinch of salt
- 1 tsp instant coffee powder
- 3 large eggs
- 275gr caster sugar
- 50gr really good dark chocolate, roughly chopped #
- 50gr walnuts, roughly chopped #
# You can substitute the roughly chopped dark chocolate and walnuts for whatever you fancy really. White chocolate, grated orange rind, cherries, any other nuts you would prefer.#
One day I'm going to try it with roughly chopped after eight mints.......The after eights just have to survive long enough to get in mixture...


Do you bake your own chocolate brownies?
Now for the instructions....
- Put the 85gr dark chocolate and 85gr butter into a large heat proof bowl (See picture 2). Place the bowl over a pan of very slow simmering water, it's important that the bowl isn't touching the water, you want the chocolate and butter to melt together slowly to combine. If you're impatient and try and do it quickly the chocolate and butter will go fudgey and won't combine nicely and you'll be left with a greasy mess. When they are glossy and melted, (See picture 3) set aside to cool right down.
- Now you can put you're oven on to heat up, 180c - gas mark 4 or 160 c for fan assisted ovens.
- Line you're tin, the tin I use is 25cm x 16cm x 5cm. To line it I take grease proof paper cut it larger than my tin, so it'll hang over the edge (See picture 4). I then get the paper wet carefully squeeze out the excess water and line my tin with it. I find that works just fine without the need to grease the tin, you could always us butter or margarine if you'd prefer.
- Sieve the plain flour, cocoa powder, instant coffee powder and salt together into a bowl
- Put the eggs and sugar in to a large mixing bowl, large enough to hold all of the ingredients. Whisk them together until thick, pale and double in volume (See picture 6) - I'd recommend using an electric mixer as this can take up to five minutes or more.
- Carefully pour the cooled, melted chocolate mixture in to the egg and sugar mixture. Fold together, being careful not to knock the air out. (See picture 8)
- Resieve the flour, cocoa, coffee powder and salt over the top of the chocolatey mixture. (See picture 9)
- Gently fold this all together. It will become thick and gunky. (See picture 10) Don't be tempted to over do it, stop when it becomes muddy.
- Sprinkle the roughly chopped chocolate and walnuts - or whatever you've chosen - over the top of the mixture and carefully stir in.
- Pour the mixture into your prepared tin and pop onto the middle shelf in the oven. Cook for about 25 - 30 minutes depending how gooey you like you brownies in the middle. You can't test if brownies are cooked with a toothpick or knife like other cakes as you want them sticky in the middle. (See picture 13)
- Allow to cool a little in the tin before carefully lifting out, using the over hanging greaseproof paper and cut into rectangles - I get about 12 decent sized brownies from my tin, (See picture 14) you may like to cut them smaller as they are rich. If you didn't use greaseproof paper then wait until completely cooled before cutting and lifting out.
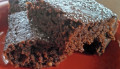
- Serve with vanilla icecream or fresh cream and enjoy!!. Be warned these are as chocolatey as they look......I hope you enjoy them as much as I do!!

 2022")