Sous Vide

making your own sous vide hack
hi everyone, inspired by the seatle food geek, I have made my own version of a sous vide machine.
I became interested in Sous Vide while browsing the web. I was interested in the type of results that can be achieved with this method of cooking, including the ultimate rare steak!
Mainly a method for commercial cooking, the results have inspipred many to use it purely for the results. if you don't know what sous vide is, basically it involves sealing the food to be cooked in a vacuum sack and cooking it for an extended period in precisely controlled temperature.
One of the benefits of this method for commercial kitchens is the period of time that foods can be cooked for, or held at the correct temperature. Imagine steaks held at the correct temperature for hours, whipped out and chared off on the grill for a few seconds and straight out to the table.
As time went by, many chefs began to realise the potential as results differed vastly from conventional methods, and a whole new genre was born. If you want to see the extremes, get Thomas Kellers Under Pressure from Amazon.
But I digress, wanting to explore this style of cooking involved spending some serious quantities of money on equiptment. Some water bath equiptment run into the thousands. The cheapest I could find was £250. So, I embaked on an internet search to find a "Hack" method of Sous Vide.

All I can say is that the seatle food geek set me on the right path. His detailed instructions for building a machine provided me with a blueprint for doing it on the cheap.
However, the electrical instructions were based on North American components and voltage. I wanted to help people in the UK by posting the information and component sources I have tracked down.
I have made two basic machines. The picture above is my mark II. it is essentially a version of the Seattle food geeks, with the heating elements separated from the control unit. I have tried to make it so that you can easily replace the heating elements, without great success. These elements tend to burn out easily. In fact, I am searching for another heating method as these are not longer sold in the UK due to a dubious safety record and a trail of burnt hands! I had to get these shipped from Germany after my first option from the Ukraine didn't even meet my low quality standards. Any suggestions welcome.
Both of my contraptions are comprised of two parts, the bath or heater and the control unit.
The way i have made this allows me to switch the control unit between the two machines. Very useful with expensive components.

The Control Unit - what you will need
A PID controller- can be found on ebay for around £20
Solid state relay 25amp- an electrical 'switch' that receives a signal from the PID and turns the heater on and off (about £8)
PT100 thermocouple preferably waterproof version (mine is teflon coated)- a type of temperature probe that connects to the PID. This type of probe supports temperature readings as small as one tenth of a degree. PT100 probes usually have three wires where standard probes only have two. When you wire this to the PID, only the red wire matters, the order of the other two is not crucial (or so I hear!) Got mine from ebay for about £12. (Most PID controllers will come supplied with a K-type thermocouple, these are fine, but measure with an accuracy of 1 degree Celsius as apposed to the 0.1 degree of the PT100). Additionally, you will have to change the internal settings of the PID if you change to a PT100. Refer to the supplied manual on how to do this as each one is different. One final note on the Thermocouple, I originally wired a connector in my control box so I could remove the PT100 easily, but I found that this affected the readings. These are very sensitive pieces of equipment and changing the wires effects readings, so I decided to hard wire it to my controller and drop it in whatever water-bath I decided to use.
2 IEC Mains inlets and 2 IEC rewireable sockets - for connecting the controller unit to the mains and for connecting the immersion unit to the controller (total £4) http://www.bitsbox.co.uk/connects.html
1 flex cable - for connecting the control unit to the mains and the immersion unit to the controller. (any old undamaged flex will do)
some wire - for the internal wiring of the unit (I stripped some old domestic ring main wire for mine) (I also used some old lower gauge wire for the DC part of the unit)
An AC to DC power converter - used for converting the power for the CPU cooling fan and the water pump (£10 from Maplin) http://www.maplin.co.uk/low-cost-6w-multi-voltage-power-supply-226 I cut off the pins (to save space), opened the unit up and drilled holes in the top to feed the AC in wires in.
a box to contain the unit - I have used an ABS box from Maplin. Sturdy and will stand up to the heat. I used the MB4 which cost about £10. http://www.maplin.co.uk/mb-plastic-boxes-1676 (small tip, use circular components where possible as accurately drilling circular holes is much easier than cutting square ones!)
Small illuminated rocker switch - to isolate the power and to help with not burning out the coils. cost £1. http://www.bitsbox.co.uk/switches.html
CPU fan and heatsink - used to cool down the SSR as they can get extremely hot with prolonged use. I had this one already from a processor upgrade to my computer (most new processors come with one of these) but I used a much better one for my pc. Not sure how much these are, but I am sure not much on ebay (note - most of these run on 12v dc. I used 6v dc as this was the max for my water pump. This has the benefit of slowing the CPU fan and reducing running noise.)

The water bath - what you will need
method 1 - a cheap, large slow cooker. Can be purchased for around £20. I used one of these Morphy Richards 48710 Oval Slow Cooker, 3.5 Litre, Stainless Steel
method 2 - For a much more accurate setup!
travel water heater or other element type - I purchased two 300 watt versions from http://www.eibmarkt.com/cgi-bin/eibmarkt.storefront/4f1ef2810085d000274c4debae380680/Product/View/NS3252460 but they also sell single 1000 watt versions which would also be suitable.
Food grade high temperature espresso machine water pump - bought mine on ebay for around £12 shipped from the US.
7mm internal diameter and 4mm internal diameter black silicone tubing - I didn't want to submerge my pump as I heard that this is a sure fire way to kill them. So I bought 50cm of each to move the water too and from the pump. After reading up, I found that most home brewers use silicone as it is innert (won't impart a plastic flavour to the water), holds its shape, and is flexible. More than I needed, but this was the smallest quantity I could buy on ebay. You will also need two elbows for one of the diameters and a couple of small jubilee clips. Total cost £10. You might find this in home brew stores.
2 meters of angle aluminium or stainless steel metal and mesh and lots of stainless screws - this was my method of housing the unit. This was probably more expensive than it needed to be, but it was my chosen method. I am looking for another short cut as this was time consuming. I have been keeping an eye out for a suitable mesh bin to replace this part of the construction. The reason for the mesh is to keep the plastic bags (and fingers) away from the element while cooking. The circulation from the pump can move bags and cause them to touch the element and burn a hole.
I also used a small ABS box to mount the heating coils - I think it was the MB2 which was £5.
A selection of grommets- to fit whatever cables, heating elements and pumps are attached to the heater/circulator unit. A good way to make a watertight seal!

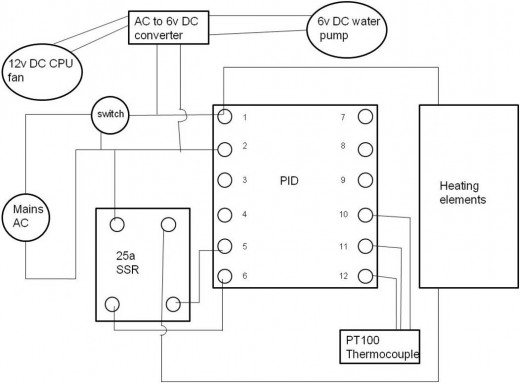
Method - making the control unit
I would suggest trying method 1 first. A slow cooker will only set you back £20 and can be used for other applications later! I have seen reports of home cheese and ice cream making that requires precise temperature control. I attached my temperature probe directly to the control unit so I could swap between the slow cooker and my own heater/circulator.
First step would be to make the control unit. All we are making here is a feedback loop. The control unit plugs in to the wall and the heating part of the machine plugs in to the control unit. With the use of the temperature probe, the control unit tells the heater to turn on and off to maintain the desired temperature.
The diagram below shows the typical layout. This then needs to be housed in the box. Choose your own layout that suits your type of box and size of components.
This unit can now be used to control your slow cooker, or any other heating device you choose. Just fill it with water, drop the probe in the water and turn it on!
But don't forget to use the PID manual as they can be complicated. I always use the autotune function as it is far easier than using the internal settings of the PID.
Method 2 - making your own heater/circulator
Method 1 is fine for an introduction but, using your control unit, a far more accurate and flexible system is the creation of your own heater/circulator. As well as being more accurate and more able to control temperatures in the range of 0.1 degree, it has the benefit of being transferabel to any type of container. I am currently using a cool box for its insulation value.
Method 2 involves the construction of a combined heater and circulator, all in a casing that will securely hold the equipment. This is my attempt.
I have made a frame out of aluminum angle, fixed with screws. But you can use anything you like. I chose this as it is easy to work with, light, available and it won't rust. All of my dimensions are based around the components. This should always be the starting point as all the heater is there to do is heat the water, ensuring everything is positioned correctly and with enough room is the primary concern. My main motivation for making a box frame was to create a cage to prevent the heating elements from touching any bags in the water bath and any hands or surfaces outside! It might be just as effective to create a partition in the water bath, but I prefer the option of being able to use my heater/circulator in any vessel.
So I will take you through my machine so you can copy, or improve my design.
Firstly, you will notice that there are two types of angle metal in my contraption. One has two equal sides while the other has one side considerably longer than the other. I did this after I found that you are unable to fit the screws in oposing corners! by using one angle with a longer side, you have more flexibility with screw placement, enabling you to fit in all of the required fixings.
On top I have mounted another ABS box to keep the electrics away from water and to hold the elements and circulator pump. While on the subject of the pump, I wanted to ensure that it was outside of the ABS box in case either of the pipes came off and water was sprayed on the electrics. Also, I left more intake hose than necessary so I can prime the pump with a syringe.

The circulator pump - after careful consideration, I decided to configure mine so that it wasn't submerged. I have seen other builds where the pump I used was submerged and apparently they work fine in this way. My particular model is rated for temperatures up to 100 degrees celsius, but I have also seen reports that they will fail when submerged at high temperatures. So I decided to use pipes an mount the pump out of the water.
However, I was also concerned that the pipes might come off from the point of contact or leak if it was entirely inside the box where the wiring was contained. I hear that the combination of electricity and water is a bad thing, so I decided to keep the pump, half in and half out of the box, using a 22mm gromit to make a watertight seal. On the inside I used a jubilee clip to make sure it didn't drop out.


And so there we go - a finished unit.
The first time you run the machine, be sure to fill it with cold water, set the desired water temp and use the autotune function. This will ensure the PID learns how to maintain the temp at the correct level.
(my PID ran the autotune by holding down the button located in the bottom left pointing to the right for a few seconds, but each PID will be different so refer to your instructions).
One final note, water an electricity are not a marriage made in heaven. Always check that everything is working properly and use a current detector to ensure of no problems. And never put your hand in the water while the machine is switched on and you are grounded.
Happy cooking!
Recipes Hub
Please have a look at my recipes Hub where I will update any ideas and things that I have been cooking and you can leave any questions.
Update
After several months of happy sous viding, I have been laying down plans for MARK III.
I would like to construct a unit with a sealed lid, as I have found evaporation to be an issue. Leaving a joint of meat to cook for 2 days means regular checks on the water level. I am only cooking at 50 degrees so I worry about turning it up to do poulty and pork. And I am so desperate to do a rack of ribs!
Also, I will try to construct a separated unit to heat the water and pump it back in the bath. But more of that when I come up with a plan. Any ideas greatfully received!
Seattle Food Geek - Sous Vide for $75
- DIY Sous Vide Heating Immersion Circulator for About $75 | Seattle Food Geek
Ive recently been fascinated by the idea of sous vide cooking a method of slowly cooking vacu-sealed foods in a precisely controlled water bath to

")
