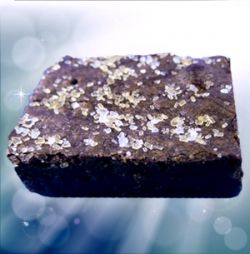
Sweet and Salty Brownies

Sweet and Salty Chocolate Delight
There are many that not only love, but crave the goodness of sweet and salty together. I can remember at one time thinking it odd, until trying it! Now I find that I like the combination of goodies such as chocolate covered pretzels etc. Having been a lover of brownies ever since i can remember, you can imagine my delight in seeing a show on TV that featured a segment on Sweet and Salty Brownies.
Well, it didn't take long before I was gathering the ingredients and giving this a try. The rest as they say, is history!

So far these have been a major hit!
Although I love to cook I'm far from being a wiz in the kitchen. The only time I had ever made brownies in my life (or most other baked goods) have come out of a box. For me this was a real challenge to make these from scratch, especially not being as familiar with the process as many others. However, I wanted those brownies so I was undeterred in my quest!
I will say that the experience was good in that I learned a few things along the way, and after ruining the first batch managed to do some more research. I'll cover some of the tips below that I picked up for those that may be in my category and need a little extra help. For you experienced bakers this will probably be a piece of cake....or shall we say, brownie!

Ingredients
- 1 Teaspoon Fleur De Sel
- 1 Cup Sugar
- 2 Tablespoons Light Corn Syrup
- 1/2 Cup Heavy Cream
- 1/4 Cup Sour Cream or Greek Yogurt
Instructions
- The first step is to make the caramel. Over high heat combine 1 cup of sugar, 2 Tbsp. Light Corn Syrup and 1/4 Cup water until a temperature of 350° F. is reached or it thickens and turns an amber color (approximately 6 to 8 minutes). Once the temperature is attained, remove from the heat and slowly add the cream. It will bubble up but once it has mixed in, add the 1/2 Tsp. of the Fleur De Sel and then whisk in the 1/4 Cup of Sour Cream. Set aside to cool while you prepare the brownie batter.

The Brownie Batter
- 1 1/4 cups all-purpose flour
- 1 teaspoon salt
- 2 tablespoons dark unsweetened cocoa powder
- 11 ounces dark chocolate (60-75% Cocoa)
- chopped or morsels
- 2 sticks unsalted butter
- cut into cubes
- 1 1/2 cups sugar
- 1/2 cup firmly packed light brown sugar
- 5 large eggs (room temperature)
- 2 teaspoons vanilla extract
- 1 1/2 teaspoons Fleur De Sel and 1 teaspoon of coarse sugar (to sprinkle on top after baking)
Instructions
- First preheat your oven to 350°, then prepare a 9X13 pan by buttering the bottom and sides. Line with parchment paper and butter that as well (I let it hang over the sides which made it real easy to lift the entire thing out of the pan after cooling and place on a cutting board). Next, whisk together the flour, salt and cocoa powder in a bowl and set aside for later.
- Place the chocolate and butter into a bowl of a double broiler or stainless steel mixing bowl over simmering water. While stirring occasionally melt until completely blended. While keeping the bowl there, turn off the heat and whisk in the two sugars until completely blended. remove from the heat and allow it to cool to room temperature if not already.
- Blend in the first 3 eggs until mixed, and then add the next 2 eggs until completely blended. Add the vanilla and mix until combined but be careful to not beat the batter too much at this point. then carefully sprinkle the flour mixture over the batter and gently fold into the batter with a spatula until just a trace of the flour is showing.
- Fill your pan with half of the batter and spread evenly. then take your cooled caramel and drizzle about 3/4 of it on top of the first layer trying not to get to close to the edges. Gently spread the caramel around being careful to not mix it in with the batter below. then carefully spoon the remaining batter on top of the caramel again gently smoothing it out and spreading it without mixing it with the caramel.
- Bake at 350° for 30 minutes, rotating the pan halfway through. Check to make sure they're done by by inserting a clean toothpick in the center and it comes out with just a few crumbs on it. As soon as you remove it, sprinkle the mixture of Fleur De Sel and course sugar over the top. Allow it to cool completely before cutting and then they can be stored for about 4 days in an airtight container. They can also be frozen for a later time

Some tips I learned along the way
and other things you may wonder about.
I suppose first is that you may be wondering what "Fleur De Sel" is. Quite simply put it is a Sea Salt, and in fact many have used regular Sea Salt for this recipe. While it will work fine, I opted to go get the real stuff. Of course all Sea Salt is not "Fleur De Sel" (literally Flower of the Sea) which is harvested by hand off the coast of France. If you or someone you love is a salt connoisseur, then go for the real stuff which has a milder flavor, is full of minerals and excellent for baking or finishing. However, it is definitely a more expensive salt so I wouldn't blame anyone for using regular Sea Salt.
Needless to say, the chocolate you use can make a difference. The recipe calls for a good dark chocolate that is 60 to 75% Cocoa. While I started with your basic Baker's Chocolate available in most stores, I quickly moved to Ghirardelli Premium Chocolate Chips that I found that were 60% Cocoa and i must say the results have been wonderful. I saw one recipe that changed it to 13 oz of chocolate and omitted the sour cream in the caramel. While i kept the sour cream, i did do one batch with the added chocolate and basically saw no difference but you can gauge accordingly.
The first attempt at the caramel came out OK, but i didn't have a candy thermometer and tried to gauge it being ready by the amber color. I got it pretty close, but after getting a pocket thermometer that would go up to at least 350° I found that the mixture was thicker by the time the temp was reached and i do think the caramel was a bit better. If you're not experienced in making caramel, you may want to get a candy thermometer or one that will work. it makes the job a bit easier. You will have some caramel left over. many like to use it on the brownies after baking, and if you'e a fan of caramel, you'll probably want to do the same!
Several folks warned about letting the caramel touch the sides of the pan that it would burn. While I didn't find that to be the case, if you do not get the caramel layer covered completely, it will bubble up through the top and the caramel will be chewier and stickier. I personally didn't find it objectionable, but your mileage may vary. If you're careful to keep the caramel layer contained, it bakes into the brownie and you don't really taste the caramel per se. I want to mention again though to be careful to not "mix" the salted caramel with the brownie batter as it will prevent the batter from baking properly. When you place the top layer of brownie batter on top, try to drip it across the top using a spatula, and then carefully smooth it out.
If you don't have the time to allow the eggs to reach room temperature on their own, you can place them in lukewarm water for 10 to 15 minutes. they should be ready once they are no longer cool to the touch. It does make a difference though so make sure they are at room temperature and that the melted mixture has cooled before adding the eggs.
I suppose I should mention that these are the fudgy gooey kind of brownies and not the cake type if that's what you prefer. And if you're concerned about it being salty, not to worry. There's only a hint of the salt and most of that comes form the Fleur De Sel sprinkled on top. Although the caramel is salted, it has a delicious caramel flavor! If you're a chocolate lover, you owe it to yourself to try this one. In fact most who try these claim they are the best brownies they have ever had. Only one way to see if you agree!
Ready to dive in and try them?
I made a mess...but it was so worth it!
Some stuff you may need for these brownies
There are a few things that the average kitchen may not have, but here you can easily find the extras you may need here without having to leave home!