Dark Souls II Walkthrough, Part Thirty-Seven: Drangleic Castle - Looking Glass Knight


Drangleic Castle is far from a dead place. The citadel of the land is full of hardy hollow soldiers who want to do you harm, and somewhere in its walls the king and queen seem quite apathetic to the plight of their land. What foul magic has besmirched this once golden realm...?
Drangleic Castle
- There are two paths you can take out of this Bonfire's small chamber, one to the right and one to the left. Go with the left.
- At the end of this passage you'll find a pit with a pole. Edge around to to the right to find a ladder to climb.
- At the top you'll find a door. Go through. You'll pop out into a large room with a large number of statues; they'll come to life if approached. You can try to beat them off if you want, but chances are good you'll be killed. Retreat through the door to your right, ignore the chests in the next room, and keep running through the door ahead and to the left. It's small, but it's there. Come back after the statues retreat to pop open the chests and find an Old Knight Hammer and a Caitha's Chime.
- The next room is a long hall lined with elephantine statues. Run up the stairs to your left; there will be archers on the two upper balconies, two per balcony. Kill them off, then take out the melee fighters at the far end of the hall. There are two chests on the balconies; the one on the right is trapped. Pop it open for ten Fire Greatarrows and the one on the left for a Firestorm.
- Go down the hall and push open the door at the end. You'll emerge outside, and an elephant lurks nearby. Take it out, then look down the set of stairs to your right. There's a door here, leading to a small storeroom. Check the corpse in here for five Repair Powders and ten Flame Butterflies and the chest on the other side of the room for an Estus Flask Shard. By the chest is a lever; pull it to unblock a door beside it. The path outside leads down, to an armoured knight, and back to the Bonfire. Don't bother with it unless your health is running low, and if it is, run. There are archers above that will do a lot of damage.
- Return to the platform where you beat up the elephant warrior and look to the aqua door. It won't open, but there's a ladder you can climb to reach the archers on the lookout. If you're a ranged fighter, use the wall nearest the archers to hide and fire; if you're melee, get down by them to force them into melee fighting themselves. They're not nearly as dangerous.
- You've now created a looped path back to the Bonfire. Go back and return to the lip of the statue room. Assuming you haven't destroyed the ones you awoke, they'll be milling around in the room. Use a ranged weapon to destroy all but one from the door, then jump down and engage the last by the giant statue in the rear of the room. This will trigger the appearance of an elevator back by the Bonfire. Hop onto it and it will ascend.
- At the top and in the next room you'll find a cage with a most unusual lock. Pop open the chests around the cage for a Strong Magic Shield, a Soul Vessel, a Fire Seed and a Key to King's Passage, then leave the room and hop back on the elevator. You'll definitely be back here.
- Back at the bottom of the shaft, you'll be near a black door that is locked. The Key to King's Passage will open it up.
King's Passage
- Ooooo. To your right in the first open area here is a corpse carrying three Alluring Skulls.
- Beyond is a long corridor leading to a misty door. A single figure appears to stand vigil here, but the statues on the left and right as you make your way towards it will come to life and attack. Pick your way down the line slowly, only fighting one or two at a time. They're not especially tough, but the statues are viciously fast. The final defender is a knight the likes of which you've fought many times in this castle already.
- And beyond the mist...
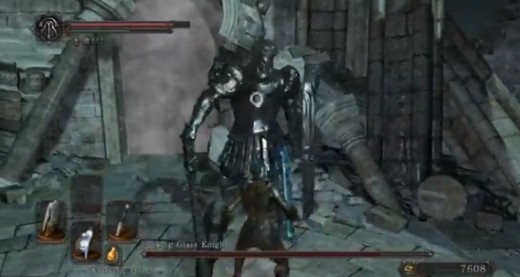
Looking Glass Knight
This fight would be fairly standard for Dark Souls II if not for one tricksy little trick. The Looking Glass Knight is equal parts ranged and melee brawler, with a decent (but not amazing) reach and a decent (but not amazing) land speed. He'll use the following moves to take you down:
- A leaping slice. The Looking Glass Knight will pretty much always do this first thing during the battle. Roll under his sword arm to avoid it and come out unscathed on the other side.
- An overhead slice. This is sometimes accompanied by a combo of strikes, to a maximum of three.
- A charging thrust. Dodge to the right or left.
- Electrical attacks. The Looking Glass Knight will charge up and unleash one of three attacks: a whipping attack that will cut at everything in an area around him, a distant ranged attack that will send a bolt of lightning cutting across the ground towards you, and another ranged attack that will send five lightning orbs in a spread towards you. All three can be avoided with careful rolling, and the Looking Glass Knight's charging time is sufficient warning to get to safety.
- Drawing in an assistant. The Looking Glass Knight slams down his shield, and after about fifteen seconds of yanking, an invader will emerge onto the battlefield to assist him. Played offline this is an NPC computer and not that bad; played online, this may well be another player. The summoning is a great time to deal a lot of damage to the Looking Glass Knight, though you should also be ready to dish out a lot of damage to whatever emerges. (From what I've heard, you can stagger the Looking Glass Knight while playing online and the summon will fail. I don't think this works offline.)
Overall, this is a fairly standard battle. Lock on to the Knight, move in close, and roll under or around his attacks. I found it quite efficient to rush at the Knight as he's attacking and roll under his sword arm, as you'll emerge just fine on the other end and have a chance to leap up and jab him once or twice before he recovers. Back off whenever he begins to charge up, avoid whatever move he unleashes, and then move back him for more bashing.
The summoning bit is problematic, as you can imagine, though killing the invader quickly when they appear will help limit your problems. Don't be afraid to stand right in front of the shield and start attacking as soon as the invader emerges. If they do get into the brawl, wait for the Knight to back off for a ranged attack before taking on the invader in earnest. You don't want to duel both fighters at once.
- Defeating the Looking Glass Knight will earn you the Looking Glass Knight Soul. You'll also open up a large lift behind you. Step onto it and you'll descend far below the castle walls.
- Once you're off the lift, run into the vined passage ahead. There's a torch dead ahead, a path to your left, and a walled-in corpse to your right. Blow through the branches to gain a Green Blossom, then head left. You'll soon arrive at the Tower of Prayer Bonfire... and beyond that, the Shrine of Amana.
Related
-
Dark Souls II Walkthrough, Part Ten: Lost Bastille - Servants' Quarters
-
Dark Souls II Walkthrough, Part Six: Heidi's Tower of Flame - Heidi's Ruin
-
Dark Souls II Walkthrough, Part Three: Forest of Fallen Giants - The Crestfallen's Retreat
-
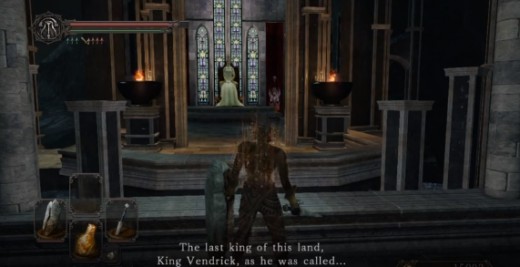
Dark Souls II Walkthrough, Part Forty-Six: Undead Crpyt - King Vendrick
-
Dark Souls II Walkthrough, Part Thirty-One: Brightstone Cove Tseldora - Chapel Threshold


