How To Easily Build an N Scale Train Layout Including Scratch Built Scenery!

Building is fun, easy and can be inexpensive!
There are two basic ways to approach building a model train layout. Purchase the items you need from commercial manufacturers or build them yourself.
You may decide to purchase the train and track, the bottom end priced trains are quite functional, look great, relatively inexpensive and tooling up to scratch build them is a costly investment.. But the really expensive part of most layouts are the buildings, trees, light poles, etc. For just the cost of some basic supplies such as clay, wood, glue, paint, plastic, toothpicks, sawdust, etc. you can have an amazingly realistic railroad scene.
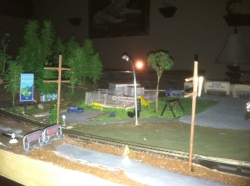
The motives to build from raw materials- a.k.a. from scratch- include saving money, maintaining quality control, learning new skills, and being able to say, "I made all this myself" as I can say about this attached photo. The tennis court, building, telephone pole, bench, light, trees- everything you see- are scratch-built, nothing except the train and track was bought as-is or in kit form!
This N scale layout is functional, will easily pass muster with your audience and won't cost near the $300 per square foot average many spend to build; more like $10 per square foot, train and track included. Do the math: on a 7' x 3 ' layout that's $200 vs. $6,000. And $6,000 is average, nowhere near the tens of thousands some layouts cost.
You'll have much fun (and stay out of bankruptcy court ; ) building this N scale train layout!

The First Step!
Which way to the nearest Home Depot?
So...I finally tired of setting up my N scale track loop on the kitchen table every year. I would run the train a few times for my daughter and her friends, but not being nailed down, the track would eventually start to separate at the connectors. After a few push-it-back-together track repairs I'd get frustrated and tear it down until the next Christmas....but no more! I decided to make a permanent setup that could be stored against the wall and simply be picked back up whenever I felt like working on it (or my daughter felt like I should run it, lol). Or maybe even be left up all the time.
You can imitate this layout if you like, but note that this is my first ever attempt at building an N gauge layout and there's no master plan. I'm pretty much making decisions on the fly, often inventing ways to make what I need as the build progresses. I'll tell you the basics of the endeavor here and you can either copy or implement your own variations.
First you'll need a base: wood of some sort to build the layout on. I went to Lowe's intending to buy a sheet of 3/4" plywood and ended up purchasing a solid door slab for $25, the kind of interior door you'd normally hang between two rooms. They come unpainted and have no knobs, no indented window panels or anything, just a flat slab about 7 foot x 35 inches wide- a perfect layout size.
I decided against plywood because good quality plywood is more expensive and far more flimsy than a door slab. I didn't want to build a layout, pick it up and watch everything shift around when the plywood bends. I highly recommend you start with a door slab. It's far cheaper, better and easier than framing a piece of plywood with 2 x 4's.
If space is a problem simply cut the door down to a smaller size.
You could build legs for the door slab from 2 x 4's or set it on the floor and work laying down or possibly even hinge it to the wall. Hinging will make access to that side difficult though! I set my door slab on the good old kitchen table to get started.
So let's lay some track! Here is a list of the tools and materials you'll need:
A small box of tiny 1/2" wire nails to nail down the track
A roll of thin, black slightly spongy material to put under the track. I use non-slip shelf liner. Felt would probably work. Styrofoam works well also and can be used to elevate the track. Start saving egg cartons, packing styrofoam, etc. It has a lot of uses.
Tack hammer
Nail Punch
Nail puller or Flathead Screwdriver
Needlenose Pliers
Small Regular Pliers or Vise Grips
Scissors
No doubt, some N scalers will take issue but this method will achieve our modest goals perfectly and save $ over commercially available roadbed. We'll "ballast the track" later:
1) Figure out where you want your track by laying it out then remove the track connector on your first piece temporarly, set the track on your felt, shelf liner or whatever medium you've chosen. Pick up both the track and liner and cut out a piece of liner as snug to the perimeter of the track as possible.
2) Put your track connectors back on the rails. Lay the liner with the track on top. Holding a nail with the vise grips carefully tack down one end of the track. Most track has a slightly oversized space between the ties at each end. Place the nail in that space, tight up against the track so the nail head wil push down on the tie. Put one nail at each end. If you're doing a loop design lay it out before you tack it down or it may not line up to close the loop. An optional touch of black magic marker on each nail head will make them about disappear.
Repeat until you have your track laid or at least enough to start on scenery.

The Track Plan
I decided to simply make a big loop around the outside of the door, then do a turnout about midway around the outer loop and send a strip of track down under the elevated portion, at the bridge. Your'e looking at about half the track plan here
To the left is the darker, finished area and the remainder of the loop. To the right is a town in the planning stages. I'm considering adding a second door base for this stage.
Notice the roads are wider but made of the same modeling clay used on the country roads as described in a module below. It will just need to be sanded much smoother and have yellow and white lines installed.

If You Mess Up...
...No Biggie!
Simply put another nail in beside the bad one, or pry it up with a screwdriver or nail puller. Once you pry the nail head up slightly, vise grips or pliers will quickly finish pulling it up.
Amazon Spotlight Personal Review - Got A Credit Card Handy? It's A Great Buy!
The Bachman Tri-Level Auto Carrier


Pulling out a "bad" track nail
Be sure to visit this lens also as it has some good photos and details how to build a tunnel, a cornfield, a McDonald's that some have mistaken for the real thing and more!:

Rule of thumb N Scale Size Conversion Chart
1:160
80 feet in real size = 6 inches in N Scale
50 feet - 3.75 inches
20 feet= 1.5 inches
10 feet= .75 of an inch
6 feet = .45 inches
3 feet = .225 of an inch
2 feet - .15 inches
1 foot= .075 of an inch

A House Built From Scratch
Do-it yourself doesn't mean quality must be sacrificed!
There are excellent, highly detailed N Scale buildings commercially available, but you'll pay $20-$40 for a kit, $40- $150 for a fully assembled structure and even at that price, many fall short of being convincing. This residential house typical of one you'd find on a higher end residential street cost under 50 cents for materials yet looks more realistic than the majority of commercially available houses that look like the cheap plastic they are.

Scenery makes the layout!
Buldings, cars, people, road signs, light poles....just about everything you see in real life can be duplicated in N Scale!
Let's lay some grass and dirt...and maybe a few trees too. You'll need:
A Bag of Brown Dirt
A Bag of Green Grass
Trees
Elmer's Wood Glue
Nice to have but optional:
Hot Glue Gun instead of the Elmer's
Basically spread the wood glue where you want dirt or grass, then quickly sprinkle the material thinly on the glue. Allow to dry thoroughly.
Most land is not perfectly flat. A gob of hot glue or a longer thinner strip of hot glue, once dry, will provide a slightly raised area to add realism.
Wood glue can do the same type of terrain building but it requires hours to dry instead of the seconds hot glue takes.
To plant trees you can apply the glue to the base of the tree, plant it, then you'll need to hold it in place until it dires. Hot glue dries in less than one minute. Wood glue will take hours so you'll want to position something to hold the tree in place during dry time.
Grass and dirt are both available at N scale dealers but it's expensive and you don't get much at all for the money. You can make your own with sifted sawdust and food coloring. Fabric dye works even better but it's a messy, somewhat dirty job, definitely wear gloves and a mask. Obviously use green dye for grass and brown for dirt. It's not a bad idea to mix up a little yellow also.
Some places you'll want pure green, some areas will need pure dirt, but often you'll hsve transitional areas where blends of green, brown, and sometimes yellow, will be more realistic.
The Empire Builder
Some N scale modelers think nothing of spending $1,200 on a steam engine or $150 on a single kit building. $2-$3 on every tree. $35 on just one single light and pole, $7 to $25 on every tiny little vehicle...it quickly adds up to big money. If you want to end up with forty or fifty grand in your 6 x 3 foot layout, go for it.
I started out with a basic N Scale train set and bought a few extra cars on closeout along with some extra track. Buying a kit will give you the biggest bang for your buck. This will be your big one-time investment. If you follow my instructions, the landscape elements and other scenery won't cost much at all.
While just about any N gauge train set will work to get you started, if you can afford it this is my recommend. Bachman trains are good quality and this kit has the engine, power pack, a good amount of track and even some road signs.
Now I prefer old fashioned style track, not the EZ Track that comes with most sets but you can make EZ Track work just fine and it will hook up with older style track. For your small layout a kit will be the perfect start!
Additional choices
Once again, sets rarely come with more than a circle or oval of track, purchase some extra and perhaps consider getting a turnout or two.


Add trees, shrubs, rocks and gravel
When I discovered that commercially available N Scale trees were over $2 each and realizing I'd need dozens, maybe hundreds, I decided to find an alternative. Pines are shown here and I also make leafy maples and oaks. Ditto shrubs and autumn trees sporting red, gold and other fall colors. Details on making them will be covered in the next Lens.
I'm biased I guess but I think my homemade trees look far more realistic than the commercially available ones that look like plastic covered wires gloriously adorned with green carpet padding pieces representing leaves.
What do you think?
Gravel can be sifted into different sizes for use as parking lots, boulders, etc. These items, especially the trees, will make a huge difference in how realistic your layout looks.

The Depot Building
Painted and detailed
It may be difficult to see in a pic but the dark green strips around the window and such are not paint, they're little strips of wood which impart a three dimensional effect.
This building runs about $40 to $50 if you buy it assembled at a train shop. I don't think there's more than fifty cents worth of materials in this do-it-yourself one.

People, Vehicles, Animals
Patience Test!
Making your own N scale people, vehicles and animals is a challenge and then some. A 6 foot tall person scales down to less than 1/2 inch so painting them requires extremely fine detail and it's very easy to accidentally break off the model's appendages. They won't cry but seeing an hour of work go down the drain in a snap, you might. Notice the little dude in the camping scene pic at the bottom of this lens, he's about 3/8 inch tall.
The Wal-Mart semi truck in this pic was made using a door magnet for the trailer and modeling clay for the cab & wheels.
I'm using a product called "air dry modeling clay" which is sold at Hobby Lobby. There's a brand called "Cloud" that is perfect but they were out so I purchased Fimo Light- so far, so good. A small $5 block will make a lot of people, vehicles and animals.

How To Create Your Roads
A big mistake some modelers make is to draw roads flat on the wood base and paint them. Or they get flat gray plastic roads and glue them down. Not cool at all in my opinion because they look so unrealistic as to be ridiculous and toylike. Look at roads you travel. Typically they're humped toward the middle so water will drain and they usually have a lot of imperfections, especially rural roads.
A better method is to spread some air dry modeling clay very thin, humping slightly toward the middle. Roadways have slight dips and elevations so making the road a bit higher in spots is not a bad idea. Sanding is necessary. In general, city and town roads need to be smoother and rural roads can be pretty lumpy. The pic shows me painting a rural road made of the clay, just up from the depot. To the left is an elevated area made of the clay with a few boulders on it. Later I'll add paint, dirt, grass and such to complete this area.
Notice the phone poles made of thin wood dowels and toothpicks!

Make A Phone Pole
This one has a "transformer"- a spent .22 ratshot shell casing!
Using wood dowells for the vertical pole and square toothpicks for the horizontal poles, I make about three regular poles to each one that has a transformer. String black thread for wires!

Raise that train bed.
I thought it would add beacoup interest to raise the track about 4 to 5 inches at the far end of the large loop. Seeing pre-cut track risers for $150 forced a trip to Home Depot for a discounted 2 x 4 for $1.50 which was then sawed to create the necessary shapes. There's one riser about 2 feet long, the rest is small blocks of various heights. The procedure was to add track, nail it down, then set in the next piece, cutting to order as things proceeded.
Some thin shims (paint stirs are perfect) were added as needed to support the track by filling any gaps and everything was wood glued and hot glued to the door base to make it very stable.
A gap was left about the middle of the short end door base, to allow for a train bridge.
Later, all this wood will be covered with "hillsides" made of paper mache (flour, water and newspaper). Visit another of my N Scale lens creations How to Make N Scale Scenery Grass Trees and More to see how the hills turned out. The link is in the link module below.

Be sure to add a fire in your camping area!
It's late fall and this little guy needs to stay warm!
Text module
Sorry, I'm out of room here but if you liked this please take a look at my other lens on this subject:
How To Make Your Own Scenery: Grass, Trees and More! See the Link List below.
It has tips on making buildings cheaply that look better than kits sold commercially, how to make a tunnel, how to light your layout for fifty cents per light pole instead of $20 to $35 per pole, and more!
Link List
- How To Make Your Own N Scale Civil War Reenactment Scene
Do you have an interest in the Civil War and would liket to incorporate a realistic CW scene into your modern layout? Here's how! - How To Make Your Own Scenery: Grass, Trees and More!
Make scenery yourself for a small fraction of the cost and better too! - Scratch Build An N or HO Scale Observation Tower
Very cool! Build this amazing piece in about an hour for under $3 in materials. Includes tool list, material list and step-by-step instructions, all FREE! - How To Use Hobby Motors In Model Train Layout Projects
Want a moving ski lift on your layout? A ferris wheel? A moving carousel complete with zoo animals? This Lens shows you how! - Bachmann Trains EZ Command Digital Command Controller Review
Thinking of buying a model train set? DCC let's you run one or two and up to to ten trains on the same track instead of just one, controlling them digitally. It adds SO MUCH EXCITEMENT to train operations! Learn how NOW!
Related

Model Train Resource: Z-Scale Track Plans To Inspire Your Own Layout Designs

Scale Models of the Isle of Man Railway
")
Building a Full Relief Model Building from a Low Relief Kit. (Metcalfe P0205)

Model Train Resource: Online Videos of Great HO-Scale Track Plans

Rites of Passage for a Model Railway - 3 Base Boards, Track, Basic Trackside Scenics


