Digital (Digi) Stamped Handmade Cards

What Are Digi Stamps?
Digi stamps, or digital stamps, are relatively new to the paper crafting world and have quickly become a fan favorite. These stamps can be downloaded directly from your PC and can be printed right in the comfort of your own home. Though these stamps will still ultimately be colored and embellished the same as a traditional rubber stamp would, digi stamps offer many more benefits to rubber stampers for the following reasons:
- Buyers will have instant access to their stamps upon payment
- Digi stamps can be sized and altered for complete customization
- They are much, much cheaper than wood-mounted rubber stamps and clear acrylic stamps
- They can be stored electronically so they take up virtually no room in your already crowded scraprooms
Digi Stamped Handmade Card Tutorial
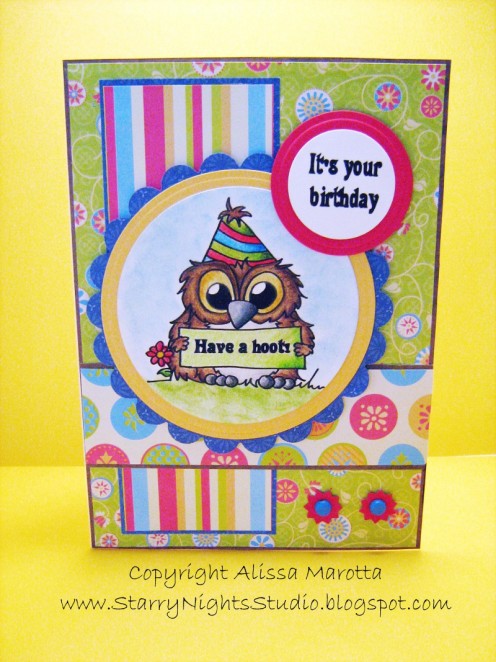
Using digi stamps to create handmade cards offers cardmakers a whole new realm of creativity. To make a handmade card using digi stamps, use the following instructions. My "Have a Hoot!" birthday card will be used as the example.
Materials
To build this card you will need the following:
- 8 1/2" x 11" white piece of cardstock (card base)
- Solid brown cardstock (A)
- Solid blue cardstock (B)
- Designer paper #1 (C)
- Designer paper #2 (D)
- Designer paper #3 (E)
- Spellbinders Nestabilities Scalloped and Classic Circles
- Digi Stamp
- Prismacolor Pencils
- Chalk
- Circle Punches
- Brads
- Adhesive
- Foam squares
Creating the Card Parts
- Cut your brown cardstock (A) to 5" x 7". Cut your designer paper #1 (C) to 4 3/4" x 6 /4". Adhere (C) to (A). This technique is referred to as "matting" because you are creating a frame for your designer paper to make it stand out.
- Cut your blue cardstock (B) to 2 1/2" x 6". Cut your designer paper #2 (D) to 2 1/4" x 5 3/4". Adhere D to B.
- Cut your brown cardstock (A) to 1 1/2" x 5". Cut your designer paper #3 (E) to 1 1/4" x 5". Adhere E to A.
- Now you're ready to add your digi stamp. Since the largest Spellbinders scallop and classic circle is 3", you'll want to make sure your digi stamp is smaller so that it will fit inside. For this card, I chose to make my digi stamp 2 1/2" x 2 1/2". Once you have sized your digi stamp, print to white cardstock.
- Color your digi stamp with Prismacolor Pencils, making sure to add shading to the edges. Once complete, add chalk to the sky and grass.
- Using your large Spellbinders Nestabilities die, cut your colored digi stamp with a classic 3", and then cut a larger classic circle in yellow cardstock, and an even larger scallop circle with blue cardstock. Adhere the three circles together.
- Using your PC, design and print a sentiment to correspond with your digi stamp (in this case "Its your birthday) and cut with 1" circle die framed with a 1 1/2" circle die in red.
Assembly
Now that you have created all of the necessary card parts, you can assemble your card.
- To begin, take your 8 1/2" x 11" white piece of cardstock and score at 5". Now trim the edges to make a 5" x 7" card.
- Adhere the three matted pieces of cardstock and designer paper to the white card according to the layout in the example shown. Then take your digi stamp, which has been "nestled" and adhered to the larger circle and scallop dies and adhere approximately in the left-center of the card with foam squares. These squares will give your card dimension.
- Adhere your smaller "nestled" dies to your card atop your digi stamp using more foam squares.
- Choose two embellishments (in the card shown I have used circle punches and brads) and adhere to the bottom right hand side of the card.