Owl Party Supplies & Ideas

Owl Birthday Party Ideas
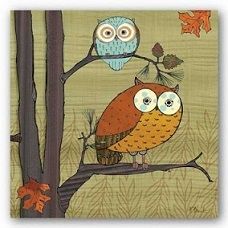
There's just something about owls that make us smile. With their big round eyes and whimsical potential they can turn any dull birthday party into a themed-dream. Let's explore some sweet ideas to incorporate the owl into your next party.
One of the great things about owls is there is no wrong way to craft one - the ideas are endless once you have a feel for what you are aiming for. Take at look at these variations on the owl and be inspired!
Owl Party Favors
To top off your party theme, make some adorable take home party favors that will have your guests oohing and ahhing.
You can find these cute little boxes at your local craft store. They are very versatile and you can change your owl's look over and over again. These samples use round punch-paper layered upon each other for the feathery look and bigger circles for the eyes and ovals for the wings. Get creative and see what you can come up with. Other materials you may consider using are;
*coloured felt
*paint
*glitter
*feathers
*craft foam
*beads
The possibilities are endless, so play around with different supplies and textures for your own unique owl family.

Owl Favor Bags (DIY)
Paper bag owls can be used for decoration and/or sent home with your guests as party favors.
To make my paper bag owl you will need;
*Plain brown craft bags (handle removed) or lunch bags
*Decorative paper
*Glue
*Scissors
*White and Gold paint
*4 ends from ribbons spools - 2 different sizes
*Black glitter glue
*Yellow craft foam
*3 brown feathers
*Foam double back tape to close
Instructions;
If you are using craft bags take the handles off. Fold tops over and cut a "V" - this is the bird's crest. Paint the bigger of the ribbon roll ends gold and the smaller ones white. Put aside. Cut decorative paper in a half circle to measure front of the bag. Glue into place. When paint is dry on the circles, glue one over the other so the holes are together. Glue onto front of bag beside the pointed crest. Fill in eyes using black glitter glue. Let dry. Cut out beak and feet from yellow craft foam and glue into place. Glue one feather along each edge of point. Glue feather on back for a tuff. Finished! Once you fill these with treats use double back foam tape to close.
This is a "hoot" and takes about 30 minutes. Let your imagination take flight to see what variations you can come up with.
Tip: Using the ends of ribbon rolls ensures you a perfect circle every time.
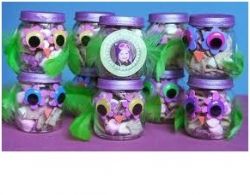
Owl Candy Jars
Using recycled baby food jars or small jam/mason jars are a great way to save the environment and to also have some inexpensive ways to craft. These owl jar novelty gifts are super simple and, once again, you can incorporate your own style and taste into them. For this example the moveable eyes were used along with feathers and pre-cut craft foam.
Let your imagination take you where it will to see what whimsical new owl "species" you can craft.
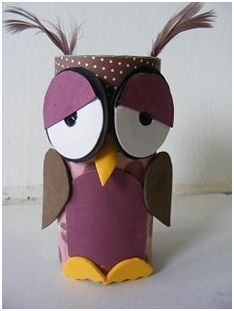
Sleepy Owl Place Setters
For the next owl I used an empty ribbon spool (you can also use a toilet tissue roll but the ribbon rolls are much heavier). This little guy would be perfect to use as a place setting; just add your guest's name. You could also put some styrofoam at the bottom and stand lollipops, pencils or anything on a stick inside of him.
You will need;
*Tall ribbon roll
*2 coordinating papers
*2 brown feathers
*Yellow, plum, brown and black craft foam
*2 round circles (ribbon spool ends)
*Hot glue
*White paint
Instructions;
1) Paint ribbon spool bottoms white. Set aside until dry
2) Take your ribbon roll and measure 1 stripe from each color to fit around the roll - one should be slightly wider than the other - this will be the owl's body. Cut and glue into place.
3) Cut two plum half circles for droopy lids. Glue over white circles (when dry) about half way over the inner circle. Glue into place.
4) Cut a black circle from craft foam slightly larger than the eyeball. Glue into place.
5) Cut two teardrop-shaped pieces from the brown foam and glue on the sides for the wings.
6) Cut a diamond for the beak and half circles for the feet from orange foam. Glue into place.
7) Add a feather to each side of the head for ear tufts.
Viola! A sleepy owl waiting to be part of your party.
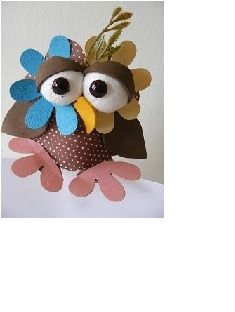
DIY Owl Decor
I've been having a hoot with all these super owls. So for my last one I wanted to create something a bit different. This one is made entirely from die-cut flowers (except for his eyeballs - a styrofoam ball cut in half with bead pupils).
I used different colors and cut and formed the flowers until it looked just right. I then took my little owl gave him a leaf-tuft for feathers and glued him to a short ribbon roll. This darling little guy is cute and was super easy to make.
Tip: Try using die-cut hearts
Owl Party Note
I hope you have enjoyed this peek into the craft owl world and also got some great ideas for your next birthday party. Don't let the elusive owl get away when the options are so abundant. Trust me, you're going to have a 'owling good time finding your own inner owl.
Happy Planning!


