The Indestructible Homemade Bed

Step by Step Assembly


The Indestructible Bed
I built about 50 of these back when we were starting up Odyssey Harbor in the early 80's. We knew we were getting emotionally disturbed kids with violent tendencies and we wanted beds that would survive the onslaught. I designed this and set up an assembly line. I cut them and staff assembled them. A few of our early kids, built their own beds.
The frame uses 2x6's routed around the edges to protect the kids' heads. You can screw them together, but we used 4 inch lag bolts screwed into predrilled holes. They're very strong that way. Run 2x2's around the inside bottom of the frame and screw them into place. Before you do anything else, paint or stain and varnish the assembly. Drop some 1x6 slats on top of the 2x2's and screw them into place. Where you use screws use cabinet washers with them - little brass washers designed to form a raised recess for flat screw heads.
Next cut the legs - shorter for the feet and longer for the head. You'll have to figure out how high from the floor you want the bed to stand and cut the 2x6's accordingly. Paint them or stain and varnish before assembly. Bolt them to the ends of the frame with 2 carriage bolts per leg. Use a paddle bit to recess the nuts as shown in the picture so the kids don't hit their heads on the bolts. Cut off any excess bolt.
Bolt 1x6's to the top edge of the legs facing toward the mattress. Use a wider board if you wish to create a wider head board. Carve some designs into the headboard if you can handle a router or moto-tool. Be sure and round the edges of all boards with a router before assembly as a safety precaution and to make the bed look better. Paint or stain and varnish before you assemble the head of the bed and footboard.
Cut half or three-eighths plywood to fit inside the frame, drop it into place and screw it down. Now all you have left to do is drop the mattress into the box and you're done.You can further beef up the plywood bottom by screwing a couple or three 1x6's across the bottom of the frame to reinforce the slats. If you've got a bed jumper, this is a useful adaptation to keep him from breaking the plywood through the frame.
We used these things for the entire 14 years the center was open with only a couple of minor repairs in all that time. We had one kid who worked for a week trying to kick loose a bed rail. Lengthen the legs and you can convert this design into bunk beds.
These are great for kids beds or anywhere you need a simple, almost indestructible bed.
Tom King -Flint, TX
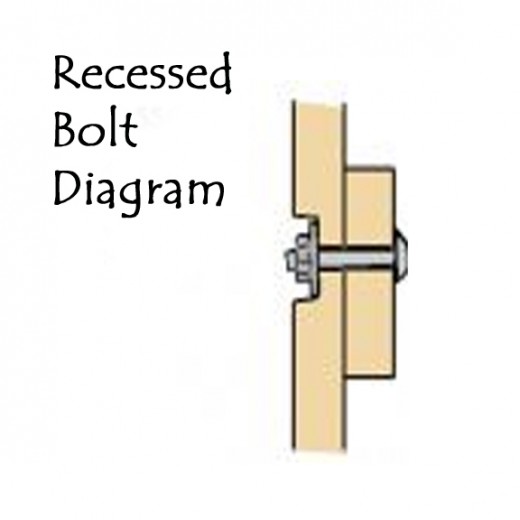
Recessing the bolts
Recessing the bolts.
After you've drilled the holes for the bolts, Drill a hole a bit larger than the size of the nut over the original bolt hole on the inside of the frame. Make sure the hole is wide enough to accommodate a socket wrench.
Make the hole deep enough to sink the edges of the bolt below the surface of the board. Don't go too deep to avoid weakening the boards. Placing the bolts on the inside of the frame looks better and insures the kids won't bang their head on the nuts. Grind off any excess bolt that stick up beyond the tightened nuts.
This will keep the kids from banging their heads. Recessing the nut in this fashion is also handy for building homemade playground structures without risking injury from protruding bolts.


