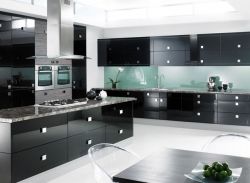
DIY Projects - Giving Your Old Kitchen Cabinet a New Facelift

Another Do-It-Yourself Project
Often, cabinets are discarded only because they show a little surface wear or are the wrong wood tone. However, considering that new cabinets in an average size kitchen can easily cost $5.000 if not more, it makes sense to look for a less-expensive solution. Paint, plus some time and effort, can correct minor deficiencies for 5 percent of that cost or less.
Best of all, today's advance technology paint products let you skip the messy and daunting task of removing the existing finish before re-painting. As a matter of fact, don't try to strip the finish-it may be a heat-cured epoxy that is impossible to remove. For an average-size kitchen with about 25 cabinet doors and drawer fronts, count on spending three or four days preparing, painting, and changing the hardware.
Select your paint and new hardware at the same time for a harmonious look. The job will be easier if the door pulls and knobs that you select will fit into the old holes. If not, you will have to fill the holes with wood filler and sand them smooth. Make sure the hinges will work with your doors, as well. (You probably will have to drive screws into new holes).
Decide what parts of the cabinets you will paint. The easiest solution is to paint only the faces of the frames, the drawer faces, and one side of the doors. But you may prefer to paint both sides of the doors and visible parts of the cabinet interior, too. Shelf bottoms easily can be covered with shelf paper.
Decide whether you like the texture of rolled-on paint or brush strokes. Usually, the best solution is to brush the cabinet frame and to roller-paint the doors and drawer faces, using a thin-nap roller sleeve.
Materials & Tools Required
MATERIALS: new door pulls; new hinges; alkyd or latex interior enamel recommended for cabinet; primer/sealer, if needed; commercial wall-washing compound or kitchen degreaser; white vinegar; wood filler; mineral spirits.
TOOLS: Drill with screwdriver bit; screwdriver; masking tape; labeling pen; sawhorses or work table; plastic sheets or drop cloths; 200-grit sandpaper; sanding block or power sander; vacuum cleaner; sponge; rags; rack cloth; masking tape; puny knife; fine steel wool;
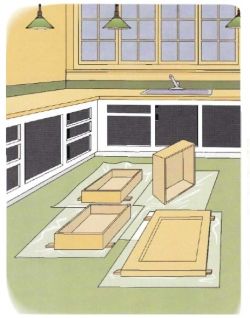
Dismantle the Cabinets
Ensure that your kitchen or garage floor is covered with plastic sheeting or drop cloths. Lay down a series of long, thin pieces of wood to keep the doors raised as you prepare and paint them. Dismantling goes quicker if you use a drill equipped with a screwdriver bit. (Most cabinet screws require a No.1 Phillips-head bit.) - You might also want to read up on my article on having "The right tools for the right job" by clicking the link below.
Unscrew the hinges and remove the doors. Remove the handles or knobs, Take the drawers off their glides and remove their pulls or knobs. If you plan to reuse hardware, store the pieces so they won't get lost.
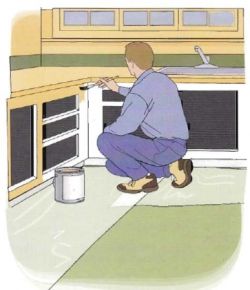
CLEAN & PREPARE THE WOOD
Airborne grease coats every household surface. It’ll ruin the paint job if you don't remove it. Wash the cabinets with a wall washing compound or kitchen degreaser. Rinse the cabinets with water containing 1/4 cup white vinegar per gallon. Wipe them dry and let them air dry for 24 hours. Then wipe them down with mineral spirits to remove all traces of grease. Air dries them again. Look closely for cracks and other imperfections-they will be magnified by paint rather than covered up. Fill holes with wood filler, let them dry and then sand to smooth.
Hold a new hinge in place to see if the screw holes in the doors and frame will line up. If not, fill the holes and sand smooth. Scuff the cabinets by rubbing sandpaper with the grain just enough to break the surface gloss. Vacuum up the dust and wipe the cabinets with a tack cloth.
Paint Job
Bring a sample door to your paint dealer to make sure your paint will stick. To be absolutely sure, buy an oil or alcohol-based primer/sealer formulated to block stains and adhere to glossy surfaces. Apply two coats, letting the door dry between coats (about one hour). Buff each coat with fine steel wool. Clean up the dust. Next, apply two coats of professional grade semi-gloss interior alkyd enamel formulated for painting woodwork. Let the first coat dry 24 hours, then buff with fine steel wool. Clean up the dust before applying the second coat. Paint the wall cabinets then the base cabinets. Apply each layer of primer/sealer and paint in this order: top trim and rails, bottom rails and underside of wall cabinets, stiles, the back side of doors, drawer faces, and drawer fronts and edges.
For some ideas on choosing paint colors, you may read my other article on choosing paint colors here: https://hubpages.com/living/Choosing-Paint-Colours
"Spend some time this weekend on home improvement; improve your attitude toward your family".
- Harold Ramis
Reinstall With New Hardware
Give the paint plenty of time to dry completely. Even after it is dry to the touch, paint (latex especially) will be soft and easily damaged for a few days. It is best to exercise caution in this case. If the knobs or pulls fit into the old holes, installing them will be easy-just screw them on. Hinges may be more difficult. If an old hole is too large and the screw doesn't fit tightly, cram a toothpick or other small piece of wood into the hole. If you filled the old holes, drill new ones carefully-don't try to drive screws without pilot holes.
To read up on how to choose and apply proper finishing to your woodwork projects, you can go to my other article on Choosing and Applying Wood Stains and Finishes.


