Vintage Milk Paint Finishes & Recipes

Organic Paint Techniques are Beautiful and Safe
Furniture restored with vintage milk paint finishes are both lovely and healthy for your home. Milk paint is durable, emits no dangerous fumes, and contains no harmful toxins. Milk paint is a wonderful finish for children's furniture and toys, which often end up in little mouths. It is also my finish of choice for raised bed gardens and containers which I do not want exposed to harmful chemicals. Old, tired furniture receives new life when refinished with milk paint, using techniques that make boring articles look like interesting vintage pieces.
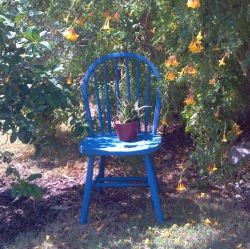
This time-tested recipe is simple and inexpensive, yet creates a durable, beautiful paint for both interior and exterior projects. The measurements given will yield approximately 1¾ quarts of paint, to cover approximately 90 to 100 square feet. To make less paint, simply divide the recipe in half or quarters. Tint the paint with organic pigments to add depth to your vintage finishes, like the distressed tri-color technique that we used to create this beautiful piece out of a thrown-away chair.

Gather all of your tools and ingredients in advance. Milk paint does not contain preservatives, so it must be used immediately or it will separate and spoil.
For this recipe, we use fresh milk that will be curdled with acid, in this case vinegar, to create curds, called Quark. The milk protein is concentrated within these curds, providing the paint with durability so that it dries to a hard, mold and mildew-resistant surface.
Ingredients
- Container large enough to hold approximately 1.5 gallons of liquid
- Wood or plastic spoons or wood stir sticks
- Cheesecloth (two yards)
- Plastic or glass containers (margarine or large whipped topping tubs work well)
- One gallon paint bucket
- 1 gallon skim milk (not powdered)
- 2.5 cups white vinegar
- 1 cup of hydrated lime (type S lime)
- Pigment or acrylic tint to color your milk paint
- Water for rinsing and slaking
- Household gloves
- Tarp of painter's plastic
- Soft steel wool
- Sand paper
Instructions
- Allow the milk to stand and warm naturally to room temperature. In a large container, quickly stir in the white vinegar. Do not stir the milk again because it is important that the quark not be disturbed while the curds are forming. The milk solids will separate from the liquid, creating solid curds and liquid whey. Allow the mixture to sit at room temperature for at least 12 hours, or up to two days for best results.
- When the quark is ready and you are ready to paint, place your dry pigment powder in a container and mix with an equal amount of water. Work the pigment into a smooth paste. Shaking it in a glass jar with a tight lid works well for mixing pigments. If you are using acrylic tints, follow the instructions on the package to prepare them for mixing.
- Place the lime in a plastic or glass container that is large enough to hold several cups of liquid. Do not use a metal container as it may react negatively with the lime. Wear gloves and be careful not to inhale the lime dust or allow it to touch your skin or eyes. Gently pour 1½ - 2 cups of water into the lime, stirring constantly until the lumps are broken down and it forms a creamy paste.

While you are mixing pigments and lime...
...separate the whey from the solid curds. Line a colander completely with a double layer of cheesecloth by folding one of the pieces in half before placing it in the colander. Place the colander in a sink or a large bowl. Pour the curds and whey into the lined colander and allow the whey to drain. You now have small, easy to dissolve curds, called quark
Note that if you save the whey, it can be used in place of water for baking, or as a base for healthy fruit shakes or soups. Our dog also loves to drink it, and it is very healthy for her to do so. Whey will keep for up to a week in the refrigerator.

Rinse the quark with cool water to neutralize the acidic vinegar. Allow it to drain, so that the curds are moist but not dripping wet.
Lift the quark by gathering the cheesecloth at the corners, and transfer it to your paint bucket. Break down any large curds with a plastic or wooden spoon or stir stick. Add the hydrated lime paste to the curds and stir briskly. The curds will begin to turn from a lumpy cottage cheese-like mixture into a thin but creamy paint. Allow the mixture to sit for 15 to 30 minutes to dissolve the curds completely.
Stir the slaked pigment into the paint, a little at a time until your preferred depth of color is achieved. All ingredients should blend, and the consistency will become thicken a little bit. If the paint is too thick, add water slowly and cautiously so as not to accidentally make the paint too thin. Strain your completed paint through a fresh piece of cheesecloth or a discarded pair of nylons to remove any remaining undissolved quark. Stir your paint thoroughly and often during application. Excess paint can be stored up to several days in the refrigerator, however it will begin to separate quickly, so it is best to use it fresh.

Creating a Tri-Color Distressed Vintage Finish
Choose a piece of furniture to refinish. I found a discarded chair that I thought would look lovely with a fresh milk paint finish.
Surfaces that will accept milk paint must be absorbent, such as wood, clay, or plaster. Milk paint will not adhere to previous finishes, such latex or other types of paints. I began this project by sanding off as much of the previous white paint as I was able to remove. Paint thinner and steel wool will remove most finishes, but in this case I chose not to use drastic measures, and a little bit of the white paint remained on the chair. For this project, I don't mind a little bit of the white paint showing through the milk paint.

To create a vintage look, I chose to use three different colors of milk paint. I separated the untinted paint into thirds and mixed green, Sedona red and blue pigments. You can use any three colors for this type of project. Blue, red and black or green, red and black are the most popular color combinations. Contrasting colors work best. You will paint two layers of each color (two layers of the first color, followed by two layers of the second color, finished with two layers of the third color.)
Begin by painting two layers of your base. In this case, the base color is green. Using a natural bristle paint brush, cover the piece entirely with paint. The first layer may be thin. To aid in spreading the first layer of paint, wet the piece with water before you begin, then immediately spread your paint. Allow the first layer of paint to dry, and add a second layer of the same color. Allow the second layer to dry for about an hour.
After the base layers of paint have completely dried, begin to paint the first layer of the second color. For our project, the second color is red. Allow the first coat to dry, and add a second coat of the same color.

Allow the two coats of the second color to dry completely. Then add two coats of the third color, which in this case is blue. Because milk paint is more translucent than other types of finishes, you may be able to see some of the second color shining through the top coat. This effect is lovely and desirable, but if you prefer a more opaque finish, add a third coat to the layer of paint.

To give your piece the illusion of age, as though it had been painted numerous times over the decades, use a piece of steel wool or sandpaper to rub away some of the top layer of paint, revealing the colors underneath. Rub on the edges and the seat, where natural wear would occur.
Hint: save a little of your top color, just in case you do not like how an area looks after you have scuffed the paint. You can always repair it by covering it with a fresh coat of the top color.

Protect Your Project
To protect your finished project, allow the paint to dry thoroughly and rub it with linseed or mineral oil, using a soft cloth. Another option is to spray the piece with clear polyurethane, or an organic sealant, such as Soy Seal. Finishes should be reapplied periodically to provide long-term protection to your piece.

Using an inexpensive, easy and safe milk paint finish, this old, discarded piece has gained new life. It is a lovely addition to our garden.
Milk paint is also suitable for reviving old wardrobes, cabinets, hutches and tables. Terra cotta pots gain new life and interest with a coat of milk paint. Plaster walls and trims look lovely with a translucent coat of milk paint. Use your imagination and have fun experimenting with this versatile paint medium.

Commercial Milk Paints
Save yourself the trouble of mixing your own paint, and purchase commercially prepared milk paint. These paints are high quality, durable, and safe, giving you the look of vintage paint without the hassle of preparing it yourself.


More Resources
Learn more at the sites listed below, which I have used as references for my own projects.
- How To Use Pigments | The Earth Pigments Company
Learn the basics of using pigments, either mixed into a medium or mixed with plain water. - Recipes for Casein and Milk Paints | The Earth Pigments Company
Milk paints are easy to make, nontoxic and durable. We feature three basic recipes for casein or milk paint in order of their strength. - Learn How to Create Faux Finishes Using Water Base Finishes | General Finishes
Save money by creating furniture heirlooms using faux and decorative finishes. Learn about for faux finishes including distressing, marble technique,crackle technique, wash coats and wood antique graining. - Milk Paint Makeover | Scout & Nimble
Yes, I'm all caught up in the milk paint magic;it actually enticed me to come out of hiding. Â I saw this cute lil desk on Craigslist this week and knew it would be the perfect tester for me and my milk paint. - Milk Paint Terra-Cotta Pots - Martha Stewart Home & Garden
Read Martha Stewart's Milk Paint Terra-Cotta Pots article Get do-it-yourself closet, kitchen, cabinet organization ideas, plus home decorating and gardening tips. - 16 Creative DIY Flowerpot Ideas | The New Home Ec
Bring color to your home or patio by planting flowers-- 16 DIY Flower Pot Ideas! A great weekend project. - Terracotta Pots at uglyducklingtransformations
Posts about Terracotta Pots written by Ugly Duckling
I would love to hear from you. Share your vintage projects, tips and techniques, or ask questions here.


