How To Create an Amazon aStore: A Step-By-Step Guide With Photos and Video


An amazon aStore is one way to make money as an Amazon associate. An aStore is a product that Amazon affiliates can use to monetize their blogs, hub, lens, web pages, or websites. When an affiliate has successfully created an aStore, they are at liberty to use banners, widgets, and links on their web pages to advertise and direct visitors to their store. Setting up an aStore is easy and free for associates. You do not need to know HTML coding or have any other technical internet skills. You can even choose the color scheme and items you want to sell.
I will show you how to create your own aStore and start making more money online.

Step 1: Become an Associate
In order to monetize your web page with Amazon's aStores, you need to be an associate. This is free and there are other benefits to being an associate than having an aStore. Go the Amazon's website and click sign in to create your account. You will be taken to a new page where you will be asked to sign in to your account. Enter your email address, click the button that says 'I am a new customer', and then sign in.
After clicking the sign in button, you should see a Registration page. Fill in your name, email address, phone number, and a password then create your account.
Congratulations! You are now an Amazon Associate.
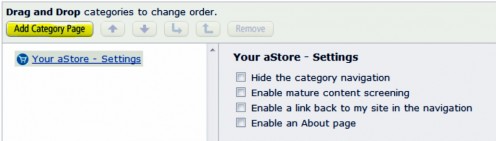
Step 2: Create Your Category Pages
Now that you are an associate, sign in and click on the aStore tab on the home page. Here, you can create the settings for your affiliate store using the choices given. Four basic choices are given:
(1) Hide the category navigation
(2) Enable mature screening - to prevent children or persons younger than eighteen from viewing adult content.
(3) Enable a link back to my site in the navigation - A link will be placed in your aStore that will allow visitors to easily go back to your website or webpage.
(4) Enable an About Page - Tell your visitors what they will find in the store.
Decide the category in which your aStore will fall. This will be the deciding factor on what people will find in your store based on keywords describing the contents of your store. You can create more than one category of items in one store by using the Add Category Page button on the ribbon. You can place them in whatever order you desire. To change the order of the categories, use the arrows to move them up and down and to collapse and promote subcategories.
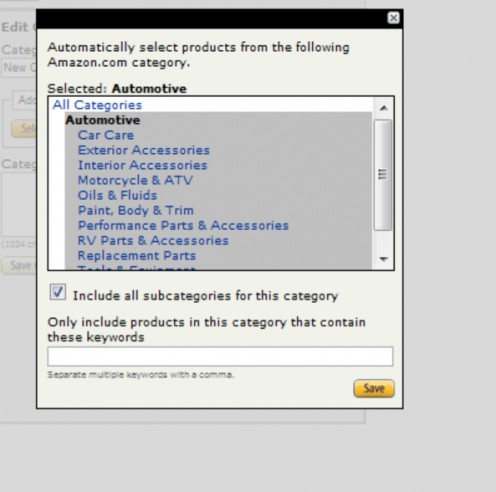
Step 3: Edit the Category
The Category Title will update automatically when you add products. If you are a new associate, it may be easier for you to choose your products from a list provided by Amazon. On the Edit Category Page, choose Add products from Amazon.com category from the dropdown then select an Amazon category. You can include all subcategories for the category you chose or list keywords that will narrow down what products will be included in your stock. Add a description, save your changes and hit the continue button.
Step 4: Edit the Color and Design of Your Store
Customize your store using different colors and a logo. You can use a prepared theme or create your own by customizing the page background color, font and colors of the header, content background color and even the color of your links. There is also the option of naming your store and including a logo. Unfortunately, you cannot upload a photo and will have to use one that is already on a webpage. In doing this, remember to use photos that are associated with the store's contents and do not infringe on the author's copyright.

The aStore widgets are there to help you to market your aStore. As an amazon associate, you are able to create and customize widgets to place on your page. These widgets are advertising your products and direct people to your aStore. To get a widget of your aStore, click on the get link tab and copy the HTML shown. Paste this code in the desired area on your page and save it.
You can customize the widget by changing the colors and behavior of the widget. For example, you can change its size and the colors of the background and borders.
If there are not enough items available in your store for display, a generic Amazon ad will be displayed.
Step 5: Customize Your Widgets
Widgets are the little windows on the page that show the different products offered in a specific store or page. When you are through customizing your widgets save your changes and get the link to your store. You can place this link on your webpage to direct people to your store. Just copy the HTML link provided and paste it at your desired location.
You can create as many aStores as you want, as often as you wish.

")
