How To Cut Your Own Hair

Whoops!!!

Cut Your Own Hair?
Cutting your own hair may seem scary--who wants to show up at the office with a scraggly, uneven, unflattering haircut that is too short? You might even end up violating your company's dress code!
Yet, with the proper preparations, it's actually pretty hard to mess up a DIY haircut. As long as you get the right equipment, work cautiously, and keep it simple, cutting your own hair shouldn't present too much of a problem.
Here is a guide to how to cut your own hair, organized into some steps.
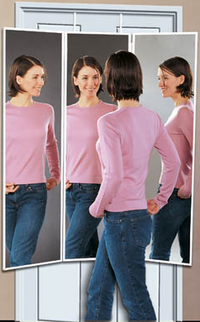
3-way mirror
1. The first step to cut your own hair is to get the right supplies.
Purchase some haircutting scissors. They're not too expensive--you can get a good, sharp pair for about $15 at a drug store or beauty supply store. Compared to how much it costs to go to a salon or a barber every week, they are an invaluable investment. You'll also need a comb. If you plan to cut the hair at the back of your head and don't want to just randomly poke around, invest in a 3-way mirror (unless you already have one in the bathroom):
If you're interested in how to layer your own hair, rather than cut everything the same length, get some hairclips and scrunchies.
Don't Panic....
ooOJasonOoo @ Flickr.com")
2. Wash and comb your hair. Wet, combed clean hair is easier to cut than dry, uncombed, dirty hair. Having wet hair also gives you more control. Indeed, if your hair happens to become dry again during the course of your DIY hair cut, have a sprayer bottle ready to get it damp.
3. For nervous first-timers, the easiest do it yourself hair cut to attempt is the one where all the hair is one length. Grab a small section of hair from the front of your head. It should be maybe about one eighth of an inch in diameter. Then, cut it about a quarter of an inch longer than you want your overall hair length to be (to accommodate for drying; actually, depending on how curly your hair is, you may want to cut it significantly longer when it's wet).
4. Now, if you're paranoid, get a ruler. Measure the length of hair you've just cut, from the tip to where it touches your scalp. Then, keep combing your hair and carefully cutting sections of it using a ruler, so that they're all the same length as that one initial section of hair. Keep doing this until you've cut all your hair to one length. As always when you're cutting hair, the smaller the sections you're working with, the more even it's going to look--and the longer it will take. Experiment with what feels comfortable by occasionally pausing and checking if everything you've done looks even. Here is what not to do:

5. If you are more confident, there's no need to rely on the ruler. Just plan out the haircut you want, and figure out how long you need the hair at the sides, front, and back of your head to be. Then, cut accordingly. Again, working with smaller and smaller sections of hair ensures your DIY hair cut won't look choppy. Be careful when you cutting the hair at the back of your head. Coordinating your scissors using the 3-way mirror takes some practice. That is the trickiest part of cutting your own hair.
6. Use caution to avoid mistakes. Err on the side of greater length, then keep trimming if necessary. Keep checking if everything looks even.
7. One trick to making everything even without using a ruler is to alternate sides when cutting your hair. Don't just cut the hair on the right side first, and then on the left side. Instead, cut a small section of hair on your left side, then an equivalent section of hair on your right (or vice versa). This will let you keep both sides to approximately the same overall length.
That way, you won't have to worry about accidentally cutting one side too short, then cutting the other side even shorter in an attempt to even it out, then cutting the first side even shorter, and so on.
8. How to cut your own fringe: making or trimming bangs is, in some ways, the easiest part of cutting your own hair. Just use a comb to carefully measure out a section of hair at the front of your head that you're going to make into bangs (damp hair is crucial here). Then, create the bangs, bit by bit. Remember to cut in very small sections to ensure that your bangs make an even line. Keep checking for evenness with every cut you make. Use your two eyes as guide marks--make your bangs start at the same distance from both of your eyes. Make a few angled cuts if you want your bangs not to look so blunt.
Layers
DearBarbie @ Flickr.com")
9. Layers: Cut your own hair to get the layered look, section off equal parts of your hair using the hairclips and scrunchies. These will be your "layers." Once you've divided up your hair, simply cut the different sections to the desired lengths. Here is a picture of someone getting this done to them at a salon:
This hub brought to you...
by Julie-Ann Amos, professional writer, and owner of international writing agency www.ExquisiteWriting.com
Why not create your own HubPages? It's fun and you can make revenue from Adsense and other revenue streams on your pages. JOIN HUBPAGES NOW - SIMPLY CLICK HERE...
This work is licensed under the Creative Commons Attribution-Non-Commercial-No Derivative Works 3.0 Unported License. To view a copy of this licence, visit http://creativecommons.org/licenses/by-nc-nd/3.0/ or send a letter to CreativeCommons, 171 Second Street, Suite 300, San Francisco, California94105, USA.