How to Make Your Own Lipstick

Lipstick!

The 'Perfect' One
Many women around the world raid the drugstores in hope of finding a perfect shade of red or a perfect pink etc. Come on, admit it, we've all been there, done that- even if it may be a little embarrassing to admit to.
Finding your PERFECT lip colour can be hard. It can be frustrating. It can be tiring. Have you ever looked endlessly at a rack of lipsticks only to find your shade isn't there? Do you feel that no matter how many lipsticks you try, none if them are the shade for you? Are you fed up of searching for that 'perfect' shade of red? Or a perfect pink? Or the dreaded perfect nude? Or are you allergic to a certain ingredient in lipsticks? Or are you running out of money to spend on lipsticks? If the answer to your question is 'YES' then look no more. You will find the answer to your dilemma in this hub:) HOORAY!!!!
The only way you could find your perfect shade that is unique so that nobody else wears your signature shade is simply to make your own lipstick. All you need are a few items which you could find in your local store very easily.
Advantages of making your own lipstick
- It's Cheaper
- You can customise your shade: so if you want a red with that slight hint of blue; your wish will come true! It rhymes!:)
- You can adjust the ingredients in case you have any allergies
- You can add your own scents into your lipstick
Disadvantages
- It can get a little messy
- Nothing!
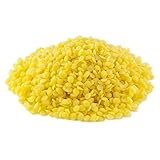
Wax based lipstick
Ingredients
1 teaspoon of Beeswax pebbles (pastille/Pill like form in little pieces)
1 teaspoon of shea butter to make it moisturising (if you cannot get hold of this, you can substitute it with cocoa butter)
1 teaspoon of coconut oil-you can find this at your local asian/middle eastern grocery shop)
1 pinch of natural food colouring (search online for a large selection of colours!)
An empty lipstick bullet of container to put your lipstick inside
OPTIONAL: 1/4 teaspoon of an essential oil or essence to make it smell nice
OPTIONAL: if you like a matte finish, add 1/4 Teaspoon bentonite clay(don't worry it's totally safe for the lips)
OPTIONAL: if you like a frost finish, add 1/4 teaspoon of edible silver or gold dust! WOW
Method
To start making your lipstick, first you must gather all the ingredients and equipment that it required.
Next, you must create a double boiler by placing boiling water in a saucepan and placing a heatproof glass bowl on top, making sure not to let the water overlap into the bowl. After this, place your shea butter and coconut oil into the Bowl and wait for it to melt. Next, add the rest of your ingredients: colouring and essence/oil if applicable. If you are using a lipstick tube, make sure you twist it right to the bottom before pouring your liquid lipstick into it. If you are using a container, just pour the liquid lipstick straight in, make sure it doesn't overflow and ruin your work surface. Place it in a fridge and wait for it to harden...
Et Voila! There you have it; your very own homemade lipstick!

![Crayola Inspiration Art Case Coloring Set - Rainbow (140ct), Art Kit For Kids, Toys for Girls & Boys, Art Set, Easter Gift For Kids [Amazon Exclusive]](https://m.media-amazon.com/images/I/51pKf+DgTOL._SL160_.jpg)

Attention!
Don't forget to wind your lipstick down before pouring in the liquid lipstick
Crayon based lipstick
Crayons are made primarily from wax and pigment and they’re relatively safe to use. After all, kids eat them all the time and they turn out perfectly okay. Don't worry, it's totally safe to use on the lips.
Ingredients
A wide colour variety of crayons- preferably non toxic ones such as crayola
1 teaspoon shea butter
1 teaspoon coconut oil
Empty lipstick or lip balm container
OPTIONAL: essential oil of your choice to mask the waxy crayon smell
OPTIONAL: if you like a matte finish, add 1/4 Teaspoon bentonite clay(don't worry it's totally safe for the lips)
OPTIONAL: if you like a frost finish, add 1/4 teaspoon of edible silver or gold dust! WOW
Method
Choose your perfect colour combination (feel free to mix colours but it must be equivalent to 1 crayon).
Next, heat your crayon on low heat on a saucepan, making sure to take off the label.
After this, pour in your butter and oils and mix a lot so that it is very thoroughly combined. If it is not combined properly, it will have patches of high pigmentation and low pigmentation which you do not want.
If you are using a lipstick tube be sure you twist it right to the bottom before pouring your liquid lipstick into it. If you are using a container, just pour the liquid lipstick straight in, make sure it doesn't overflow and ruin your work surface. Place it in a fridge and wait for it to harden...
Et Voila! There you have your very own crayon lipstick.
Make your very own lipstick today!!!
— UnknownHappy Crafting!
I hope this hub helped:) comment below if you try it and don't forget to follow me and check out my other hubs. And oh yes, don't forget to vote on the poll!
Poll!
Which method would you prefer?
I thought I was the right person to write this hub because I am quite experienced in make up and I enjoy writing about craft and make up. Also, I have tried both of these lipstick making techniques using crayons and beeswax and I have found that they both work equally as well as each other. I thought I would share my findings with you to make it easier for you :)
Did you enjoy this hub?
For more Style and Beauty hubs by this Author, click on the links below:
http://hubpages.com/style/Choosing-the-perfect-lip-colour-for-YOU
http://hubpages.com/style/Top-MAC-Lipsticks-for-every-Season
http://hubpages.com/style/Awesome-DIY-lip-plumper-for-full-and-voluptuous-lips
http://hubpages.com/style/Fixing-smashed-blushers
Check out my new craft hub:


