Build a Battery Powered USB Charger

Make a Battery Powered Charger
If you're battery is dying, you don't have to suffer without it until you can make it to an outlet or charger. By making your own, pocket sized charger you can give your gadgets a few more minutes of power and juice until you can find your way to a charger.
What You'll Need:
Make sure that you get the proper tools and equipment. The most important thing that you'll need is a small tin box; altoid mint tins work great because they're cheap and easy to come by. Otherwise, make sure that you have the following things.
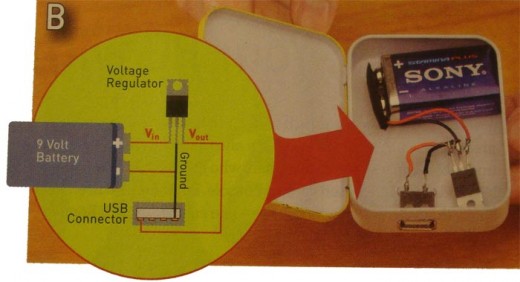
- 9V battery clip
- +5V voltage regulator
- Female USB connector
- 9V battery
- Insulated copper wire
- Soldering equipment
- Dremel tool
Directions
- Cut the altoids tin so that you have a hole that is just big enough to hold the female USB connector. The hole is best made on the narrow end of the tin, a little to the left or right; you don't want the hole in the center.
- Wire the circuit that will allow you to charge your USB devices with the 9 volt battery. All you have to do is connect the positive (red) wire from the battery clip to the V-in pin on the voltage regulator, and then the V-out pin to the +5V pin on the USB connector.
- Then connect the ground wire from the battery clip to the ground pin on the regulator and the USB connector.
- After you've connected and soldered everything, you'll want to wrap the connection in the electrical tape so that they don't short out as you install the circuit in a tin casing. But, first, make sure to feed the battery clip and the voltage regulator through the hole, then fit the USB connector into the hole so that the lip of the connector rests on the edge of the hole.
- Hold glue or epoxy the wires in place.