Techie Corner: How To Set Up an Email Account

Live Without Email?
How Long Have You Been Using Email
Setting Up An Email Account
For this example, I will use Yahoo.com, but most online email programs are very similar in setup and usage.
1. Go to Yahoo.com
2. Click on the Mail button
3. If you already have an account, sign in with your Yahoo! ID. If you do not have an account, click on ‘Sign Up.’
4. Enter in your name and the required information. You will need to create an ID. Enter it into the ID box and then check to see if it is available.
5. If it is not available, Yahoo! will create some suggestions.
6. Select one of the suggestions (or you can keep trying to create an ID).
7. Choose an email address.
8. Select a Password and then re-type your password.
9. If you have an alternate email address, enter it here in case you forget your password.
10. Choose a security question and answer.
11. Type in the hieroglyphic code that shows in the bottom screen.
12. Read and agree to the license by checking it at the end.
13. Then click ‘create my account.’
14. Once you finish you will see a message showing your account details.
When you first log in, you will see your email folders to the left. There will be a number near the Inbox if you have any emails in there.
Books About Email

Reading Your Email
To check for emails, click on the inbox button in the top left portion of your screen and this will prompt Yahoo! to search for mail.
The email will appear in your inbox. Double click on the email. If there is an attachment, highlight the attachment and click on it. It will check for viruses and then prompt you to download the file.
Click ‘Download Attachment.’ You can then choose to open the file or save the file to the location of your choice.
There may be instances where you may not be able to open the file. One instance may be if you have a pop-up blocker that may prevent the attachment from opening. If this is the case, you can either disable the pop-up blocker, or just hit the CTRL key while clicking on the attachment and it will temporarily disable the pop-up blocker for this one file. Another reason may be if you are a different version of Microsoft Word than the person who is sending a document. The extension is the letters following the period. In the example above, the name of the document is Word.doc. The .doc tells me it is a Word 2003 document or earlier. If it were to say .docx, you would be able to tell that the document was created in Word 2007 or later. If you do not have 2007 or later installed on your PC, you will not be able to download or open this file. You can ask the person who sent it to you to convert the document to 2003 or you can download the Microsoft Office Compatibility Pack. Read the instructions on the page before doing so as you may need to install some Microsoft updates.
If you are unable to open certain files, check the extension on the file. If you are unsure what the extension is for, you can easily look it up on line, by just typing in something like “what extension is .xls” in the search line. The Internet will come up with quite a few citations letting you know that .xls is for Microsoft Excel. If you didn’t have Excel on your PC, or any spreadsheet program, you may not be able to open this file.
Other extensions are:
.pps = PowerPoint
.pub=Publisher
.pst=Outlook personal storage table
.dbf = Database File, such as Microsoft Access
.cdx = Index File
.pdf = portable document file – Adobe Reader will open this type of file.
Some programs have viewers that you can download to see the file; but others do not. You may have to do a search online to see if any downloads are available. Be careful of viruses when downloading ANY file!
There are many more extensions. If you ever are unsure of what type of file it is, look it up online.
Don’t open anything from anyone if you do not know who they are. Attachments can be potential viruses. If you are unsure of any email, delete the file along with the email.
Email Etiquette
When e-mailing, it is important to keep a few things in mind:
- It is very difficult to interpret a person’s mood or tone in an e-mail. What may sound as argumentative may just be the result of an e-mail sent in haste.
- If you send an email in all caps, IT APPEARS AS IF YOU ARE YELLING AT SOMEONE. You may want to tone it down with some lower case letters.
- If you are only replying to say ‘thanks’ or ‘ok,’ you may want to refrain from hitting ‘Reply All’ and just reply to the sender instead.
Setting up Microsoft Outlook

Reply, Reply All and Forwarding
If you want to reply to an email, simply click the reply button.
If there are more than one person the original email was sent to and you want to reply to ALL of the people included on that email, click the down arrow by the ‘Reply’ button and select ‘Reply All’ from the drop down box. Be careful, however, as this will be sent to everyone on the email.
To forward an email to someone not on the email list, click the ‘Forward’ button. Type in the email address of the person(s) you wish to forward the email to. Separate the email addresses with a semicolon if sending to more than one email.
Composing an Email
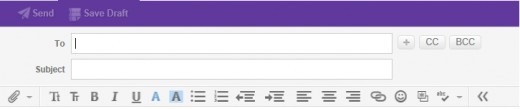
Composing an Email
To compose an email, click on the 'Compose' button at the top of the screen.
For more options, click on the Inbox. You can read your email from this tab.
Beneath this tab is a toolbar. You can delete, reply, forward or print your emails from this tab.
Your new email will appear. Enter in the email addresses you wish to send to. If you wish to carbon copy (Cc) someone enter their email in the Cc field. If you wish to send it to someone as a blind carbon copy, (you don’t want anyone else to know you sent it to this person or you are protecting their email address), click on the ‘Show BCC’ field and another address field will appear below Cc. Enter the private email address in the Bcc field.
To switch to ‘Rich Text,’ click on the ‘Plain Text’ icon.
Adding and Reading Attachments

Attachments
To add an attachment, click on the universal symbol for attach- the paperclip.
A dialog box will appear enabling you to choose the location and name of the file to attach. Highlight the file and click ‘Open.’
Once the file is attached it will appear in the heading of the email.
If you wish to remove this doc, click ‘Remove.’ It will only delete the file from your email, not from your computer. To add another document, just click attach again.
In the subject line, type a subject. This field is not mandatory, but it is helpful when trying to sift through and locate a specific email. It also helps the receiver know what the email is about.
In the body of the email, type your text and when you are finished, click on ‘Send.’
If you don’t have time to finish the email, click on ‘Save Draft’ and it will save this unfinished email in your drafts folder.
To continue typing in the email when you are ready to go back to it, click on the Draft folder and double click on the email to open it.
Printing an Email
To print your email, select the ‘Print’ icon from the main toolbar. Choose the printer for which you would like to print.
Add a Reading Pane
To have your emails show in the bottom portion of your screen (without having to open them), click on Actions. At the bottom of the Actions menu, there is an option for ‘Reading Pane.’ Click on this once to select or to deselect.
SMS Messaging
SMS Messaging is Text messaging. You can send a message to a cell phone from here. Click on the drop down arrow next to the Compose button. Select SMS.
Type the phone number of the person you wish to send the message to along with a message in the spaces provided.
In Closing...
Once you start to practice using email, it does become very easy. Take your time and it will become second nature. In fact you might wonder how you ever got along without it!


