Gmail - How To Create A Customized Filter To Perform Tasks On Email Messages Automatically

Gmail; using Google's smarts to sort out your email inbox
Google is a company that is built on making search better. As such, it should not come as a surprise that there are in-built tools within Gmail (arguably the second-most recognised product from Google itself) that helps to make your life easier.
One tool is the ability to filter both incoming and existing emails and perform tasks on them. The tasks available are to:
- Skip the Inbox (archive it)
- Mark as read
- Star it
- Apply a label (we'll talk much more about this later)
- Forward it
- Delete it
- Never send it to Spam
- Always mark it as important
- Never mark it as important
- Categorize it as ....
This article would briefly go through the various option, with an emphasis on automatically creating adding label(s) to emails for keeping your Gmail tidy.
To find out how to create a label to sort and categorize your emails, check out my Hub here.
Creating a Filter
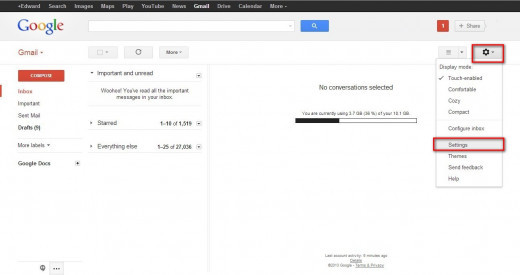
To create a filter, first you have to go to Settings. Click on the gear-looking icon on the top right side and select "Settings" on the drop-down menu that appears.
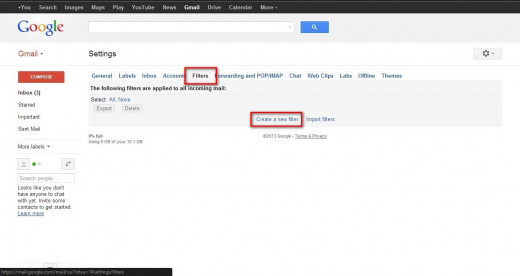
Then click on "Filters" on the Settings page. You can either create a new filter or edit a filter that was set up previously.
For this Hub, we shall look at how to create a new filter. Click on the "Create a new filter" link at the bottom of the dialogue box.
Criteria to Search For
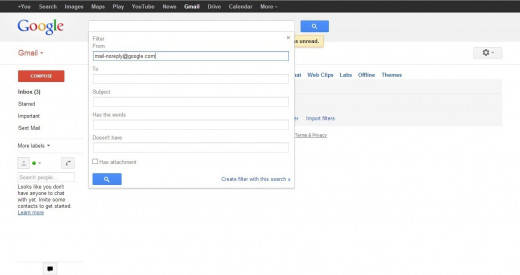
You will then see an option dialogue box appear from below the search text box. This is where you enter the parameters you want your new filter to, well, filter your mails by. For every filter, you can get Gmail to filter your emails by:
- Sender ("From")
- Recipient ("To")
- What is in the subject line of the email ("Subject")
- Contains certain words or phrases ("Has the words")
- Does not contains certain words or phrases ("Doesn't have")
- Contains an attachment ("Has attachment")
Note that there are some overlaps in the categories, as "Has the words" would work if the word was found in the subject line of the email too, thus overlapping with the functionality of the "Subject" filter.
For the example on the right, I am trying to filter for all emails from Google's Gmail support team, and hence I've added their email address into the "From" field.
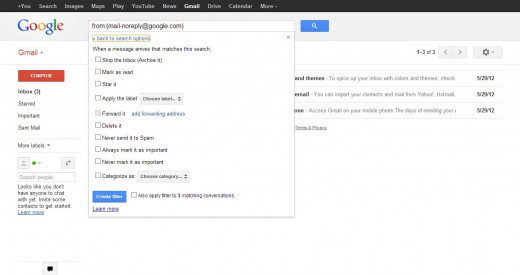
Action To Be Done
After inputting the search criteria, you would have to choose an action for Gmail to take once the search criteria is fulfilled. In my example, the action(s) I choose would apply to emails coming from the Gmail team.
Most action are straightforward; their names state what they would do. However, I find "Apply the label" very useful and would like to talk a little more about it.
"Apply the label" is very useful for categorising your emails with labels. For the purpose of setting up filters, you can either set the filter to automatically add an existing label or a new label to all emails that match the search criteria. You can set labels for important emails, to separate work with personal emails, etc. With this action set in your filter, you now have an automagically-sorting Inbox!
You can create a new label while creating your filter, but if you want to find out how to create a label from scratch, do check out my Hub on How To Create A Customised Label To Categorize And Sort Your Inbox.
And You Have A Filter
And there you have it, you have set up an automated task within Gmail to help sort your emails according to how you want them.
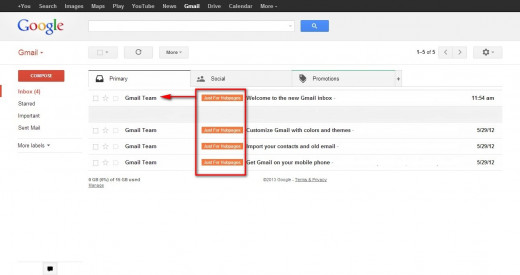
If you have used routed emails to a label, you will see the labels being applied automatically to every email that meets the search criteria.


