How To Use Visualiser on Chamsys MagicQ - Attach To Truss, Rotate & Move Fixtures


What is the Chamsys MagicQ Visuliser
Thankfully, the Chamsys visualiser is now fully operational on my Macbook and on Windows PC setups (How is it on your Linux system?). Useful for pre-programming shows, a cheap and easy way to show clients what their event will look like and has a great plan printing function you can give to your technical crew when rigging an event.
Chamsys can auto insert your lighting fixtures in to the visualiser and you can manually insert truss, poles, and other objects to give your plan a sense of realism and practicality on rig day.
It's a little fiddly but if you follow some of the simple tips listed here, it makes it a little easier to get great results.


Inserting Truss & Objects into Chamsys Visualiser
First things first! If you intend on using the visualiser, make sure the first thing you do is insert and position the truss and rigging you are going to have in your rig. Inserting first makes things a little easier later on.
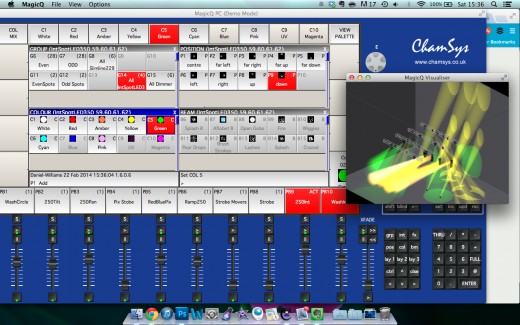
Open Chamsys and start your new show
Click 'Patch'
Click 'View Vis' (Soft key, top left)
In the patch window, click 'View Objects'
Click 'Insert' (soft key, top centre)
The pop up menu lets you choose the object you with to insert. For this demo, I am going to insert a truss section, 12 meters in length.
Click 'Truss' (From the pop up menu)
Now you should see your truss in the patch window. There are various attributes you can change, the most useful being the length of the truss. Naming the truss is advised as this will show up on your rig print outs.
To change the length to 12 meters, click the box under the length tab and type 12 and hit return.
Now, to check you have actually inserted the truss, you need to view the visualiser. On my Macbook this is in the tool bar of Mac OSX. Click visualiser and then view visualiser. I'm not sure where it is on the Windows version!


Moving Objects in Chamsys MagicQ Visualiser
Still within the visualiser patch window (Partch - view vis - attach objects) adjust your windows so you can see the visualiser and Chamsys screen at the same time (or connect a second screen for the least frustrating way of working!)
Now, within the visualiser, edit your view (Very top tool bar in OSX) to 'Free View' click, hold and move the cursor around to get a good view of your truss. Also try holding shift and moving the cursor to pan (Anyone using 3D modelling software should be used to this).
When positioning your truss, its a good idea to view it using all the different view points to make sure it is where you think it is. The 2D nature of the screen makes it difficult to tell from any one angle.
Within Chamsys, with the object you wish to move selected, the encoders become your means of moving the object. The encoders on the right move the truss horizontally, vertically forwards and backwards. The encoders on the left rotate the object in every way you could wish!


Super Dooper Top Tip
If you want to group your fixtures but not have a truss, pole or object in the visualiser, you can insert an object, attach the fixtures to it and then, from the 'attach objects' window, under the model column, click the object and when the pop up window appears, click 'invisible' - Boom!
Adding & Attaching Fixtures In Chamsys Visualiser
Patch your fixtures in Chamsys as you normally would. When the pop up asks you if you want to auto insert to the visualiser, obviously click yes but be aware that this will be the default for the rest of the show.
It is most likely that you will want to attach your fixtures to objects such as truss or poles within the visualiser. Mainly because thats how it will be on your rig but also because it helps to group fixtures and makes it easier to move them together. Here is how to attach fixtures to objects in the visualiser.
In the patch menu, click 'view vis'
In the patch window, click 'vis heads'
Choose the heads you wish to edit in the same way you do elsewhere in the software (Click on the fixture name, hold shift for multiple fixtures)
Click 'Fit to Object'
Choose the object you wish to attach to ('Truss one' in my case)
The fixtures will now jump to the bottom of the object you have chosen. You can now move them around the visualiser using the techniques explained above. (Select the fixture and use the encoders on the right).
Don't forget that even if you move the fixture away from the truss, it will still be 'attached' which means that if you move the truss, the fixture will move by the same amount in the same direction!
Printing Rig Plans In Chamsys MagicQ
Following the advice above will give you a great start at designing your rig in visualiser. When you have completed your rig, Chamsys offers a great function to print a design of your rig. So you can hand it to your crew chief who can hopefully implement this and rig your lighting.
Within the visualiser window, click file and then paperwork.
From here you can make choices on what data you want to create. I use the 'create PDF' to give me all the documentation and then print this.
I hope this basic tutorial has given you enough information to get started with using visualiser. If you have any questions about this then please leave a comment and I will endeavour to answer!


