- HubPages»
- Technology»
- Internet & the Web»
- Web Page & Web Site Development
Install Drupal 7 Quickly: How to Install Drupal 7 Quickly on Your Computer
Drupal is a free and open-source content management system (CMS) and content management framework (CMF) written in PHP to create personal blogs to corporate, political, and government sites including whitehouse.gov and data.gov.uk. As this is most popular and stable CMS, building a dynamic website is more easy and flexible before previous. Using Drupal, a standard website can easily build within few hours. The version of Drupal is Drupal 7 is much more updated then all the previous version like Drupal 6. Drupal 7 has the features of capability of better media handling, integrate CCK module to create custom content types, WYSIWYG editor, better performance and scalability, better tools to structure/organize content, basic Views-like module, automatic upgrade functionality, improved node access system, better internal APIs, better external APIs, usability and many more. Installation of Drupal 7 is much much easier and quicker than all previous versions of Drupal. In this page, you will learn how to install Drupal easily and quickly step by step on your local computer. Just follow the steps and see how easy to install Drupal on your local computer.
Minimum requirements to install Drupal 7
Before Drupal 7 installation, you have to confirm the following requirements are met.
- Apache HTTPD or Microsoft IIS for web server. But my recommendation is to use Apache server.
- PHP 5.2.0 or later to run the Drupal 7 code
- Drupal 7 supports databases like MySQL version 5.0 or later, PostgreSQL 8.3 or later SQLite 3.4.2 or later.
To install Drupal 7, you have to meet the above mentioned requirements unless you may not find all the features and flavours of Drupal 7. It is noted that most hosting companies will already have these installed, but if your server is alittle out of date, now is the time to update your hosting server.
You can easily install Apache, PHP and MySQL onto a Microsoft Windows machine through XAMPP, which is published by Apache Friends. This package includes Apache, MySQL, and PHP with a standard Microsoft Windows installer. To download it you may visit www.apachefriends.org/en/xampp.html
Steps to Install Drupal 7 on you computer
When the above requirements are completed, you may ready to install Drupal 7 on your computer. Here we would discuss the local installation of Drupal 7 on Windows platform. However, the option is quite similar if you use Linux or Mac or real host servers. The thing you have to remember that you must have to resolve all the minimum requirements before Drupal 7 installation. When you are ready, then follow the following steps to install Drupal 7 on your computer:
Step 1: Obtaining Drupal 7 and Extract Drupal 7
- Go to the Drupal project page on Drupal.org: http://drupal.org/project/drupal and find the latest official release of Drupal 7.
- The latest stable release is marked with green background and the "development releases" are marked with pink color background. At the time of publishing this tutorial, the latest release is Drupal 7.8.. Download the latest release of Drupal 7 from Drupal "Recommended releases" and save it to your computer. There are two formats of Drupal 7 archives .tar.gz file and .zip format. You can download anyone.
- After completing download of Drupal 7, you have to extract the files
- Rename the extracted folder with your website name. For example, we rename it to mySite.
- Now, you will need to copy them to your web server's document root. If you use XAMPP, you have to copy that folder of http folder.
- After the above steps, you are ready to start the installation process. Simply navigate to http://localhost.com/your-folder-name/install.php. For example, our website name was mySite and so we have to navigate http://localhost.com/mySite/install.php.
When you have completed the above steps, let's step through the installation process in detail now.
Step 2: Selecting Drupal installation profiles
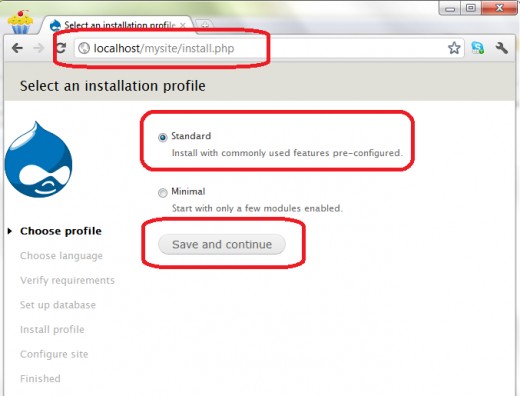
First step to install Drupal is selecting a Drupal installation profile. Drupal 7 prompts you with a screen asking for which installation profile you want to use during the installation with the option Standard profile or Minimal profile.
Minimal profile of Drupal installation profile installs the basic configuration of Drupal with only the required functionality enabled and no additional features of Standard profile.
Whereas standard profile of Drupal, installs and activates several commonly used features like Search module, Powered by Drupal block, basic page content type, an article content type, taxonomy, Seven theme, administrator role to make your Drupal site more useful immediately.
My recommendation is to start with the Standard installation profile if you are setting up an entirely new site or if you are new to Drupal.
After selecting the Drupal installation profile, click on Save and continue button to go to the next step.
Step 3: Language selection
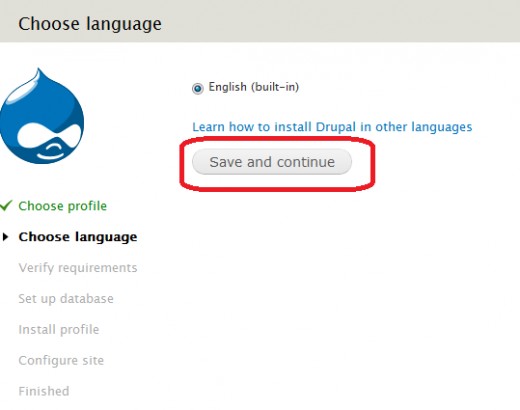
Choose the language with which you want to install Drupal. By default, Drupal only includes an English installer. If you want to want to install Drupal in other language than you have to download a translation from Drupal.org. In this tutorial, we will continue with the English installation.
Click on Save and continue button step forward of Drupal installation.
Step 4: Requirements check
Drupal will now check all the requirements of your server to ensure that Drupal meets the minimum requirements to run Drupal and to ensure that everything is ready for the installation to proceed. If the minimum requirement is not fullfilled then you need to resolve that. After Verifying the requirements, you now have to set up database for your Drupal 7 website.
Step 5: Database configuration
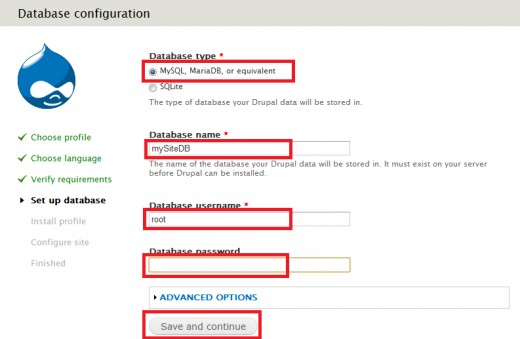
This step of installing Drupal is to configure the database where Drupal will store the content and configuration information for your site. Before entering all the information, you firstly have to create a database for your Durpal website. To create this tutorial, we use phpMyAdmin for our Drupal website database. All the things of this step are:
- Create a database for our site for example we create a database mysiteDB in phpMyAdmin database.
- Go to the Drupal installation page, select phpMyAdmin database form Database type to store our Drupal website data.
- Type the Database name which we created previously. The database name must be unique and same.
- Now, give the Database username andDatabase password.
- After all these, click on Save and continue button.
As the installation proceeds, Drupal will display its progress and the installation may take several minutes to complete.
Step 6: Configure site to install Drupal
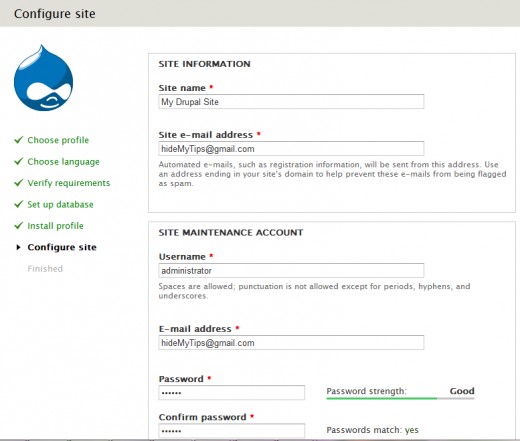
When Standard installation has completed, you have to configure the Drupal website. The basic configuration starts by asking you for the SITE INFORMATION and SITE MAINTENANCE ACCOUNT details. Configure the Site name, email address, username of the administrator and password. You should make sure that the Password is difficult to guess and that it is stored securely.
Determine which country your site is located in as well as the Default time zone for the site.
When you have finished entering the configuration options, click on Save and continue button to finalize your choices.
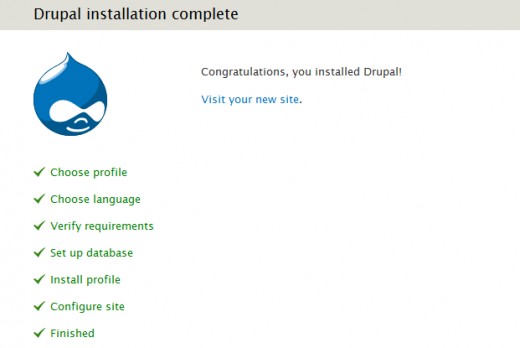
After all options have been saved to the database, a final status screen stating that the installation completed successfully by displaying the message Congratulations, you installed Drupal! and you can finally navigate to the site by clicking on the Visit your new site link.
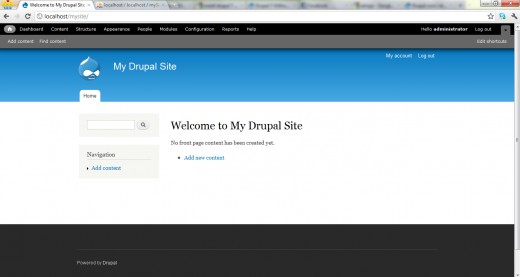
The final outlook of our installed site is like the following:
At the beginning of this tutorial we tell that installation of Drupal 7 is really easy and quick. Hope, you already find this. By following the above mentioned steps you can easily and quickly install 7 on your local computer on Windows platform. The installation of Drupal 7 is quite same when you try to install Drupal of other platform like Linux or MAC. The thing you just have to remember before installation is to meet the minimum requirements of Drupal 7 installation. If you try to install Drupal 7 on any hosting site, the steps are similar.
Hope, following the above steps you can easily install Drupal on your computer. Furthermore, if you face any problem then please tell me in the comment section and I will try my best to resolve your query. Moreover, if you feel some important information is missing of this tutorial then please mention it in the comment section.
~ Written by rancidTaste [www.hideMyTips.com]


