Installing WordPress 3.X As A Multi User Blog
Setting Up WordPress 3.X As A Multi User Blog
This is an effort to get people to try out the latest version of WordPress in multi Blog / multi User mode. The installation and configuration is relatively painless and it does work very smoothly. Hence if you go through this material carefully, I’m sure you will be able to setup and use WordPress so that multiple people can Blog using a single install of WordPress completely independent of each other.
Wordpress 3.0 offers a MU Blog system built into its core. There is no need to download and install a WordPress MU script any longer.
One just needs to install WordPress 3.X normally in as a single user Blog, then:
- Make a few copy / paste type changes in its wp-config.php file
- Set up a few network settings after
And your WordPress Blog will deliver Multi Blog functionality.
Start off by doing a clean Install of the latest version of WordPress ( i.e. WordPress 3.1 when I wrote this material ). Then, login as wp-admin in the usual way and get to the WP Dashboard. You are now poised to get started.
Instructing WordPress To Deliver Multi Site Functionality
Fire up your FTP client and access your WP installation. Get to the wp-config.php file.
NOTE: wp-config.php is normally found in root directory of the WP installation.
Select wp-config .php , right click and Edit the wp-config .php :
NOTE: Search for the line /* That's all, stop editing! Happy blogging. */ which is normally found towards the end of the wp-config file.
Place your mouse cursor just above this line ( which is just a remark statement ) and press the Enter key a few time to make some space just above the line.
Copy / Paste the following code snippet just above this remark statement:
define('WP_ALLOW_MULTISITE', true);
Once you’ve done this save the file the freshly updated wp-config.php back to hard disk.
NOTE: This code snippet instructs the WordPress core that it’s required to work in multi site from now on.
Next go to the WP, dashboard and refresh the page if it is already
open
OR
Logout and Login again as wp-admin normally and reach the WP dashboard
A new option Network will be found under Wp-Admin >> Tools as shown in diagram 1.
Clicking the link Network is how the WordPress user interface that will allow you to complete configuring WordPress to work in Multi Site / Blog mode is displayed in your Browser as shown in diagram 1.
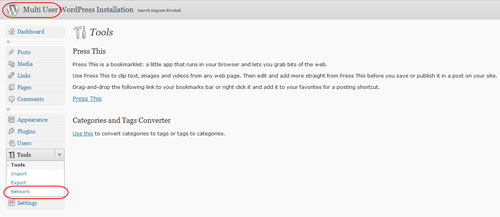
On click of Tools >> Network the user interface as shown in diagram 2 will be displayed in your Browser.
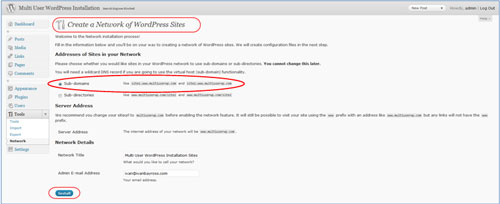
Under the heading - Addresses of Sites in your Network
Select the blogs-as-subdomains - radio button ( i.e. the radio button selected by default ) and click Install.
Just as shown in diagram 2.
On Click of Install the user interface as shown in diagram 3 is displayed in the Browser.
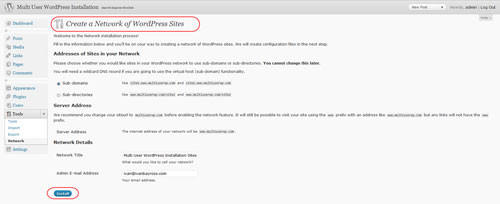
Follow the instructions contained in line 1 on this page and create a blogs.dir using your FTP client software just as instructed.
NOTE: This directory is used to store uploaded media for the additional Blog sites and must be writeable by the web server.
Additional code placed in the wp-config.php file
Next copy and paste the code visible in the first text box into the wp-config.php
file.
NOTE: Do this just above the line - /* That's all,
stop editing! Happy blogging. */
AND
Just below the code snippet you pasted there earlier i.e. define('WP_ALLOW_MULTISITE',
true);
For example, this was the block of code I received when I was doing my install on localhost.
Here is what the additional code block looked like within my wp-config.php file.
define( 'MULTISITE', true );
define( 'SUBDOMAIN_INSTALL', true );
$base = '/';
define( 'DOMAIN_CURRENT_SITE', 'multiuserwp.com' );
define( 'PATH_CURRENT_SITE', '/' );
define( 'SITE_ID_CURRENT_SITE', 1 );
define( 'BLOG_ID_CURRENT_SITE', 1 );
/* That's all, stop editing! Happy blogging. */
Adding Instructions To The .htaccess File
Next using your FTP client, navigate to the root directory of your WordPress installation and locate the .htaccess file.
Click on the file once to select it then right click and select Edit from the sticky menu that is displayed there. The .htaccess open in Editing mode within your FTP client.
NOTE: If there are any WordPress rules within the .htaccess that exist these must be deleted.
Next copy and paste the code visible in the second text box into the .htaccess file normally found in the root directory of a WordPress Blog.
Save the .htaccess file back to hard disk.
This was the block of code I received, which I added into the .htaccess when I was doing my install on localhost.
RewriteEngine On
RewriteBase /
RewriteRule ^index\.php$ - [L]
# uploaded files
RewriteRule ^files/(.+) wp-includes/ms-files.php?file=$1 [L]
RewriteCond %{REQUEST_FILENAME} -f [OR]
RewriteCond %{REQUEST_FILENAME} -d
RewriteRule ^ - [L]
RewriteRule . index.php [L]
All the necessary changes to the wp-config.php file and the .htaccess are complete.
The WordPress installation is now ready to be informed about all the multiple sites / Blog that it has to handle.
You will now be instructed to logout and login in again in the WordPress admin section.
Please do so.
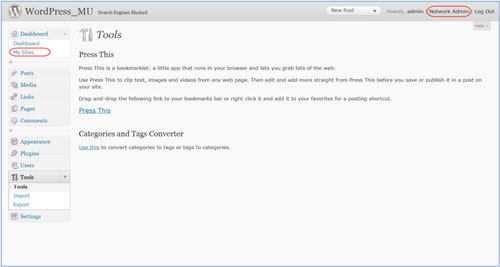
When you re-login, you will see a new menu link called My Sites under Dashboard Menu as shown in diagram 4.
On the top right hand corner, you will see a new link called Network Admin as shown in diagram 4. These are the explicit indications that your WordPress installation has been set up correctly to deliver multiple Blogs.
Now let’s create a new Blog.
Remember that you are the Network Admin as shown in diagram 5.

While you are Network Admin, and you’ve clicked the link Sites, the user interface as shown in diagram 6 will be displayed in your Browser. Click Create a New Site as shown in diagram 6.
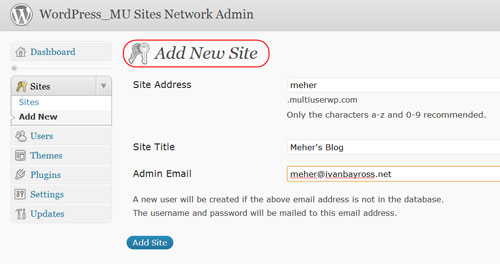
Adding a new site as shown in diagram 7.
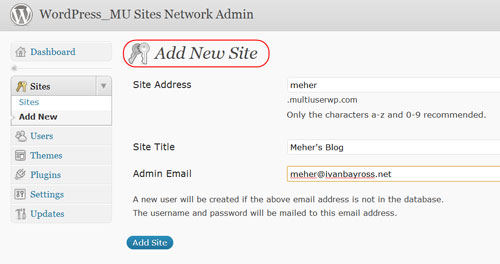
The information I entered was:
Enter the Site Address - meher
Enter the Blog Title – Meher’s Blog
Enter the Admin Email Id – Enter a legitimate Email ID here
NOTE: Ensure that a unique Email ID is used for each
such new site / Blog
Having done this a new site / Blog will be created named meher under the parent Blog which you installed and just configured to deliver multiple sites / Blogs.
Making Entries In Your HOSTS file
Since I was installing and configuring WordPress on my laptop, I’d have to ensure correct Domain Name Resolution. Simply because there is no domain named meher.multiuserwp.com registered on an Internet based DNS server. Hence I made the following entries in my HOSTS file on my laptop, the entry was as follows:
#127.0.0.1 localhost.localdomain
127.0.0.1 localhost
127.0.0.1 multiuserwp.com
127.0.0.1 meher.multiuserwp.com
NOTE: Do register the remmed out entry please.
If you have such an entry in your HOSTS file please rem it out as shown above.
NOTE: In Windows the HOSTS file is normally
found in:
c:\windows\system32\drivers\etc\hosts
In Linux the HOSTS file is normally found in:
/etc/hosts
NOTE: No such entries must be made in your HOSTS file if you are experimenting directly on a webhost.
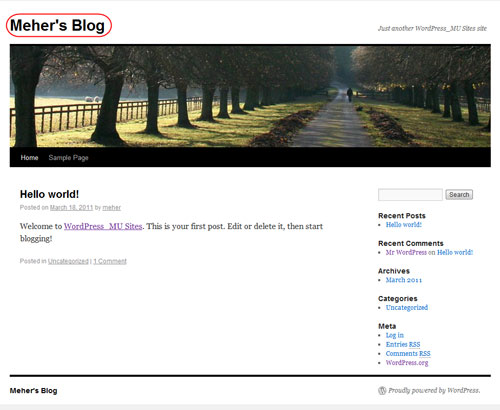
Now in a new Browser tab I entered the URL - meher dot multiuserwp dot com in the address bar and Meher’s Blog, Home Page was displayed as shown in diagram 8.
Should you enter the URL - multiuserwp dot com the parent Blog will be displayed in your Browser window as shown in diagram 9.
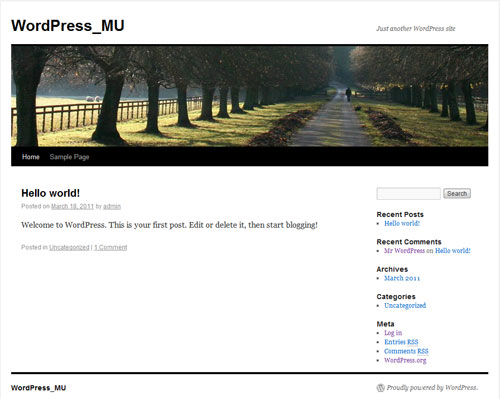
Now you have to separate Blogs the parent Blog named WordPress _MU and Meher’s Blog both being independent of each other but delivered by the same WordPress installation.
If you wish to add more Blogs then simply go back to being Network Admin >> Sites >> Add New >> Create A New Site and - add another site.
Each of the Blogs will have their own independent Admin Dashboards displayed.
Here are the URLs:
meher dot multiuserwp dot com/wp-admin
AND
multiuserwp dot com/wp-admin
Setting a Login Password for Meher
Note: When the New Blog was created, a user also was created but this user did not have a password.
To set a password for this User, Login in as wp-admin using the URL multiuserwp dot com and go to Network Admin.
Go to Users menu and click on the Edit link under user meher as shown in diagram 10.
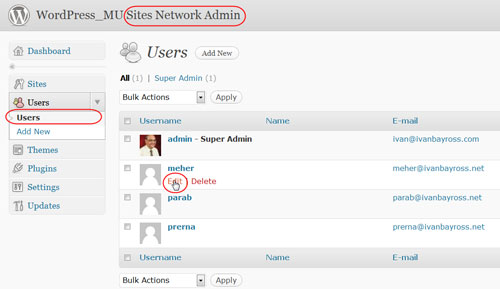
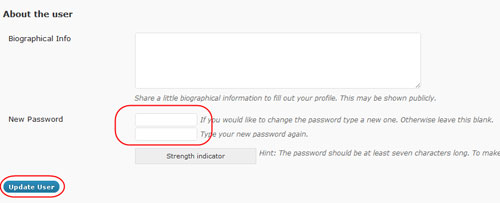
Scroll to the End of the Page and locate the New Password.
Enter the passwords in the textboxes adjacent to the label New Password and click on Update User as shown in diagram 11.
Meher will now have a Password and can log into Meher’s wp-admin Dashboard.
Now open a new Browser tab and enter the URL meher dot multiuserwp dot com/wp-admin in it address bar and press GO or Enter.
The Admin login form of Meher’s Blog will be seen in the Browser tab as shown in diagram 12.

Enter the User Name and Password for meher dot multiuserwp dot com blog.
And click Login to get to the Admin Dashboard of Meher’s Blog.
Ivan Bayross
Open Source Tutorials | Open Source Training

