|Joomla 1.5 Tutorial to Design Professional Website


Joomla is undoubtedly one of the finest and easiest CMS for designing a website. Building website with Joomla is so easy that even a layman can create his own Joomla website or blog within an hour of practice. So, if you have no knowledge of programming, do not worrry because this hub you will find show you step-by-step process designing Joomle website. As you already alware of that Joome is an open source CMS, which means you do not have to worry about buying any software. With Joomla you can design almost any type of websites ranging from personal to professional or even e-commerce sites.
Let me explain why joomla is also called CMS. Actually, the full form of CMS is content management system, which is used to maintain blog type websites.Generally, we use a CMS instead of a website whe we need to frequently update or add contents. Joomla is build with PHP, CSS and HTML. You must have heard of CSS-cascading style sheets. In simplest form CSS means separating the content of a website from the layout of the site, which mean unlike normal HTML pages in CSS when you change the layout(background images, colors and other presentations data )of the website the content remains unchanged, because contain does not reside on the webpage. Instead in a Joomla site content stay in a database and the looks of your site is presented by the template. So, easily you can change the looks of your site without affecting the presentation of contents of your site. When you first make you site this will be clear to you.
Contents
- 1. Installing Joomla How to install template
- 2. How to install Joomla Template
- 3. How to delete a Joomla template
- 4. Changing “welcome to Front page” heading
- 5. Sections and Categories in Joomla
- 6. Adding contents in Joomla
- 7. How to add Adsense in Joomla
- 8. Editing Joomla template
- 9. Changing the logo of default Joomla template
- 10. Adding Amazon affiliate id in Joomla
- 11. Making SEO friendly Joomla URL
- 12. Adding Google analytics in Joomla
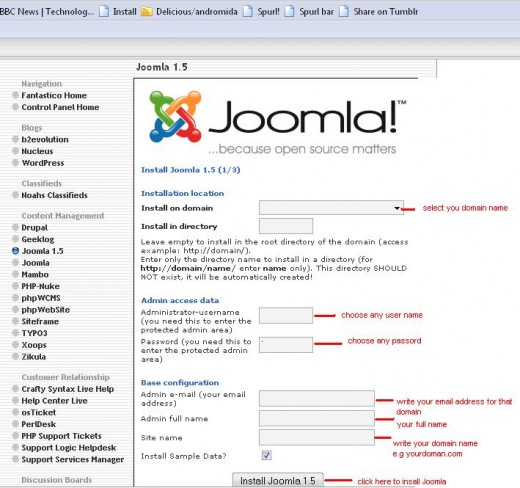
1. Installing Joomla
For beginners installing Joomla can be a daunting task and time consuming in a server. It is better to avoid manual install Joomla in your hosting server. The easiest way to install Joomla is to use hosting providers already have Joomla installed in their servers. Now –a-days almost all the hosting providers have installed Joomla in their servers and you don’t feel go through the hassle of installing Joomla manually in your website. Follow the following instructions to install Joomla in your hosting server.
1- Login to your hosting server
2- Click Joomla in your control panel
3- a new window will open up, click the "new install". Check the three screen shots below to finish the Joomla installation.


2. How to install a Joomla template
After installing Joomla you will have three templates, with rhuk_milkyway set as default. To select the other two you have to go to “Extensions” and then “Template Manager”.Next, select any of the templates and click “default”. Apart from those three templates, if you want to add any other free template, you can Google for it by typing “free Joomla template”. To install the new template for your website, login to your Joomla site and then click “install/uninstall” button, and then browse the new template that you already downloaded in your computer and upload it. If the upload is successful, then you will get a successful uploading message. For the new template to take effect on your site, go to template manage and select the uploaded template and then click default.
You also have to use “install/uninstall” option in “Extension” for adding any module or components to your site.

3. How to delete a Joomla template
For deleting any Joomla template go to “Install/Uninstall” from Extensions and then click on “Templates”, a new window with all the available templates will come, then select the template you want to delete. Now, you just have to click uninstall button to remove it permanently form your hosting server.

4.Changing “Welcome to Front page” heading
Default Joomla template has a default welcome message. You can change it as you like by opening the “Main Menu” form “Menu” and then click to “Home”. Now on the right side you will find an option “page title” under the “parameters (system)” option. Type anything you like and click “Save”.

5. Sections and Categories in Joomla
Sections and categories are the most important part of Joomla CMS. Without sectioning and categorizing your articles it will be difficult to manage a site with hundreds of articles. But you also can choose to add articles in uncategorized fashion. But as your site keeps growing each day, you will need to add more menus to give your each article a link from the front page. On the other hand, if you categories a number of similar type articles under a category name. For example you have 50 articles on digital cameras and accessories. If you make a category called “digital cameras” and under this name link all your articles then it will be much more reader friendly for your visitors, they will simply click a link called “digital cameras” then you can show then all the 50 articles under one page.
When you first install your Joomla site, it comes with a number of default sections and categories with each category having a number of articles. It is better to delete all the default articles, sections and categories so as you can start building your site from scratch. It is not possible to delete any sections without deleting categories and category deletion is not possible without deleting all the articles in that category. So, at first go to “Article Manager” from “Content” and delete all the articles. And then the same way delete all the section.
Now, you create a new section from “Section Manager”by going to “Content”. then click “new” and name the section. And add an alias name to make your section name search engine friendly and then create a few categories (at least two) under that section by going to "Category Manager". For adding articles to each category, write at least two sample articles.
Section A>category 1> articles
Section A>category 2> articles

6.Adding Contents in Joomla
For adding the articles you have written, you need to open article manager from content, then click “new” and the fill out the following sections. For example, you choose your articles title as”My favorite Books”.
Title- My favorite Books
Alias: my-favorite-books
Section-select the section name
Category-select the category of your article
To make your article appear in the fornt page, select “Yes” in “Front Page”
On the right side you will see “Metadata Information” , fill out the “description” and write a t keyword for your article to target the search engine.

7. How to add Adsense in Joomla
You can add adsense in Joomla in two ways-by manually code insertion and by adsense module insertion. For adding adsense module in Joomla download a module file “easy Google adsense for Joomla”-you can find it by a Google search or can visit Joomla-extensions.yourcafe.com. The file name is”mode-easy-adsense-Joomla 1.5x”. Now follow the below instructions.
- Open extensions manager and install the new module.
- To implement the adsense code in the new module, open then “easy adsense module” by going to Module Manager from “Extensions” and then put your adsense id.
For manually adding adsense code in Joomla, open the “Extensions” and click “New” in Module Manager and open “custom HTML”. Select “show title=no” and choose position to left. In custom output window, put your adsense code-that is all. Remember manually adding of adsense code is the safest option.
8. Editing Joomla Template
Not recommended for the beginners..
9. Changing Default
Joomla Logo
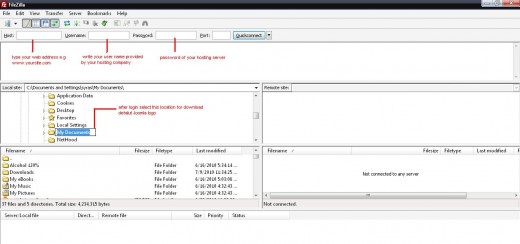
Joomla default template has a logo of “Joomla” in the upper-right corner, if you want to change it then there is a simple way to change it. First of all download a ftp software, normally I use free Filezilla. You can find this free software by a Google search.
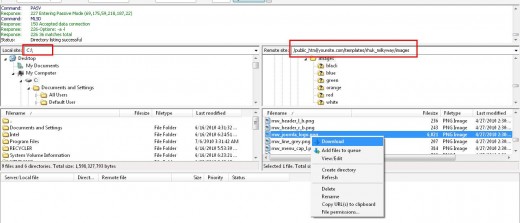
After the installing open Filezilla, open it and type in host name, username and password of your hosting server. Now, click on “Quick connect” button to complete the logon process. On the right site of this ftp software you will see “remote site” option and on the left side you will find “local site” option. On remote site click the /public.html, then click your domain name. Under the domain name there is a folder called “templates”, click it and then click on “ rhuk_milkway and images. The complete path of Joomla logo will be in a location like- /public_html/yoursite.com/templates/rhuk_milkyway/images...
Below the “remote site” option in Filezilla you will see another option “file name”. Under the “file name” select the image name called “mw_joomla_logo.png”, right click it and download it to your computer.Now in your computer make necessary change on the download Joomla image, you can use either paint or Photoshop. When editing is done rename it as mw_yoursitename_logo.png. Be careful about the .png-it must be in small letter. Now click the new image file in Filezilla and upload it exactly the same location where you downloaded it.
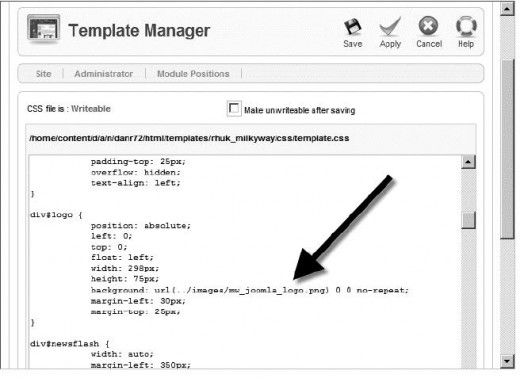
When uploading get finished, open your Joomla site and login in with administrator password. Select “extensions, and then “template manage”. Now select your template name and then click edit. You will see “edit css” option, just open it and select “template.css” and click edit. Now, search for “div#logo” –you can easily find this by pressing ctrl+F and typing div#logo in the search box. When div#logo
appears you will see something like: background: URL (…. mw_joomla.log.png…) just replace the old image file name with the new one-mw_yoursitename_logo.png and then click save button. Now open your website to see the new logo.
Changing Joomla Logo
10. Adding Amazon affiliate id in Joomla
There are many free Joomla extensions for adding Amazon affiliate code in your site. You can try vip amazon associated module from a page of Joomlamind and th file name will be like - 064_mod_vipamazonassociates. install this file in your Joomla site and then add your affiliate id and keywords as you wish. Open you site or refresh it you will find new Amazon Ads relevant to your keywords set up in that module.

11. Making SEO friendly Joomla URL
Joomla URL are not search engine friendly by default. To make them SEO friendly download a file AceSEF Basic and install it in your Joomla site. After installation go to “Component” and then go to AceSEF and then click on SEF URLs, here you will see how automatically all your article titles has been converted into SEO friendly URL.
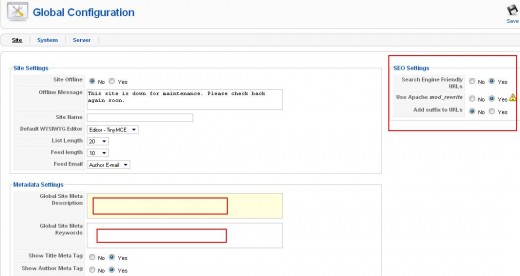
After installing AceSEF you need to go to “Global Configuration” mode from site. In the right side “SEO settings” , select the” Search Engine Friendly URLs” and “Use Apache mod_rewrite” ; save it. Additionally, in global configuration mode you can add meta description and meta keywords in “metadata settings” to make you site more visible to search engines.
12. Adding Google Analytics in Joomla
Adding Google analytics code is very simple in Joomla. At first copy your Google analytic code. Log on to your Joomla site. From extensions select “Template Manager” and now select the template which you want to add the code. In that template page click “Edit HTML”. A new window will open with full of HTML code; scroll down to the bottom of the codes. On the second line to bottom you will see a tag called </body>, add your analytic code just before the body tag and save it.
By exactly following the steps mentioned in this hub, I made my first Joomla site. Hope this hub will help all the beginners trying to make their first ever Joomla site. Have fun with Joomla!


