Create Rusty Grunge Style Fleur-De-Lis in Photoshop

Fleur-De-Lis is the symbol of kings. It is depicted usually as golden or silver shape but why not try to be a bit unorthodox and to make it grunge and rusty looking?
From this tutorial you will learn how to stroke Custom Shape tool Path, how to use Layer Mask and how to apply Texture to a stroked Shape. You will also create awesome Background with the help of Branches Texture and Clouds Filter.
Both Branches and Stone Textures used in the Tutorial are my own photos and unrestricted stock.
You can create this grunge style image in any version of Adobe Photoshop as I have used default Custom Shape, Filter, Adjustment Layers and Blending Options.
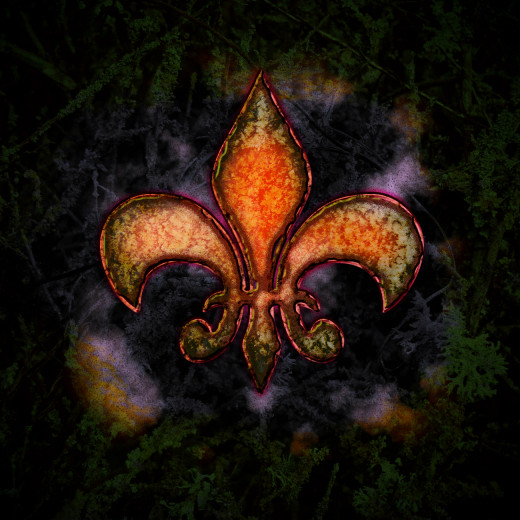
This is the final result:
![Adobe Photoshop Elements 2018 [Old Version]](https://m.media-amazon.com/images/I/51AQ4wl7eOL._SL160_.jpg)
STEP 1
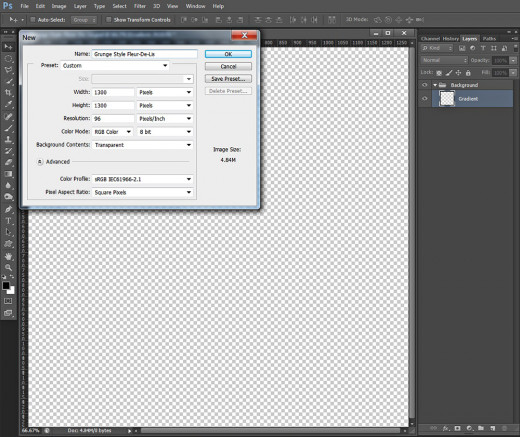
Firstly create a square canvas- go to File, New and insert 1300px for both Width and Height. Call your .psd file Grunge Style Fleur-De-Lis, then Set the Resolution to 96 Pixels/Inch and choose Transparent from Background Contents drop down menu. Select also RGB Color Mode.
Now rename Layer 1 to Gradient and go to Layer, Group Layers (hot keys Ctrl+G) to put it in a Group. Rename the Group to Background.
Create Mystic Wood Background Effect with Radial Gradient and Branches Texture
In Steps 2-5 your work will be to prepare the cool Background for our Fleur-De-Lis. Firstly you are going to colorize the canvas with dark shaded Radial Gradient. After that you should move into your .psd file the Branches Texture which is to be placed on a new layer above the Gradient. You have to change the Blend Mode of the branches to Soft Light to make them transparent.
STEP 2
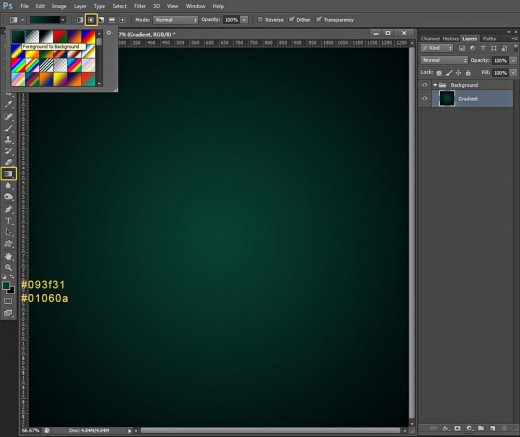
In this step we are going to prepare the base layer for our Background. For the purpose we have to change the main colors in the Tools bar. Firstly Set the Foreground Color to #093f31 and the Background Color to #01060a then take Gradient Tool, press Radial Type of Gradient icon in the Tools bar and choose Foreground to Background Gradient from the Picker. Put your mouse cursor in the middle of the canvas and drag to any corner to colorize your Background with the dark Radial Gradient.
STEP 3
Now we are going to add awesome Texture overlay to our Background.
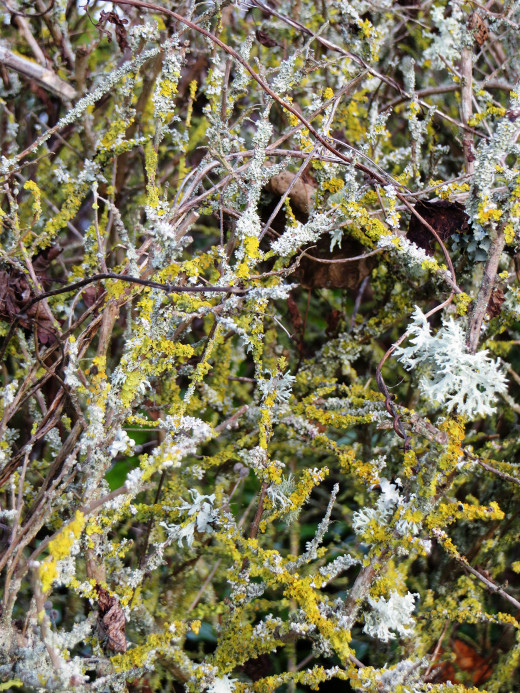
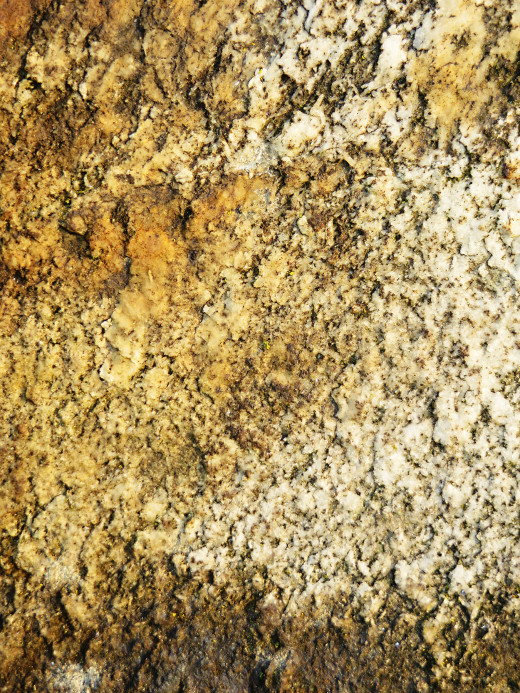
Click on my photo of Branches Texture below to download it- right click on it and select Save As. Keep in the folder where your Grunge Style Fleur-De-Lis file is.
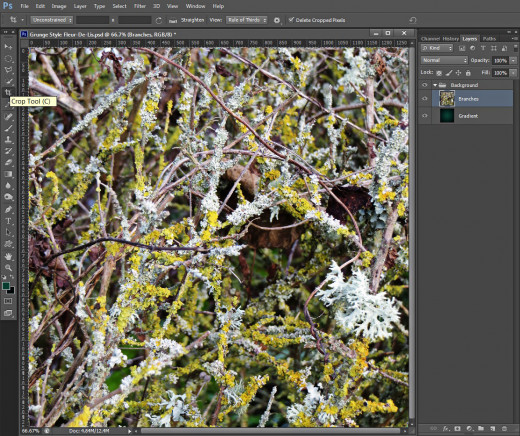
STEP 4
Create a New layer above the Gradient layer in Background Group and call it Branches, then Copy and Paste the Branches Texture. Use Move Tool or Edit, Free Transform to put the best part of it on the canvas. When you are ready, if you like, you can use Crop Tool to remove the excess parts- just select the tool, draw a rectangle around the borders of the Texture then double click to crop it.
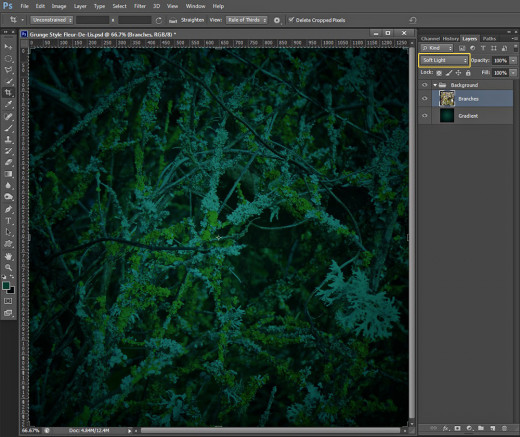
STEP 5
Change Blend Mode of Branches layer to Soft Light and you'll get a mystic wood Background.
Apply Clouds and Reticulation Filter to Improve the Background Texture
In Steps 6-13 you should firstly create a Selection on a new layer with Lasso tool of increased Feather option and apply Clouds Filter of yellowish to dark grey color to fill it. You have also to change the Blend Mode of the clouds to make them translucent.
Your next task will be to fill a new layer with pastel color then apply Reticultaion Filter (default for Photoshop). The Blend Mode of this new filter layer should be changed to add subtle grainy Texture to the Background.
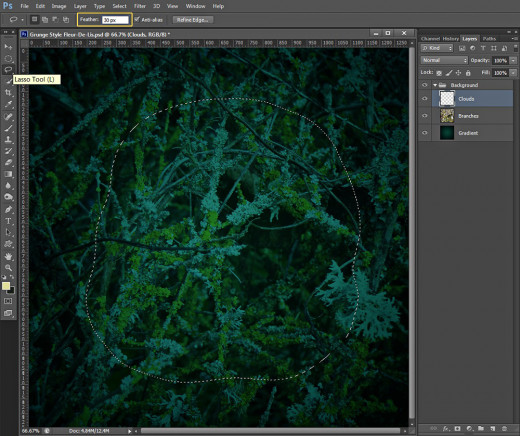
STEP 6
Create a New Layer on top of Background Group and name it Clouds.
Grab Lasso Tool and in the Options Bar set its Feather to 30px.
Draw an oval selection as you see on the following screenshot:
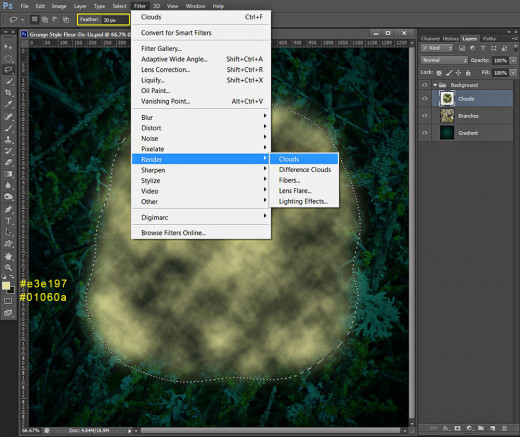
STEP 7
We have to navigate to the Tools bar again this time to change the Foreground so set the Foreground Color to #e3e197. Leave Background Color to #01060a (as in Step 2).
While the selection you created in the previous step is still active, go to Filter, Render, Clouds and you'll get something similar to my screenshot below:
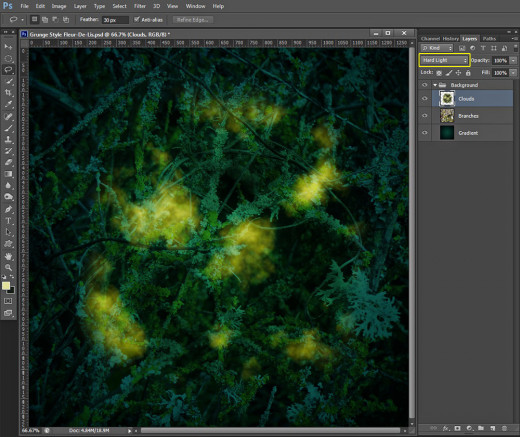
STEP 8
Change Blend Mode of Clouds Layer to Hard Light.
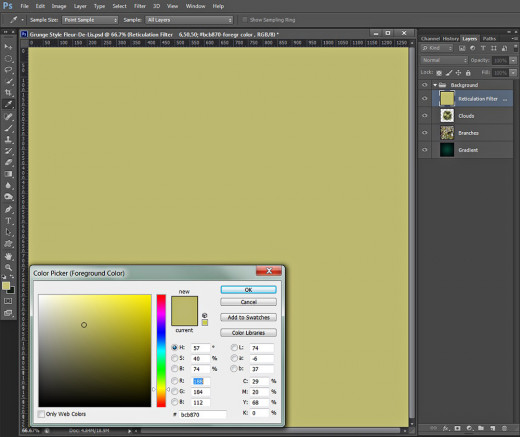
STEP 9
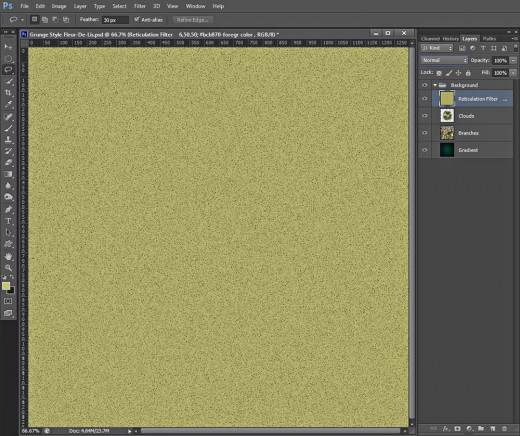
Create another New Layer above Clouds layer and name it Reticulation Filter. Change Foreground Color to #bcb870 and use Edit, Fill, Foreground Color to colorize the layer.
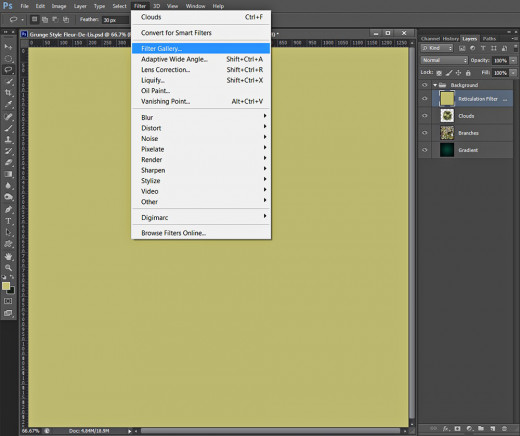
STEP 10
With Reticulation Filter layer highlighted, navigate to the Menu bar and select, Filter, Filter Gallery.
STEP 11
After the whole Filter Gallery appears on your screen, select Sketch type of filters and click on Reticulation swatch. Set its Density to 6, Foreground and Background Level- both to 50. Press OK to apply the Filter settings.
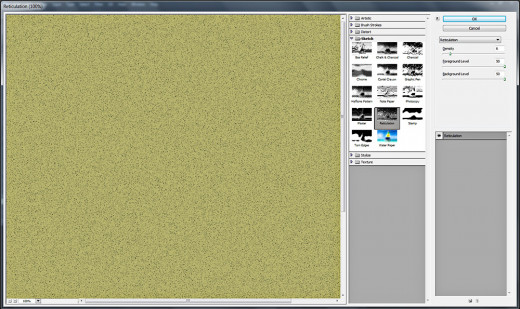
STEP 12
This is the outcome you should get after using the Reticulation Filter.
STEP 13
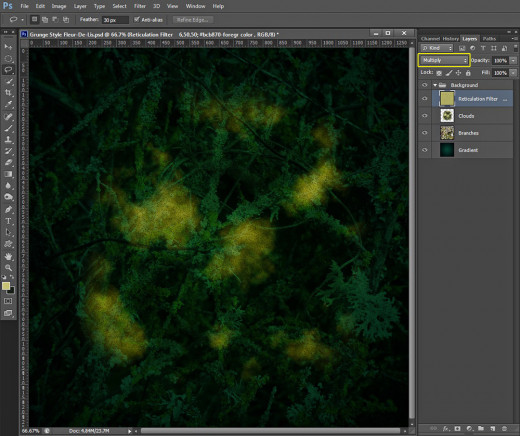
Change Blend Mode of Reticulation Filter layer to Multiply and your Background will get this awesome look:
Draw the Fleur-De-Lis, Stroke its Path and Apply Blending Options
In Steps 14-20 you have to draw the Fleur-De-Lis Path using Custom Shape tool in Path Mode and Fixed Size. When you are ready you have to stroke the Path with default Hard Round Brush then apply red wine shaded Outer Glow and Bevel and Emboss Blending Options. The Guassian-Inverse Contour you should add will increase the embossed effect.
STEP 14
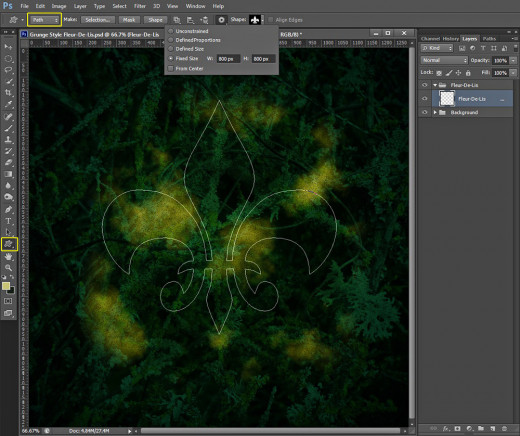
Now comes the most important part of this tut. Firstly Create a New Layer on top of Layers panel (out of the Background Group) and call it Fleur-De-Lis after the Custom Shape we are going to use later. Press also Ctrl+G to place the layer in a Group and rename the new Group to Fleur-De-Lis too.
Take Custom Shape Tool, in the Options bar set its Mode to Path and find the Fleur-De-Lis shape from the Custom Shape Picker. You can draw the path now if you like with unspecified Size, but as you can see, I have decided to be more precize and have chosen Fixed Size for my Path- 800px for both Width and Height.
STEP 15
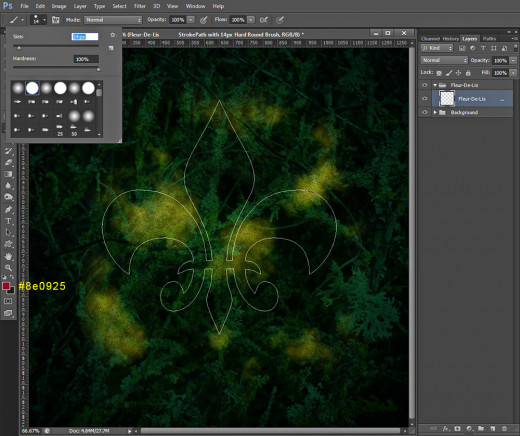
Before stroking our Path, we should set the Brush. Firstly change Foreground color to dark red- #8e0925, then select Brush Tool, grab Hard Round Brush from the Brush Preset Picker and change its Size to 14px.
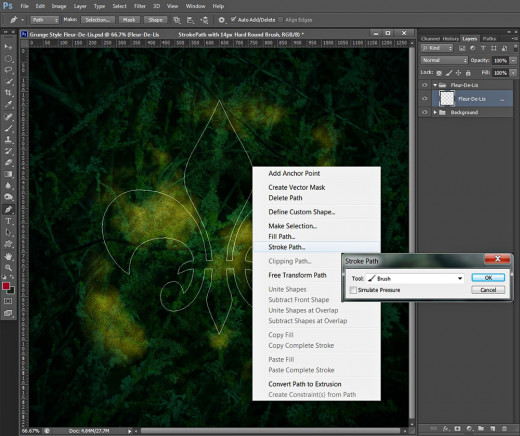
STEP 16
Select Pen Tool, right click anywhere on the Fleur-De-Lis Path and choose Stroke Path from the fly-out menu. Select Brush from Tool drop down menu and leave Simulate Pressure Option unchecked.
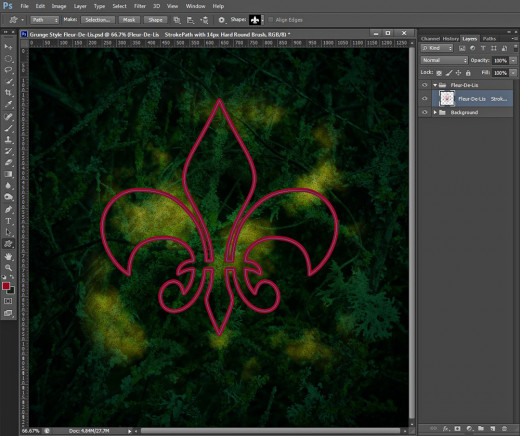
STEP 17
This is how our Fleur-De-Lis will look after being stroke. Now you can press Delete key to remove the Path.
STEP 18
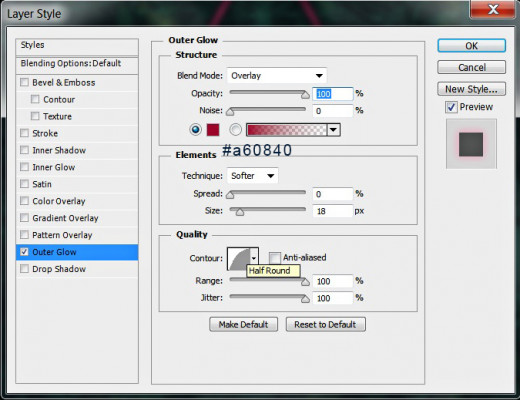
We have to add two layer styles on Fleur-De-Lis layer. Double click on its layer's thumbnail and select Blending Options or click on Layer in the Menu bar, select Layer Style then Blending Options. Firstly check Outer Glow Layer Style and change its settings as follows:
Blend Mode: Overlay
Opacity: 100%
Noise: 0%
Color of Glow: #a60840
Technique: Softer
Spread: 0%
Size: 18px
Contour: Half Round
Anti-aliased: unchecked
Range: 100%.
Jitter: 100%.
STEP 19
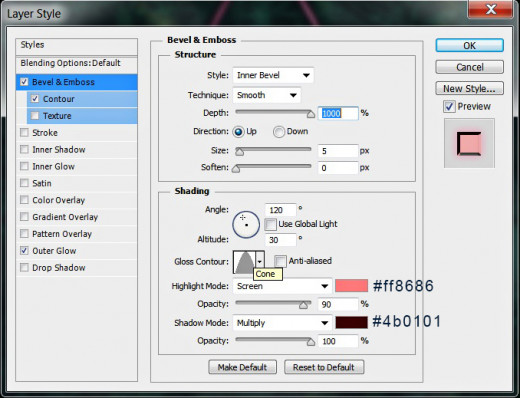
The second Layer Style to be applied on Fleur-De-Lis layer is the following Bevel and Emboss:
Style: Inner Bevel
Technique: Smooth
Depth: 1000%
Direction: Up
Size: 5px
Soften: 0px
Angle: 120 degrees
Use Global Light: checked
Altitude: 30 degrees
Gloss Contour: Cone
Anti-aliased: not checked
Highlight Mode: Screen
Color for Highlight: #ff8686
Opacity: 90%
Shadow Mode: Multiply
Color of Shadow: #4b0101
Opacity: 100%.
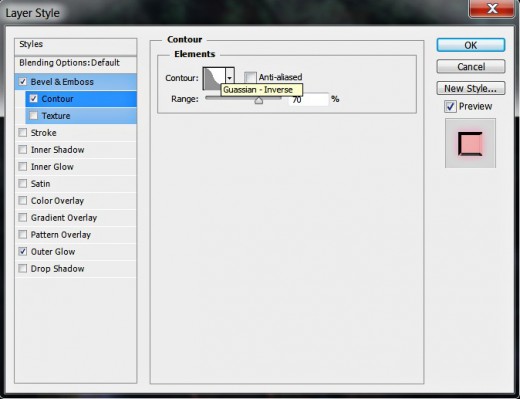
The last Blending Option you have to add to the Fleur-De-Lis Stroke is Contour. Choose Guassian-Inverse from the Contour Picker and increase the Range option to 70%.
STEP 20
Compare the result on your canvas with my screenshot below after applying Outer Glow and Bevel and Emboss to the Fleur-De-Lis layer. You should get something similar:


Add Stone Texture to the Fleur-De-Lis Stroke
In Steps 21-27 you are going to add Stone Texture with Multiply Blend Mode to the Fleur-De-Lis Stroke in order to give it rough dirty look.
To texturize the stroked shape you have to Load Selection on it, then apply Layer Mask on the Stone Texture layer to remove the excess parts. Only the Fleur-De-Lis Stroke should appear texturized.
STEP 21
Now download this Stone Texture photo of mine:
STEP 22
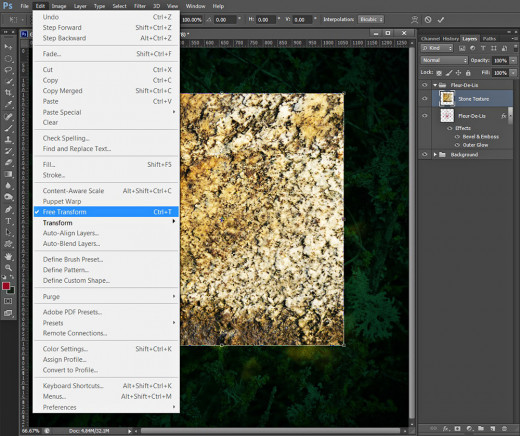
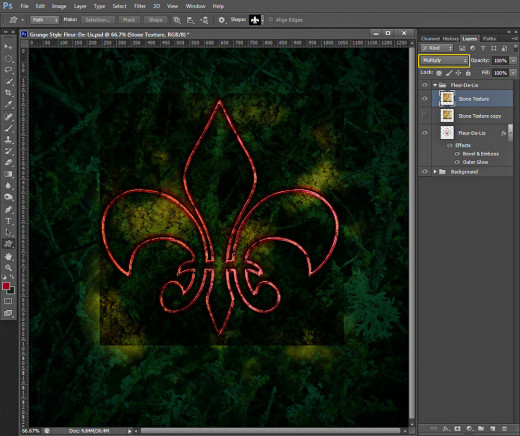
Create a New Layer on top of Fleur-De-Lis Group and name it Stone Texture. Copy and Paste there the Texture you downloaded in the previous step and use Edit, Free Transform to resize it so that it covers the Fleur-De-Lis shaped stroke. Press Enter key to apply the Transformation.
STEP 23
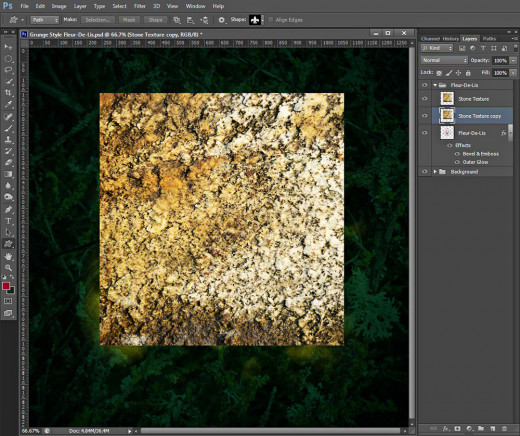
Duplicate Stone Texture layer- press Ctrl+J while it is selected or go to Layer, Duplicate Layer. Move Stone Texture copy layer below the original one.
STEP 24
Now switch off Stone Texture copy layer for a better visibility- click on the eye symbol to the left. Change the Blend Mode of the original Stone Texture layer to Multiply.
STEP 25
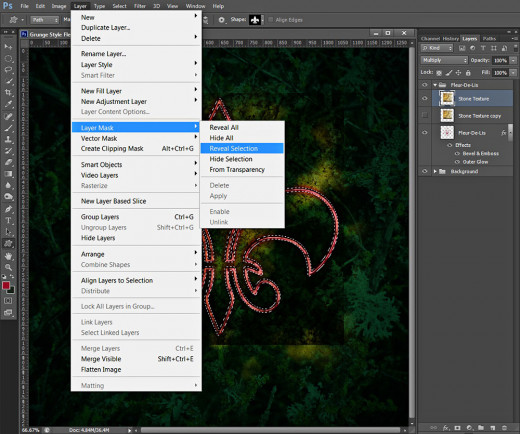
With Stone Texture layer highlighted, press Ctrl and click on Fleur-De-Lis layer's thumbnail to Load Selection (Select, Load Selection).

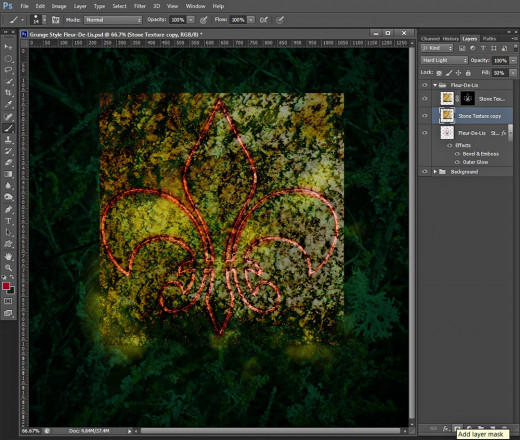
STEP 26
While the previously loaded selection is still active and Stone Texture layer selected, navigate to the Menu bar and choose Layer, Layer Mask, Reveal Selection.
STEP 27
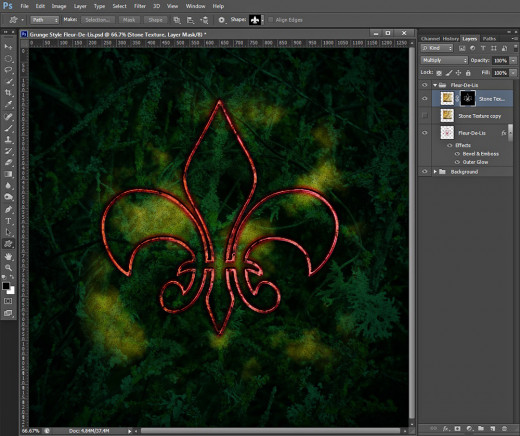
After applying the Layer Mask, only the Fleur-De-Lis stroke will be covered with the Texture:
Use Again the Stone Texture to Fill the Fleur-De-Lis Shape and Apply Layer Styles
In Steps 28-35 you have to fill the inside parts of the Fleur-De-Lis with the same Stone Texture we applied on its Stroke. For the purpose you have to activate the copied Texture layer, mask it, then remove the excess parts using default Hard Round Brush while the Mask thumbnail is highlighted.
You also have to add 3D Effect to the inside part of the shape so you should apply Glow, Shadow and Bevel and Emboss Layer Style with Rounded Steps Contour. This will additionally enhance the rusty grunge look of the shape.
STEP 28
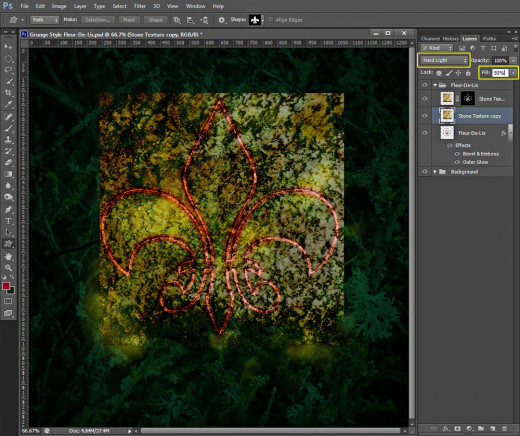
Turn on the visibility of Stone Texture copy layer, change its Blend Mode to Hard Light and reduce its Fill Opacity to 50%.
STEP 29
With Stone Texture copy layer selected, press Add Layer Mask icon at the bottom of Layers panel in order to mask the layer.
STEP 30
While the Layer Mask thumbnail is selected and the Foreground Color is changed to Black, select Brush Tool, take Hard Round Brush from the Picker and set its Size to 25px. Start Brushing the Texture, leave intact only the parts within the Fleur-De-Lis stroke. Don't worry if the borders get a bit rough. It is a grunge image at all.
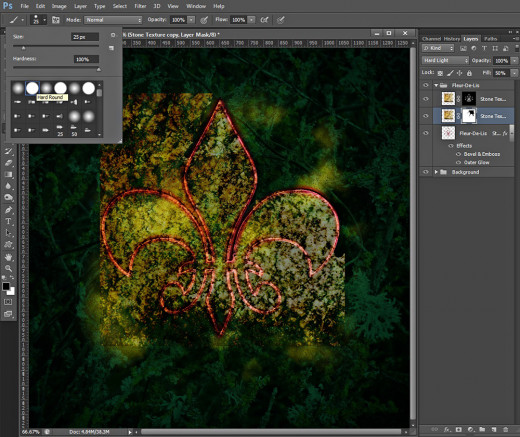
STEP 31
This is how the Texture will look after erasing its excess parts:
STEP 32
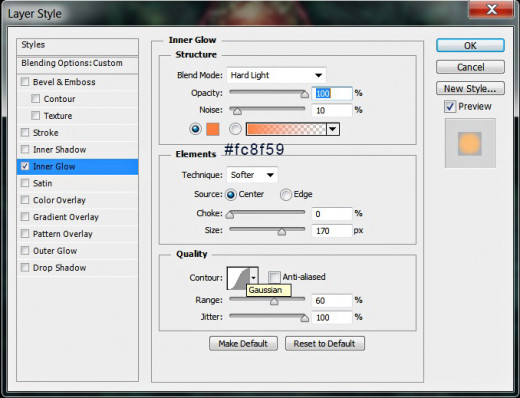
Now we have to add three layer styles to Stone Texture copy layer. Firstly apply this Inner Glow:
Blend Mode: Hard Light
Opacity: 100%
Noise: 10%
Color of Glow: #fc8f59
Technique: Softer
Source: Center
Choke: 0%
Size: 170px
Contour: Gaussian
Anti-aliased: unchecked
Range: 60%.
Jitter: 100%.
STEP 33
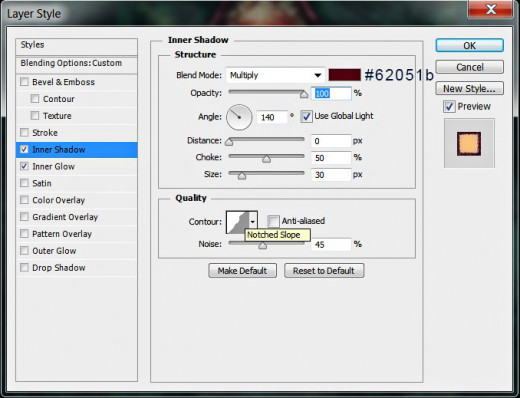
Now add Inner Shadow Layer Style to Stone Texture copy layer. Change the settings like this:
Blend Mode: Multiply
Color of Shadow: #62051b
Opacity: 100%
Angle: 140 degrees
Use Global Light: ticked
Distance: 0px
Choke: 50%
Size: 30px
Contour: Notched Slope
Anti-aliased: unchecked
Noise: 45%.
STEP 34
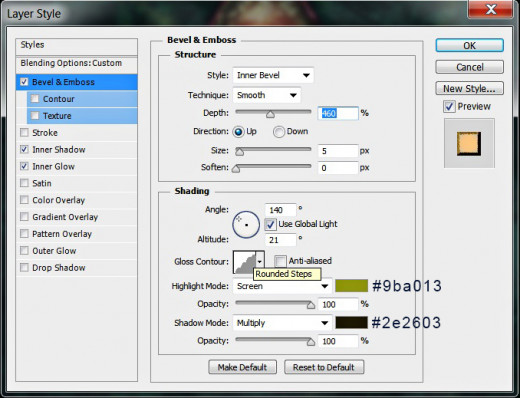
The last Layer Style to be applied is Bevel and Emboss. Change its settings as follows to create slight 3D effect:
Style: Inner Bevel
Technique: Smooth
Depth: 460%
Direction: Up
Size: 5px
Soften: 0px
Angle: 140 degrees
Use Global Light: checked
Altitude: 21 degrees
Gloss Contour: Rounded Steps
Anti-aliased: not checked
Highlight Mode: Screen
Color for Highlight: #9ba013
Opacity: 100%
Shadow Mode: Multiply
Color of Shadow: #2e2603
Opacity: 100%.
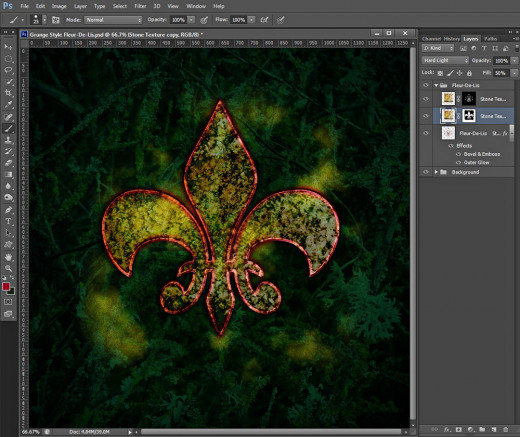
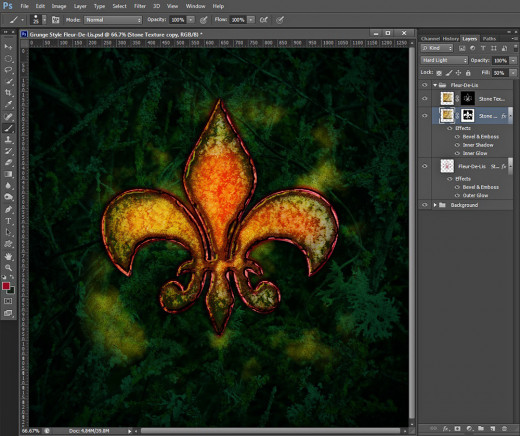
STEP 35
This is how your grunge style Fleur-De-Lis will look after applying the three Blending Options to it. The rough borders are cool, aren't they?
Add Photo Filter and Color Balance Adjustment Layers
You'll finish this tut with adding two adjustment layers- Photo Filter and Color Balance. They will improve the color shades, contrast and sharpness of the grunge Fleur-De-Lis image. You have to do a little work with a chosen Brush within the Photo Filter Mask as you need it to cover only the Fleur-De-Lis shape.
STEP 36
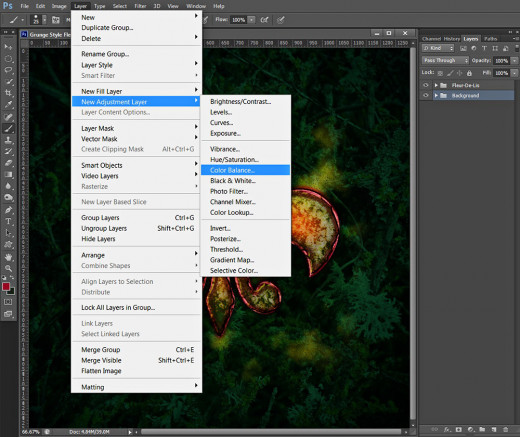
In this and the following three steps we are going to sharpen the Background and give it more colors by using the help of two Adjustment layers.
Select the Background Group then navigate to the Menu bar and choose Layer, New Adjustment Layer, Color Balance.
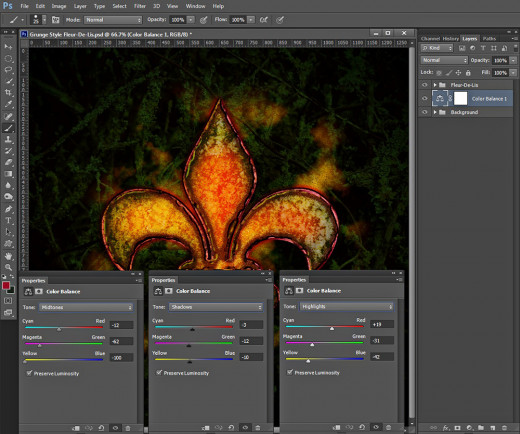
STEP 37
When Color Balance Properties dialog box appears on your screen, change the settings as follows:
Midtones:
Cyan- Red: -12
Magenta-Green: -62
Yellow-Blue: -100
Shadows:
Cyan- Red: -3
Magenta-Green: -12
Yellow-Blue: -10
Highlights
Cyan- Red: +19
Magenta-Green: -31
Yellow-Blue: -42
The Color Balance Adjustment Layer should be placed between both Background and Fleur-De-Lis Group.
STEP 38
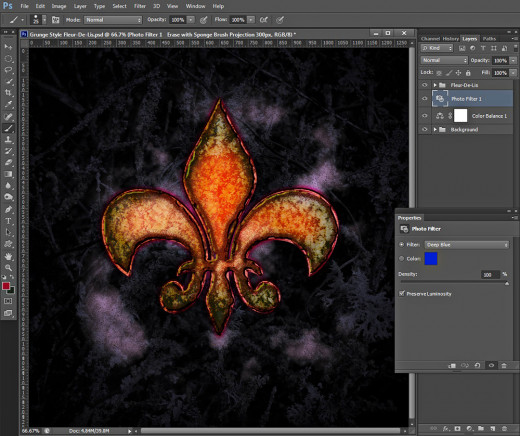
Now we are going to add one more Adjustment layer. Go to Layer, New Adjustment Layer and this time select Photo Filter. From the Filter drop down menu choose Deep Blue and increase its Density to 100%. Your Background will be covered with mystic bluish color. We'll get rid of some areas of the blue in the next step.
The Photo Filter Adjustment Layer is to be placed above the Color Balance one.
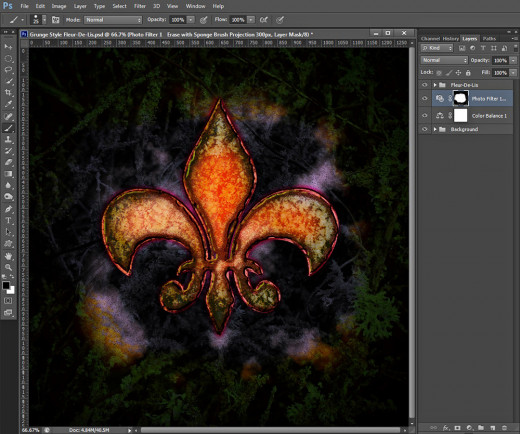
STEP 39
While the Photo Filter layer's mask thumbnail is selected, grab any Brush (Foreground Color should be black) and start brushing firstly the borders of the canvas then go in inner direction. Leave bluish only the parts around the Fleur-De-Lis.
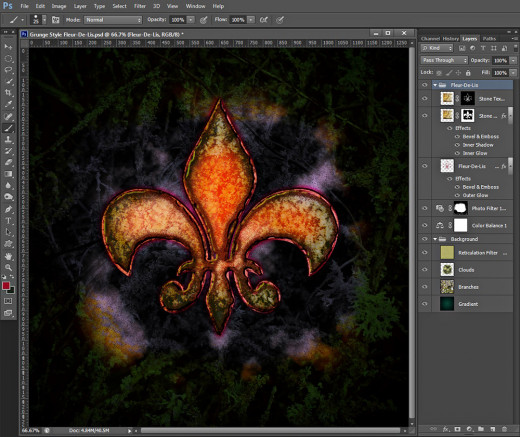
STEP 40
Our grunge Fleur-De-Lis is ready. In Layers pane you should have two groups of layers with two Adjustment layers between them:
-
Background Group which contains four layers: Gradient, Branches, Clouds and Reticulation Filter.
-
Color Balance and Photo Filter Adjustment layers.
-
Fleur-De-Lis Group with three layers in it: Fleur-De-Lis, Stone Texture copy and Stone Texture layer.
STEP 41
Below is the outcome saved in .jpg format. Hope you find this tutorial helpful. Thanks a lot for reading and God bless! :)